


Commercial
Single Door Access Control Kit
Foundation Guide
A one-door kit is often the cleanest answer when the site genuinely has one controlled opening and wants to stay proportionate. The problem is that many one-door jobs only look simple at the start. Once staff turnover, visitor handling, or a likely second door are discussed, the system can move out of the one-door tier quickly.
Where a one-door kit usually fits
| Site type | Usually a good one-door fit? | Why |
|---|---|---|
| Single rear office or staff door | Yes | The workflow is simple and the door can often stay proportionate. |
| Storeroom or service room | Often | If the site does not need a wider controller path, a single controlled opening can be enough. |
| Visitor-facing front entry | Sometimes | Only if the intercom or verification path is also addressed properly. |
| Two doors that both matter operationally | No | The site is usually already in a two-door kit conversation. |
Sample site scenarios
Small professional office rear entry
A small office with one rear staff entry may be a genuine one-door job if the front reception is always staffed and the business simply wants to stop old keys circulating. The important part is not overselling the electronics. It is making sure the lock path, egress, and credential administration stay clean.
Visitor-facing consulting suite
A consulting suite with one front door may still look like a one-door job, but if staff need to verify patients or visitors before release, the design should include intercom logic instead of pretending a plain keypad solves the whole workflow.
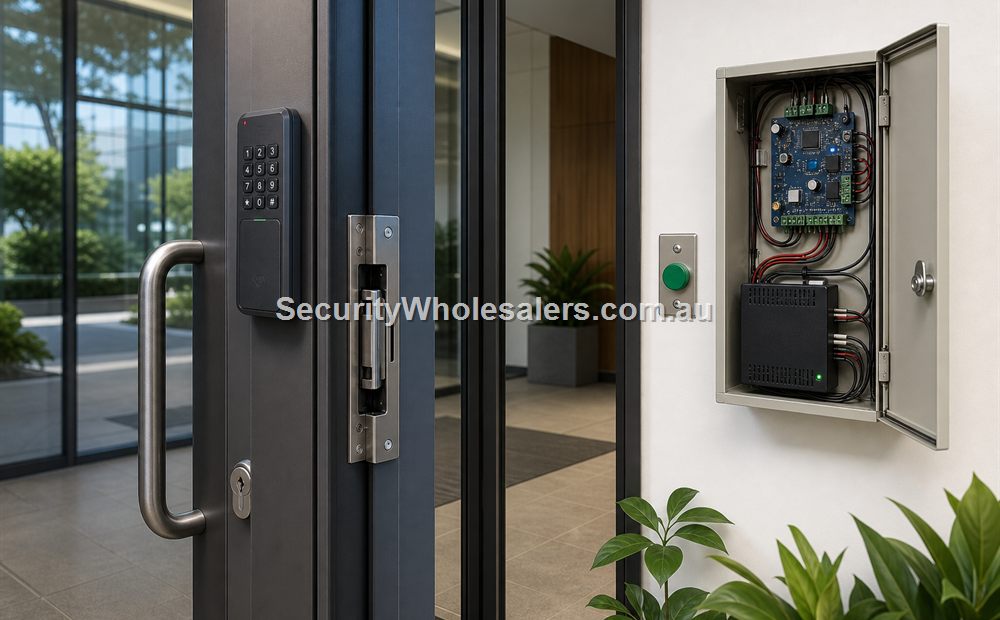
What a one-door kit normally includes
- Standalone reader, keypad-reader, or access terminal matched to the user type and the site workflow.
- Strike or maglock that actually suits the door, plus safe-side egress hardware and, where required, a door contact.
- Protected power path and clean cable routing rather than exposed lock-side improvisation.
- Optional intercom-capable station where the one door is also a visitor-facing entry.
- Clear user issue and revoke method so the site can manage the opening after installation.
Common reasons a one-door kit becomes the wrong tier
- The site already knows a second meaningful opening is coming soon.
- Management wants named-user logs or schedule-based permissions rather than one shared code.
- The one door is actually a visitor-facing entry that needs communication and controlled release.
- The opening is in a building where future integration with internal rooms, gates, or lifts is already obvious.
Relevant SecurityWholesalers product paths
- HA-AC-S1 for a straightforward one-door card or PIN path.
- DS-K1T105AM for a one-door standalone access-terminal example.
- DS-KV6124-WBE1 where the one door also needs intercom and visitor release.
- Door strikes and maglocks for the actual opening hardware path.
Related guides
Frequently Asked Questions
- When is a single door access control kit the right fit?
It is the right fit when the site genuinely has one controlled opening, modest user administration, and no strong need for central multi-door reporting.
- Does a single door kit always mean no logs?
Not always, but central reporting and broader administration are usually not the main reasons this path is chosen.
- What usually pushes a site beyond a one-door kit?
A second meaningful opening, staff turnover, named-user expectations, or visitor-facing entry usually push the site upward quickly.
- Can a one-door job still need intercom?
Yes, especially on a front door where staff need to verify and release visitors rather than only let known users in.
- What is the main one-door buying mistake?
Treating the reader or keypad as the whole system and ignoring the lock, egress, closer, and actual door behaviour.
- Which page should someone read next?
If a second meaningful opening is likely, the two-door kit page is usually the right next step.
Quote checklist for Single Door Access Control Kit
Before ordering, ask for a short answer to these questions. They make the quote easier to compare and reduce the chance of buying hardware that does not match the site.
- What exact problem is being solved: access control planning, deterrence, evidence, access control, safety, compliance or convenience?
- What happens during poor light, bad weather, busy periods, after-hours events or staff changes?
- Who will administer users, review events, export evidence and test the system?
- Which part of the design is allowed to be basic, and which part must be strong because it proves the incident?
If those answers are vague, the buyer should pause before purchasing. Good security equipment becomes much more useful when the operating plan is written down before installation.
Final field note for Single Door Access Control Kit
For Single Door Access Control Kit, the final buying decision should be easy to explain to the person who will live with the system. The quote should identify the must-have outcome, the acceptable compromises, and the support path if users, doors, cameras, sensors or site conditions change later.
This is the difference between a list of products and a security design. The products matter, but the design is what makes them useful.
Real quote scenario for Single Door Access Control Kit
When quoting Single Door Access Control Kit, the useful starting point is door-by-door access planning. The buyer should be able to record the door type, lock type, reader position, exit method, power supply, fire requirement and daily user group. Without those details, two quotes can look similar while solving very different problems.
For Single Door Access Control Kit, a shopfront door, warehouse staff door, server-room door and shared tenancy door can all need different hardware even when the software is the same. This is why a strong SecurityWholesalers guide should talk about the site, the workflow and the equipment together rather than treating the product category as a simple shopping list.
Budget-conscious path
Use the simplest reliable hardware that solves the main risk. Keep administration simple and avoid specialist features unless they change the outcome.
Balanced path
Add better management, verification or expansion headroom where the site is likely to grow. This is usually the best path for small businesses and shared buildings.
Higher-risk path
Document response, audit trail, permissions and fallback procedures. Higher-risk sites need clearer operating rules, not just stronger hardware.
The final Single Door Access Control Kit quote should make the weak points visible. If cabling, power, monitoring, mobile app access, fire release, user management or future expansion are assumed rather than written down, the buyer is carrying risk that should have been solved during design.
Questions to ask before approving Single Door Access Control Kit
- What does the system need to prove or control on an ordinary day?
- What is different after hours, on weekends, during staff changes or during an emergency?
- Who will administer users, review events, export evidence or test the system?
- What happens if the internet is unavailable, a user loses a credential, a sensor triggers falsely or a door does not release?
- Which part of the system is easy to expand later, and which part would be expensive to change?
These questions are deliberately practical. They help separate a polished product list from a design that will remain useful after installation.
Extra buying notes for Single Door Access Control Kit
The Single Door Access Control Kit buying decision should be tested against normal use, after-hours use and failure conditions. If the quote cannot explain those three moments, it needs more design work before the customer commits. This is the kind of detail that helps a buyer compare quotes properly, because it turns the conversation from ?which model is cheapest?? into ?which design will still be useful after installation??
For Single Door Access Control Kit, the best final check is to ask what would make the system fail in practice. Common answers include poor cabling, weak power planning, missed user permissions, unclear response duties, too little storage, unsuitable mounting positions, or a handover that nobody can follow. A strong quote names those risks and deals with them before hardware is ordered.
For Single Door Access Control Kit, SecurityWholesalers should help buyers feel more confident, not more overwhelmed. The ideal outcome is a quote that is technically sound, easy to explain, and honest about where a simpler option is enough.