


Frequently Asked Questions
CCTV (33)
Hik-Connect is a new service introduced by Hikvision which integrates the dynamic domain name service (HiDDNS) along with alarm push notification service. It provides an easy way for devices to connect to the Internet.
USEFUL VIDEO TO SEE HOW THIS IS SETUP DONE
APP STORE DOWNLOAD LINK – https://itunes.apple.com/au/app/hik-connect/id1087803190?mt=8
ANDROID DOWNLOAD LINK – https://appstore.hikvision.com/
FULL HIK CONNECT USER MANUAL – Hik-connect-Mobile-Client-Software-(iOS)-User-Manual
Hik-Connect-How-to-add-devices-to-an-existing-hik-connect-account-NVRs-DVRs-Cameras
Hik-Connect-How-to-enable-Hik-Connect-remote-access-on-HIK-devices-NVRs-DVRs-Cameras
How To Add Hik-Connect Device to iVMS4500
How to reset passwords on either an NVR or IP Camera?
The following quick guide by Hikvision takes you through the steps to do this.
IMPORTANT TO NOTE BEFORE STARTING:
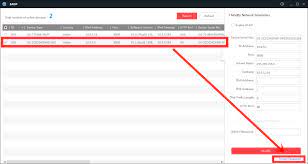
This relies on emailing items to Hikvision tech support for their help to reset. Hikvision Tech support only operate Monday to Friday business hours. They can take 2 hours to reply, thus if you send it at around 3.30, you may not get a reply. In the time you are waiting need to keep SADP tool open and running.
PART 1 – TO RESET PASSWORD ON HIKVISION NVR (scroll down for resetting for cams)
> email us the XML file (not the CSV file) and Serial Number (*Full serial number on SADP) to us. We will be emailing this file to Hikvision for them to provide a reset file. NOTE – Hikvision is only open during business hours, so you must send it to us before say 3pm on a business day to allow ample time to reply.
- Hikvision is only open 9-5 Monday to Friday, thus please send it before 2pm on a weekday so you can get the reset code back on the same day.
Hikvision_IPC_NVR_Password_Reset_Guide
PART 2 – RESET CAM PASSWORDS – TO RESET PASSWORD ON HIKVISION CAMERAS CONNECTED TO NVR,
THINGS TO NOTE:
- only Australian region products can be reset
- Hikvision is only open 9-5 Monday to Friday, thus please send it before 4pm on a weekday so you can get the reset code back on the same day.
- Only if you purchased goods from us, can we reset it – if you bought it elsewhere, please speak to the reseller who sold you the product
- email the serial number / xml file to us at enquiries@securitywholesalers.com.au
ALTERNATIVE STEP FOR CAMERA IF YOU HAVE RESET BUTTON UNDER SD CARD SLOT:
- Ensure the camera is NOT POWERED. Hold the reset button.
- While the reset button is held, power it back up (connect the ethernet cable)
- Continue to hold the reset button down for say 30 seconds then let go of the button.
- this should now be reset.
IF YOU’D LIKE TO WATCH A VIDEO REGARDING THE SADP METHOD:
Hikvision Australia’s website has firmware updates for available IP cameras.
https://www.hikvision.com/au-en/
Use the search bar to try and find your product. Firmware updates are usually available on the product page.
IF YOU BOUGHT EQUIPMENT FROM US:
You will need to contact us if you can’t find your camera listed or if you require firmware for your NVR / DVR.
You will need to also provide the full serial number of the device as well as your current firmware.
This is to ensure upgrades are done properly. In some instances middlle firmware is required before upgrading to the latest version.
We do not recommend doing intercom firmware upgrades. Please check with us if there is any doubt.
If you didn’t buy equipment from us, please contact the people who you bought the equipment from.
Still concerned about what to choose? Hikvision and Dahua are two of the most popular IP camera brands. Hikvision is the world leader in IP cameras with a global market share of 17% forecast in 2017, Dahua comes in second with a forecast of 5.5%.
Installation
Both systems are very easy to install, especially PoE solutions which almost plug and play.
Protocol
Both cameras able to support ONVIF and RTSP protocol, these are two most important features for IP camera. ONVIF ensures that your camera will work with standards-compliant equipment from 3rd party manufacturers. RTSP allows even non-ONVIF equipment (such as software) to access the security camera’s video stream. We would highly recommend choosing the same branded NVR to suit the cameras though. There are different versions on ONVIF, so there may be compatibility issues between the two.
The Apps
Hikvision Apps:
Google Play – https://appstore.hikvision.com/
Apple – https://itunes.apple.com/au/app/hik-connect/id1087803190?mt=8
Dahua Apps:
Google Play – https://play.google.com/store/apps/developer?id=Zhejiang+DAHUA+Technology+Co.,+Ltd&hl=en
Apple – https://apps.apple.com/us/app/dmss/id1493268178
Sound recording
More Dahua cameras feature sound recording vs the Hikvision ones – so if this is important to you, investigate the Dahua Eyeball cameras with inbuilt mics. Hilook cams mostly have inbuilt mics.
AI (Artificial Intelligence)
Hikvision’s Acusense is similar to Dahua’s SMD (Smart Motion Detection). Both do false alarm filtering to trigger upon human / vehicles. If this is important to you ensure the cam you select has this feature. Hilooks newer generation of cams has an acusense feature.
Night Time Colour
The way both cameras can offer full time colour is for both a special lens and actual LED light when its very dark. If this is important to you ensure that the cam you select offers night time colour.
On average we are finding the sensors on the Hikvision cameras have better low light performance. Check the spec sheets individually to compare.
The Hikvision Colorvu range seem to have the best night time performance
https://www.securitywholesalers.com.au/product-category/hikvision/hikvision-colorvu/
The Prices:
The CCTV Cameras, IP cameras, DVR, NVR, etc offered by Hikvision and Dahua are very close in price, however Dahua is slightly cheaper. As close competitors, Hikvision and Dahua have large variations of the products. Both brands offer really competitive prices compared with other brands nonetheless. Hilook pricing is around 50% cheaper.
Hilook
Hilook is a subbrand of Hikvision and is cheaper than both Hikvision and Dahua and offers very good quality picture. If you’re after a good reliable system for residential or business, check them out. https://www.securitywholesalers.com.au/product-category/hilook/hilook-cctv-kits/
The cameras are mostly compatible with Hikvision NVRs (excluding any strobe / audio features). The apps are the same.
Summary
This video explains how to set it up on your phone:
(excuse the monotonic tone)
Note – to use this effectively you’ll likely need to change sensitivities and block certain regions from triggering the alarm on the NVR.
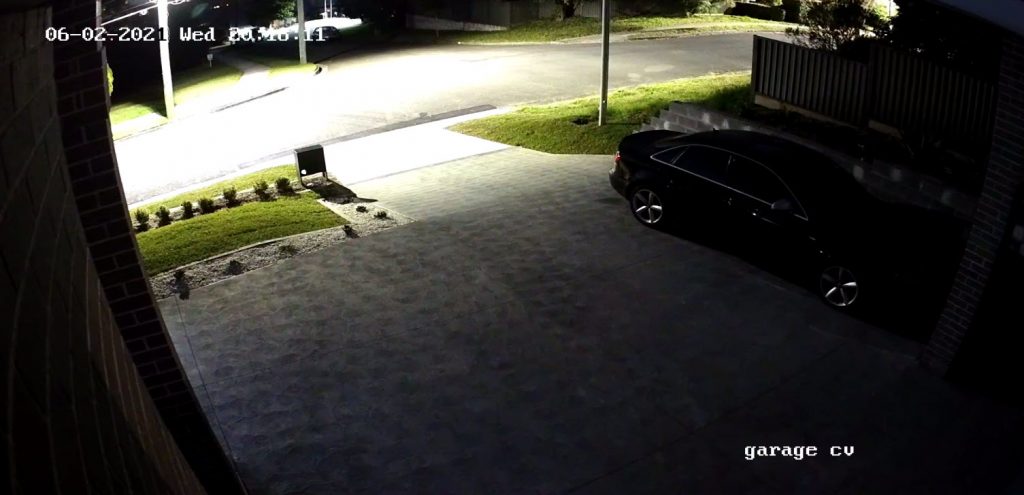
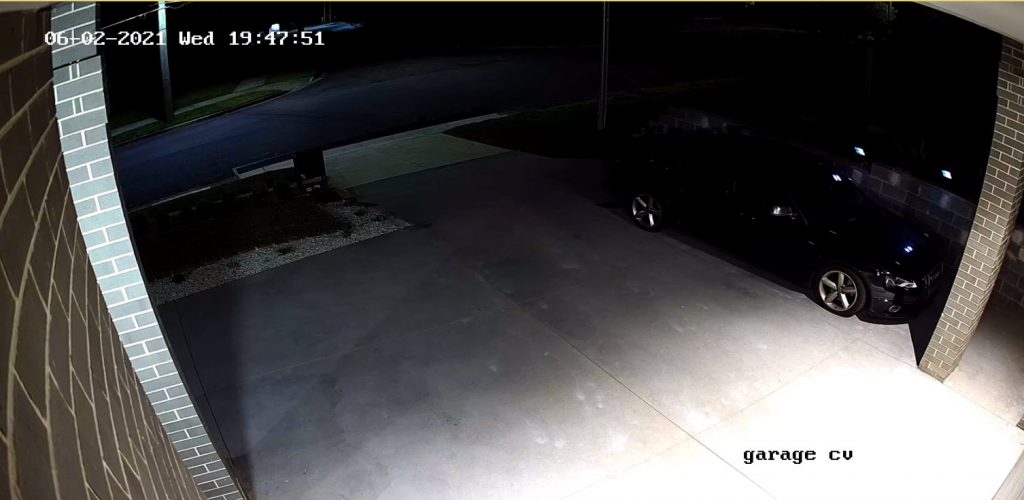
The better the lighting around the area, the more your cameras will get to see.
Our cameras come with market leading IR – so yes they have very good night vision.
NVR’s are the brains of the security system. It all comes down to how many cameras you have and which brand you choose.
We tend to stick to the same same camera and NVR combo. Hikvision with Hikvision and Dahua with Dahua.
And the more cameras you have the more channels your NVR will need! Up to 4 cameras goes with 4 channel NVRs, up to 8 cameras goes with 8 channel NVRs.
Most of our NVRs come with 3/4TB hard drives so that’s one less worry to think about!
Yes we sell directly to everyone, the good stuff shouldn’t be only for the professionals, though we do recommend installation be done by a professional.
If you’re after a basic system, have a look at our set up guide to see how cameras are usually set up
https://www.securitywholesalers.com.au/faq-items/setup-install-new-hikvision-system/
Double check that your setup of the remote viewing is done properly:
Refer to this – https://www.securitywholesalers.com.au/faqs/can-use-hik-connect-set-remote-viewing/
Otherwise, it may be that your modem is blocking some of your required ports.
Below is a list of ports required to be open.
This quick guide shows you how to set up an accurate perimeter guarding system and continuous/event recording with an AcuSense camera and AcuSense NVR or a normal IPC and an AcuSense NVR.
NOTE – IF YOU HAVE A LATE MODEL V5 NVR and a late model camera, the configuration has changed and can be found here (you no longer need to log into the camera):
How to set up Liveguard in V5 NVR and Hik-Connect APP with new baseline firmware
STEP 1 – Log into your camera via your NVR via a web browser. Follow the steps in this link below. These acusense operations are only available on the camera and not the NVR, so this step is important.
Open up SADP program (download here – https://www.securitywholesalers.com.au/faqs/hikvision-sadp-tool-can-download/ SADP will give you the IP address of the recorder . You should see the IP address next to the NVR model number.
Step 2
Open up an Internet browser eg. internet explorer and type in the IP address of the NVR. The IP address of the NVR is obtained in step 1.
Step 3
Log in using username and password of the recorder.
Step 4
Go to Configuration > Network > Advanced Settings > Other.
Tick “Enable Virtual Host”
Step 5
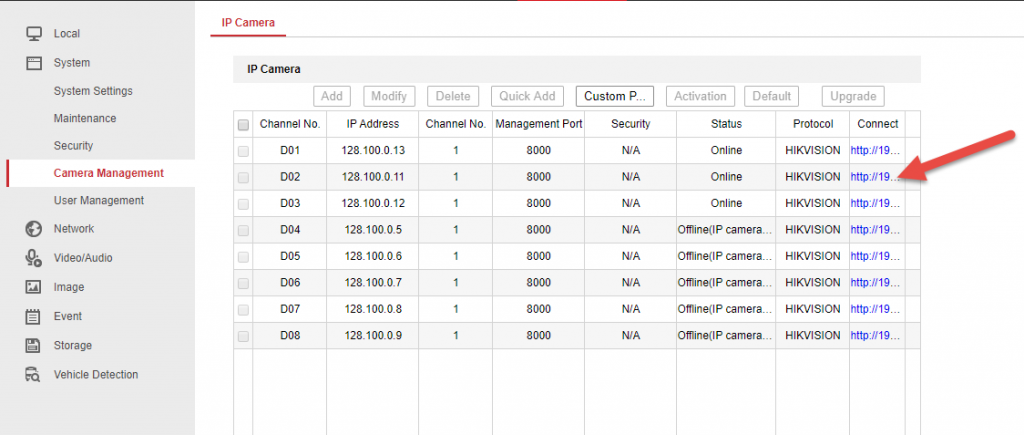
Go to Configuration > System > Camera Management > Click on the blue link next to the camera you wish to log into.
Step 6
Log into the camera. (same username / password as the NVR if the NVR activated the camera)
There you have it – you’re now logged into the camera and ready to perform actions on the camera.
NOW YOU CAN COMMENCE PART 2.
ACUSENSE Step 1. Go to Event > Basic event and disable motion detection. ONLY SMART EVENT TO BE USED WITH ACUSENSE CAMS
Here is a quick start guide as to how to configure Acusense cams.
Quick config guide of Acusense function (PDF)
Your hikvision camera could potentially send you notifications when faces are detected.
Please excuse the quality of the video, but the content is good
Forgetting passwords can be a pain in the bum, but its a bigger pain if you don’t know how to reset the Dahua password.
Instructions below:
https://dahuawiki.com/PasswordReset
If you’ve not selected an email recovery option and security questions were not selected, please follow these instructions instead
First Step – Download config tool (if you don’t have it already) – https://dahuawiki.com/ConfigTool

Instructions as to how to extract Hikvision video files using the browser.
Instructions as to how to configure preset / patrol and patterns on a Hikvision PTZ
Video which explains how to share / receive device on the Hikvision App. (allows you to share your feed with other Hik Connect accounts)
This FAQ explains how to download playback videos from the Hikvision IVMS4200
Please kindly read the below FAQ to find out how to configure / set up event recording with the storage server on IVMS4200.
The below FAQ explains how to configure the motion detection alarm via Hikvision IVMS4200. This is useful if you’d like to know when an event occurs on one of your cameras.
This Video shows you how to upgrade your Camera firmware from the NVR.
Hikvision Australia’s website has firmware updates for available IP cameras.
https://www.hikvision.com/au-en/Support/Downloads/Firmware/IPC
NOTE this is only for IPC.
You will need to contact us if you can’t find your camera listed or if you require firmware for your NVR / DVR.
You will need to also provide the full serial number of the device as well as your current firmware.
This is to ensure upgrades are done properly. In some instances middlle firmware is required before upgrading to the latest version.
We do not recommend doing intercom firmware upgrades. Please check with us if there is any doubt.
Hik-Connect is a new service introduced by Hikvision which integrates the dynamic domain name service (HiDDNS) along with alarm push notification service. It provides an easy way for devices to connect to the Internet.
APP STORE LINK – https://itunes.apple.com/au/app/hik-connect/id1087803190?mt=8
ANDROID LINK – https://www.me-app.net/HikvisionAppStore
USEFUL VIDEO TO SEE HOW THIS IS SETUP DONE – https://www.youtube.com/watch?v=sNtB7Cjm7HY
FULL HIK CONNECT USER MANUAL – Hik-connect-Mobile-Client-Software-(iOS)-User-Manual
SADP stands for search active device protocol, it’s Hikvision’s free and simple utility for searching Hikvision products (including IP cameras and DVRs/NVRs) in the local network.
Its commonly used for:
- resetting password
- Finding out what firmware is currently used
- changing IP addresses
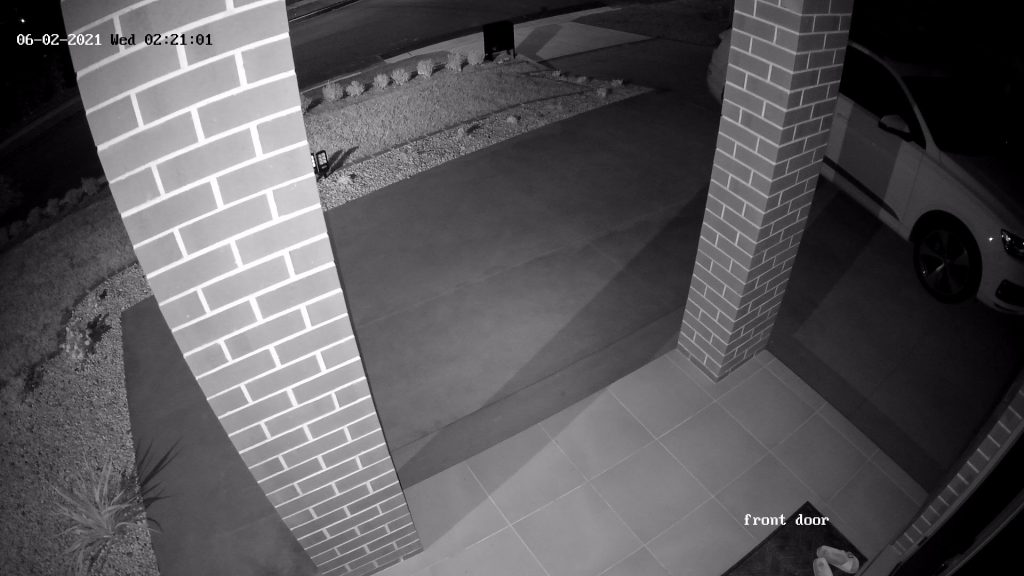
The choice here is whether you should choose a clearer resolution or a slightly less clearer resolution.
6MP = 3072 x 2048
8MP = 3840 x 2160
The higher the resolution, the clearer the image and thus potentially more useful to identify unsavoury activities. Here is a good CCTV Resolution Simulator
With better compression technology these days, the impact on storage of the clearer 4K cameras should have very little impact on the recorded footage.
Here is a video which compares the resolutions on a number plate. Although 6MP doesnt exist as a test, just imagine it as being halfway between a 4MP and an 8MP clarity.

Hikvision 6MP Cameras (37)
Hikvision 8MP 4K Cameras (49
It is important to note that MP (megapixel) refers to the resolution of the camera’s sensor, and higher MP count generally means that the camera is capable of capturing more detail and producing higher quality images. In this sense, an 8MP camera would generally be superior to a 6MP camera in terms of image quality.
Other things that are important to consider these days is if to consider a colour at night camera, or black and white at night as these will have a big impact on the quality of the image at night.
A common question relating to blurry images relates to vandalproof domes – night time images can appear blurry or foggy due to dirty/greasy dome bubble, reflection from nearby objects or loose foam ring around the camera lens.
Hikvision has produced the following document to help troubleshoot and solve these issues.
Enabling two-way audio on your Hikvision camera allows you to communicate through the camera using a built-in or external microphone and speaker. Here’s how you can set up and use two-way audio on your Hikvision camera:
Step 1: Verify Audio Capabilities
- Check Camera Specifications:
- Ensure that your Hikvision camera model supports two-way audio. Not all cameras have built-in microphones and speakers or the necessary audio input/output ports.
- Microphone and Speaker:
- If your camera does not have built-in audio hardware, you will need an external microphone and speaker connected to the camera’s audio input/output ports.
Step 2: Connect Audio Devices
- Connect External Microphone and Speaker:
- If your camera requires external audio devices, connect a microphone to the camera’s audio input port and a speaker to the audio output port.
Step 3: Access the Camera’s Web Interface
- Find the Camera’s IP Address:
- Use the SADP Tool or check your router’s connected devices list to find the camera’s IP address.
- Log into the Camera:
- Open a web browser and enter the camera’s IP address.
- Log in with your camera’s username and password (default username is
adminand the password is the one you set).
Step 4: Enable Audio in Camera Settings
- Navigate to Configuration:
- Go to the Configuration or Settings menu in the web interface.
- Audio Settings:
- Find the Audio or Audio/Video section.
- Enable the audio input and output options. This might be labeled as Enable Audio, Enable Microphone, or similar.
- Adjust Audio Parameters:
- Adjust the volume and quality settings for the microphone and speaker as needed.
Step 5: Configure Two-Way Audio in Software or App
- Hik-Connect App:
- Open the Hik-Connect app on your smartphone or tablet.
- Select the camera you want to use for two-way audio.
- Tap the Microphone icon to start a two-way audio session.
- Speak into your device’s microphone to communicate through the camera’s speaker.
Step 6: Test the Two-Way Audio
- Test Communication:
- Speak into the microphone and listen through the camera’s speaker to ensure audio is being transmitted correctly.
- Test the audio from the camera’s location to ensure you can hear responses clearly.
Troubleshooting Tips
- Check Connections: Ensure that all audio devices are properly connected and functioning.
- Update Firmware: Make sure your camera’s firmware is up to date to support the latest features and fixes.
- Adjust Audio Levels: If the audio is too low or too loud, adjust the microphone and speaker volume settings in the camera’s web interface.
- Network Configuration: Ensure your network is stable and has sufficient bandwidth to support audio streaming.
By following these steps, you should be able to enable and use two-way audio on your Hikvision camera, allowing for effective communication through the camera.
Some customers have advised they are getting max bandwidth issues with their 8MP cameras. Below are recommended settings from Hikvision to ensure you don’t have bandwidth issues while retaining the full 8MP resolution.
1. Main stream (normal) resolution is still 8MP, Bitrate type is Variable, Frame rate is 15, Max. Bitrate is 6144 kbps, Video encoding H.264, H264+ or H265 or H265+, I frame interval is 40.
2. Main stream (Event) resolution is still 8MP, Bitrate type is Variable, Frame rate is 15, Max. Bitrate is 6144 kbps,
3. Sub stream resolution choose the highest one but lower than 1920 * 1080, Bitrate type is Variable, Frame rate is 15, Max. Bitrate is 768 kbps, Video encoding H.264.
If you don’t have I Frame interval settings, please kindly disregard.
NOTE – If you have decoding issues eg. no resource when viewing cams at the same time:
please go to NVR local monitor, Configuration – Live view – Layout – More settings. Change Stream Type from Auto to Sub stream. So in multi-play mode it uses sub stream while viewing single live view it uses main stream resolution.
This FAQ deals with one of our most common questions.
“I’ve just bought a Hilook IP kit from you – what do I do?”
What you need:
- the Hilook camera/s
- The Hilook NVR
- Precrimped CAT5E / CAT6 Cables or an installer who supplies the cables (with RJ45 ends). (1 per camera and 1 from the NVR to the modem)
- A monitor or TV (with VGA or HDMI connections) (you can buy a 22′ 1080p monitor from Officeworks for around 110.)
Steps:
- Run the CAT6 cables
- Run a CAT6 cable to each camera location.
- Bring all cables back to the location where your NVR will be placed.
- Connect the cameras
- Attach one end of each CAT6 cable to the cameras.
- Connect the other end of the cables to the NVR.
- Seal all cable connections with electrical tape to prevent water damage.
- Connect the monitor
- Use a VGA or HDMI cable to connect the monitor to the NVR.
- Connect to the modem
- If you want to enable remote viewing, connect an Ethernet cable from the NVR to the modem. If this isn’t practical and there is WIFI at your NVR location, you can grab yourself a WIFI extender from somewhere like officeworks and connect a short cable to the WIFI extender instead.
- Power on the NVR and monitor
- Turn on both the NVR and the monitor. You should see a setup screen on the monitor.
- Setup the system
- Follow the on-screen instructions to set up your system.
- Important: Write down the username and password you choose, as resetting them can be a hassle.
- View your cameras
- After setup, your cameras should appear on the screen.
- Set up remote viewing
- For remote viewing setup, follow this guide: Remote Viewing Setup.
- If you encounter issues at this step, it might be related to your modem or another technical problem. Consult an IT professional if needed.
- Troubleshooting
- Check our troubleshooting guides: FAQs
- You can also try searching Google or YouTube for solutions to specific issues.
- Need help?
- If you’re still unable to resolve the issue, email us at support@securitywholesalers.com.au with as much detail as possible.
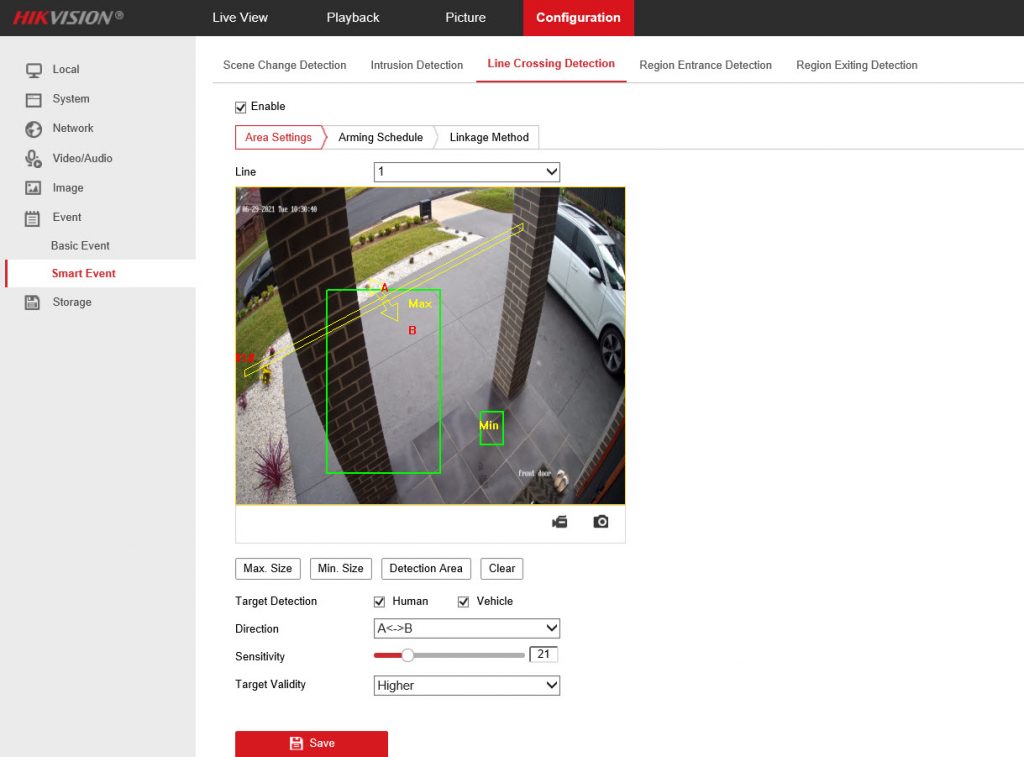
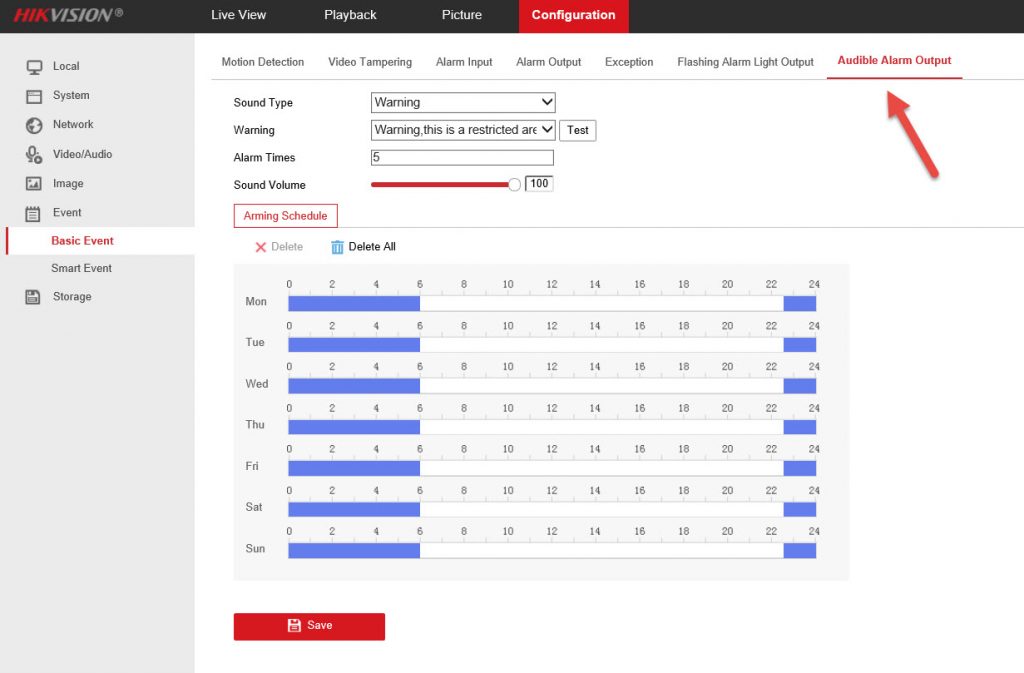
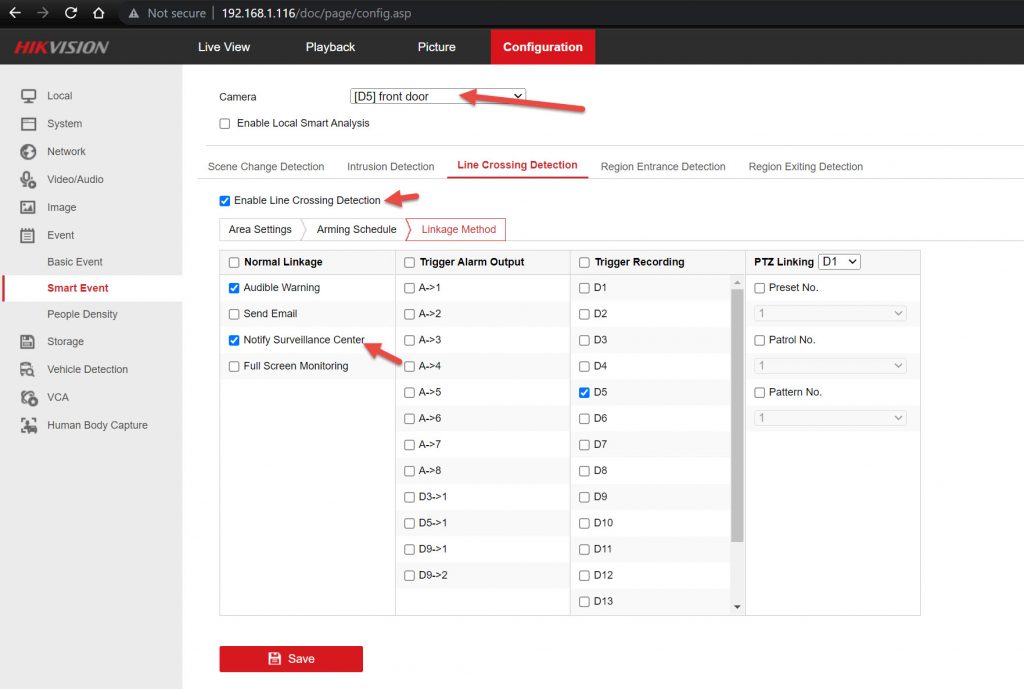
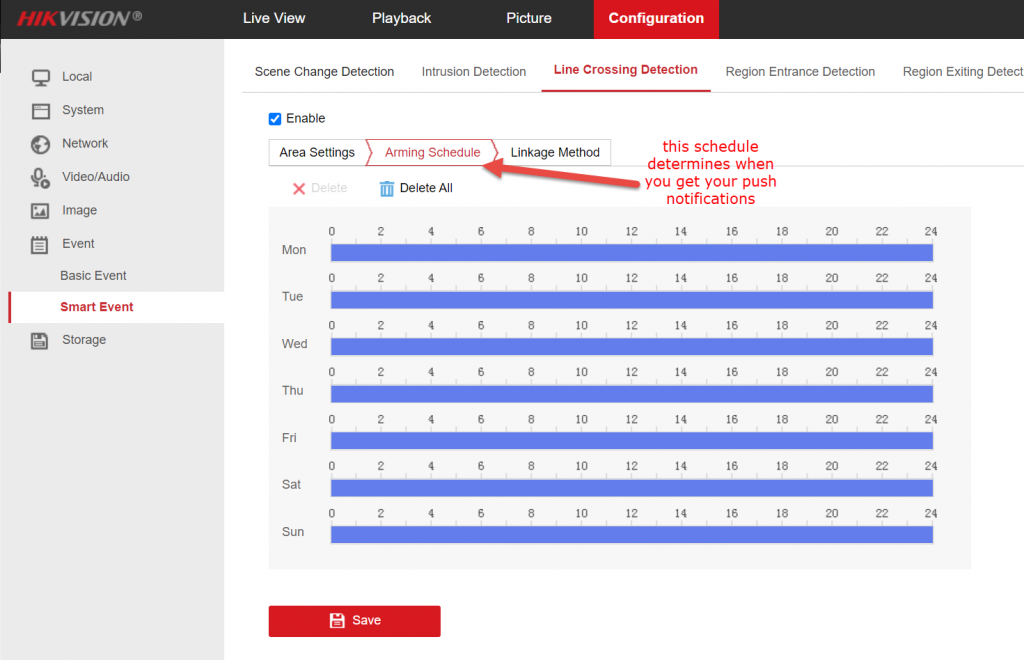
LINE CROSSING For Human / Vehicle detection
How do they compare?
The list of the ports for Dahua P2P cloud is: UDP 0~65535
TCP 9116,9118
TCP 80, 443
TCP 12367, 12366, 12337
UDP 53
UDP 8800
UDP 8802
UDP 8803
UDP 8900
UDP 8810~8815
Before you start, connect the cams to the poe switch.Connect your poe switch to your modem.Ensure your PC is connected to the same modem even via wifi.
1. Download and install CONFIGTOOL https://dahuawiki.com/ConfigTool
2. Open config tool – this should show the 2 cams which are connected to the poe switch along with the others.
3. Activate the cams. Choose the same password as the NVR
4. Connect the LAN cable that is connected into the NVR into one of the POE ports of the NVR.
5. You should see the cams connected to the NVR listed. Note down the IP address / subnet / gateway.
6. Connect the LAN cable what was just connected into the POE port of the NVR back into the LAN port.
7. You should see the 2 cams connected to the POE switch listed among other things. Ensure the IP address is in the same RANGE as the cams connected to the NVR. eg. 192.168.0.XXX (the last 3 digits can be different). The gateway and subnet should be the same as those connected to the NVR.
8. Add the cams to the NVR via the NVR – manually, using IP address, username (admin) and password.
That should be it.
What Should I Do If My Hikvision Camera Shows “IP Camera Does Not Exist”?
Question: What should I do if my Hikvision camera shows “IP camera does not exist”?
Answer:
If your Hikvision camera shows the error message “IP camera does not exist,” it indicates a connectivity issue between the camera and the NVR or network. Here’s a step-by-step guide to troubleshoot and resolve this issue:
Step 1: Check Physical Connections
- Verify Power Supply:
- Ensure that the camera is properly powered. If using a PoE switch or NVR, check that the Ethernet cable is securely connected and providing power.
- If using a separate power adapter, confirm that it is plugged in and functioning correctly.
- Check Ethernet Cables:
- Ensure that the Ethernet cable connecting the camera to the network or NVR is properly connected and not damaged.
- Try replacing the Ethernet cable with a known working one to rule out cable issues.
Step 2: Confirm Network Configuration
- IP Address Conflicts:
- Ensure that the IP address of the camera does not conflict with any other devices on the network.
- Use the SADP Tool to scan your network and verify the IP address of the camera.
- Subnet and Gateway:
- Make sure the camera’s IP address is on the same subnet as the NVR.
- Check the gateway settings to ensure they are correctly configured.
Step 3: Use the SADP Tool for Troubleshooting
- Download and Install SADP Tool:
- Download the SADP Tool from the Hikvision website and install it on your computer.
- Scan for Devices:
- Open the SADP Tool and let it scan your network for Hikvision devices.
- Check Camera Status:
- Find your camera in the list and check its status. If it shows as “Inactive,” you need to activate it by setting a new password.
- Modify Network Settings:
- If necessary, use the SADP Tool to modify the camera’s IP address, subnet mask, and gateway settings to ensure they match the network configuration.
Step 4: Access the Camera’s Web Interface
- Log into the Camera:
- Open a web browser and enter the camera’s IP address.
- Log in with the camera’s username and password (default username is
adminand the default password might be12345or the one you set).
- Check Camera Settings:
- Navigate to the network settings and ensure that all configurations are correct.
- Check for firmware updates and apply them if necessary.
Step 5: Add the Camera to the NVR Manually
- Access the NVR’s Camera Management:
- Log into your NVR’s web interface or use the local interface.
- Navigate to Configuration > Camera Management.
- Manual Camera Addition:
- Click on the Add or Manual Add button.
- Enter the camera’s IP address, port, username, and password.
- Choose the correct protocol (e.g., Hikvision or ONVIF).
- Save the settings and check if the camera appears online.
Step 6: Reset the Camera
- Factory Reset:
- If all else fails, perform a factory reset on the camera. Locate the reset button (usually a small pinhole) and press it for about 10-15 seconds while the camera is powered on.
- After the reset, reconfigure the camera and try adding it to the NVR again.
Step 7: Additional Troubleshooting
- Firmware Compatibility:
- Ensure that both the NVR and the camera are running the latest firmware versions to avoid compatibility issues.
- Network Equipment:
- Check if other network devices (switches, routers) are functioning correctly and not blocking the camera’s connection.
- Consult Support:
- If the issue persists, contact our support for further assistance.
By following these steps, you should be able to troubleshoot and resolve the “IP camera does not exist” error and get your Hikvision camera back online.
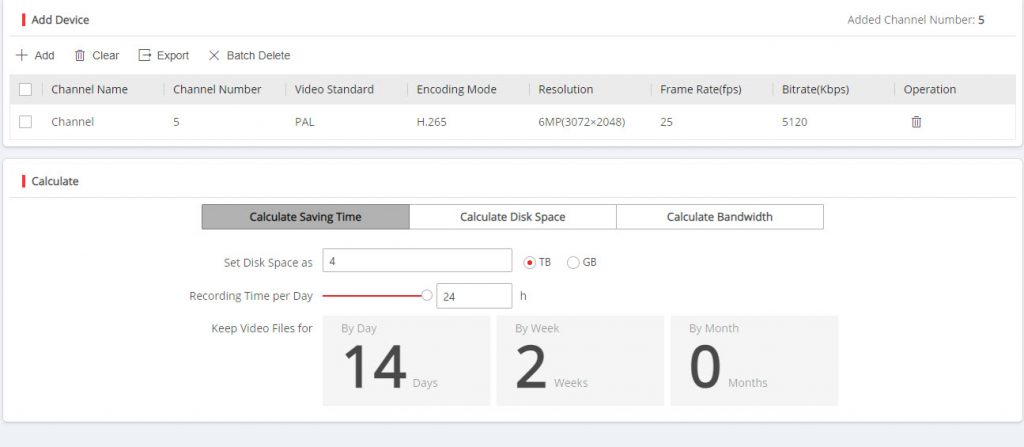
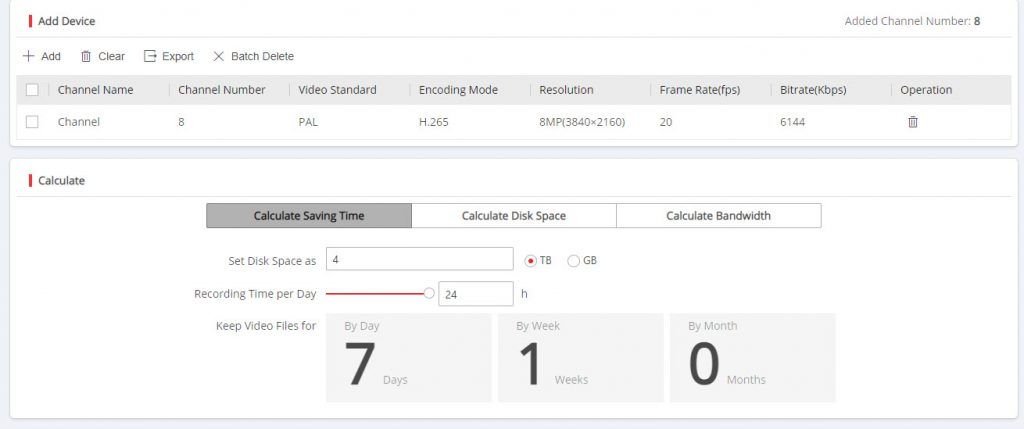
Storage requirements depend on
- whether you set it at 24/7 recording or motion only
- whether you choose H265+ or H264
- The frame rate
- The resolution you choose to record at
https://tools.hikvision.com/calculatorTool/index.html
The above is a useful url.
For example, if you have 5 cams@ 6MP resolution @ 25fps @ 24/7 recording, you will have 2 weeks:
If you have forgotten the password for your HiLook NVR, the reset process is usually completed using the SADP Tool on a Windows computer. HiLook is part of the Hikvision family, so the password reset process is very similar to Hikvision NVRs.
This guide is for customers who purchased their HiLook NVR from SecurityWholesalers.com.au.
Important Before You Start
Password reset files are time-sensitive. Once you export the reset file, you must keep the NVR powered on and connected to the network until the reset process is complete.
Do not turn off the NVR, disconnect the network cable, close SADP, or reboot the device while waiting for the reset file. If the NVR loses power or connection, the reset file may no longer work and the process will need to be restarted.
SecurityWholesalers’ existing Hikvision guide notes that the XML reset process requires the device to stay powered and connected, and that the XML file, not CSV file, is required for the reset request.
What You Need
You will need:
- A Windows PC or laptop
- The HiLook NVR connected to the same network as the PC
- The Hikvision / HiLook SADP Tool
- The NVR serial number shown in SADP
- The exported XML reset file from SADP
Download the SADP Tool from Hikvision’s HiTools/SADP support page. Your existing guide also points customers to the Hikvision HiTools page for SADP downloads.
Step-by-Step: Reset HiLook NVR Password Using SADP
Step 1 — Connect the NVR to the Network
Make sure the HiLook NVR is powered on and connected to your network.
Ideally:
- The NVR should be connected to your router or network switch.
- Your PC should be connected to the same router or network switch.
- Use a network cable where possible, rather than Wi-Fi, to reduce connection issues.
Step 2 — Install and Open SADP Tool
Install the SADP Tool on your computer.
Once installed, open SADP. It should automatically scan the network and display any Hikvision or HiLook devices it can detect.
Look for your HiLook NVR in the list.
Step 3 — Select the HiLook NVR
Tick the box next to the HiLook NVR.
Check that the model and serial number match your device.
The full serial number shown in SADP is important. Please do not rely only on the short serial number printed on the box or sticker.
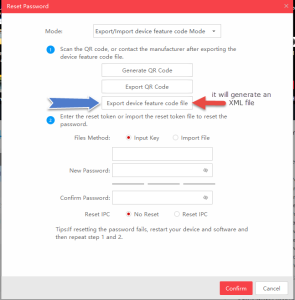
Step 4 — Click “Forgot Password”
With the NVR selected, click Forgot Password.
SADP will open a password reset window.
Depending on the firmware version, it may allow you to:
- Export an XML file, or
- Use a QR code / verification code method
For most HiLook NVR resets, the XML file method is the most common.
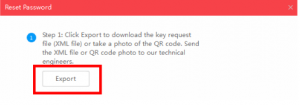
Step 5 — Export the XML File
Click Export and save the reset file to your computer.
Important: send the XML file, not the CSV file.
Your current Hikvision reset page specifically notes that customers must email the XML file, not the CSV file, along with the full serial number from SADP.
Step 6 — Email the XML File and Serial Number
Email the following to SecurityWholesalers:
To: enquiries@securitywholesalers.com.au
Subject: HiLook NVR Password Reset Request
Include:
- Your order number, if available
- Your name
- NVR model number
- Full serial number from SADP
- The exported XML reset file attached
Suggested email template:
Hi SecurityWholesalers,
I need help resetting the password on my HiLook NVR.
Order number:
NVR model:
Full serial number from SADP:I have attached the exported XML reset file from SADP.
The NVR is currently powered on and connected to the network.
Thank you.
Step 7 — Leave Everything Turned On
After exporting the XML file, leave the following running:
- HiLook NVR
- Router / network switch
- PC
- SADP Tool
Do not reboot or disconnect anything.
If the NVR turns off or disconnects, the returned reset file may fail and a new XML file will need to be generated.
Step 8 — Wait for the Reset File
SecurityWholesalers will submit the reset request where applicable.
For same-day processing, send the request during business hours. Your existing guide notes that Hikvision support operates Monday to Friday business hours and recommends sending reset requests before about 2pm on a weekday where possible.
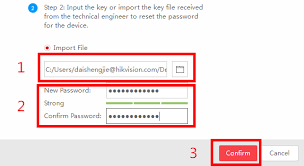
Step 9 — Import the Reset File into SADP
Once you receive the reset file back:
- Open SADP if it is not already open.
- Select the HiLook NVR.
- Click Forgot Password.
- Choose the option to Import File.
- Select the reset file that was emailed back to you.
- Enter a new password.
- Confirm the new password.
- Click Confirm.
Your new password should now be applied to the HiLook NVR.
Choosing a New Password
Use a strong password that you can safely store.
A good password should include:
- At least 8 characters
- Uppercase and lowercase letters
- Numbers
- A special character
Avoid simple passwords such as:
- admin12345
- password123
- 12345678
- your business name
After the Password Has Been Reset
Once the NVR password has been changed, you may also need to update the password in:
- HiLookVision app
- Hik-Connect app
- IVMS-4200 software
- Any connected cameras using the NVR password
- Any remote viewing setup
- Any saved browser login
If remote viewing stops working after the reset, remove the device from the app and add it again using the new password.
Common Problems
SADP Cannot Find the HiLook NVR
Check the following:
- The NVR is powered on.
- The network cable is connected.
- The PC is on the same network as the NVR.
- Temporarily disable VPN software.
- Temporarily disable firewall or antivirus network filtering.
- Try using a wired Ethernet connection instead of Wi-Fi.
- Restart SADP.
The Reset File Does Not Work
This usually happens if:
- The NVR was rebooted after the XML file was exported.
- The NVR lost network connection.
- SADP was closed.
- Too much time passed.
- The wrong file was sent.
- The CSV file was sent instead of the XML file.
If this happens, export a new XML file and repeat the process.
Can SecurityWholesalers Reset Any HiLook NVR?
Generally, password reset support is only available for products purchased from SecurityWholesalers.com.au and intended for the Australian market. Your existing guide notes that only Australian-region products can be reset, and customers who purchased elsewhere should contact the reseller who sold the product.
FAQ
Is HiLook the same as Hikvision?
HiLook is Hikvision’s value/economy CCTV range. The reset process is generally very similar and often uses the same SADP Tool.
Can I reset a HiLook NVR without SADP?
Usually, SADP is the easiest method. Some models or firmware versions may support QR code or security question reset options, but the XML reset method through SADP is the most common support process.
Do I send the XML file or CSV file?
Send the XML file. Do not send the CSV file.
Can I turn the NVR off after exporting the XML file?
No. Keep the NVR powered on and connected until the reset is complete.
How long does the reset take?
If submitted during business hours, it is often completed the same business day, but it depends on support availability.
What if I bought the HiLook NVR from another seller?
You should contact the company that sold you the NVR. Password reset support normally needs to go through the original reseller or authorised supply channel.
FOR HILOOK CAMS:
- Ensure the camera is NOT POWERED. Hold the reset button.
- While the reset button is held, power it back up (connect the ethernet cable)
- Continue to hold the reset button down for say 30 seconds then let go of the button.
- this should now be reset.
Dahua CCTV (23)
What is Smart Motion Detection?
Records normally as motion detection camera
Can differentiate human and vehicle and others }Record playback
}Can filter all motion to only human and vehicle
}Push notification
}Only get notification for only human motion
}4, 5 series NVR supports SMD }New GUI4.0 firmware
}Old gen firmware will not support SMD
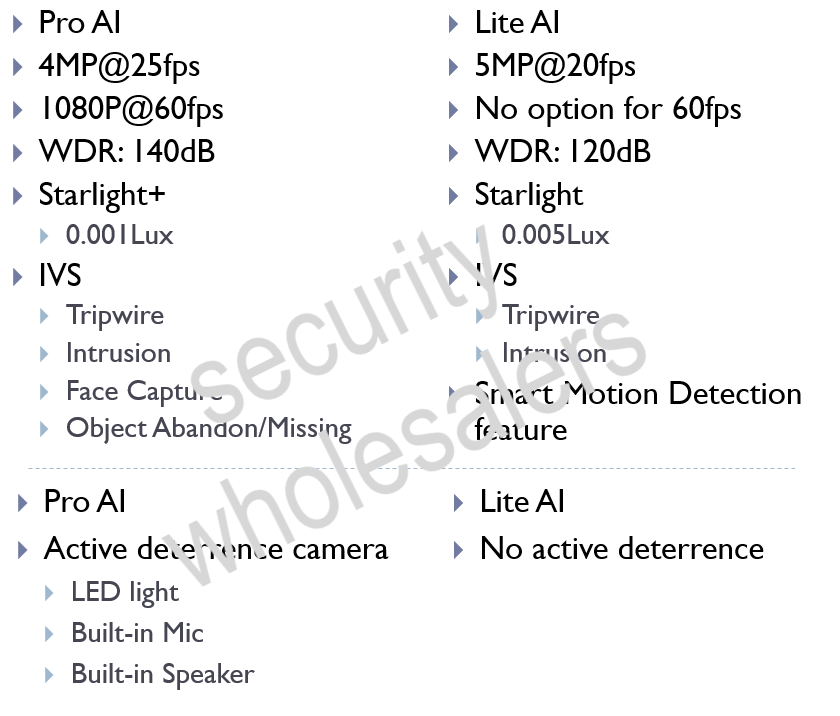
What is Face Recognition for Pro AI?
}Requires AI NVR }NVR5XXX-I-PX }AI NVR can process 16ch for face recognition on Pro AI
}Pro AI with normal NVR does not support face recognition
}Pro AI camera supports
}Face recognition
}Meta data
}Normal and Lite AI camera supports
}Only 4ch face recognition no AI NVR
}No meta data Slower face recognition
This FAQ / Video will guide you as to how to set up people counting on a Dahua NVR
This FAQ deals with one of our most common questions.
“I’ve just bought a Dahua IP kit from you – what do I do?”
What you need:
- the Dahua camera/s
- The Dahua NVR
- Precrimped Cat5e/CAT6 Cables or an installer who supplies the CAT6 cables (with RJ45 ends). (1 per camera and 1 from the NVR to the modem). Note – max length of these cables must be 95 metres or below.
- A monitor or TV (with VGA or HDMI connections) (you can buy a 22′ 1080p monitor from officeworks for around 100.)
Steps:
- Run the CAT6 cables to the locations you require (1 per camera). The cables should come back to the location where your NVR is located.
- Connect & install the cameras to one end of the cable and connect the other end to the NVR. Please seal connections near the cam with electrical tape to protect against water ingress
- Plug in the monitor via a VGA or HDMI cable to the NVR
- Connect an ethernet cable from the NVR to the modem (if you wish to do remote viewing).
- Turn on the NVR / Monitor – you should see a setup screen.
- Ensure you write down the username / password you choose. Its a pain in the bum to reset.
- After setup, you should see your cameras on the screen!
- To set up remote viewing, (this is a useful video. The video used GDMSS, but you should use DMSS
REMOTE VIEWING
Basically you will need to download an app called “DMSS” from the app store (iphone or android)
ON YOUR NVR (CAMERA BOX/RECORDER)
You will need to login and access the settings page(for example admin / admin1234)
In the settings page find NETWORK and search for P2P
It should have the QR code with SN/serial number
ON YOUR PHONE
Open the DMSS app
Click on the + icon Choose SCAN
Scan the QR code (SN) on the screenChoose NVR Enter the username and password details
Device name can be anything that you can remember (just nickname for your NVR)
Save these settings and you should now see the CCTV on your phone
Our other FAQ articles are good for troubleshooting https://www.securitywholesalers.com.au/faq-items/ or you can try Googling / Youtubing the problem.
If you still can’t resolve your issue, please email us – support@securitywholesalers.com.au. Please be as detailed as possible regarding the issue.
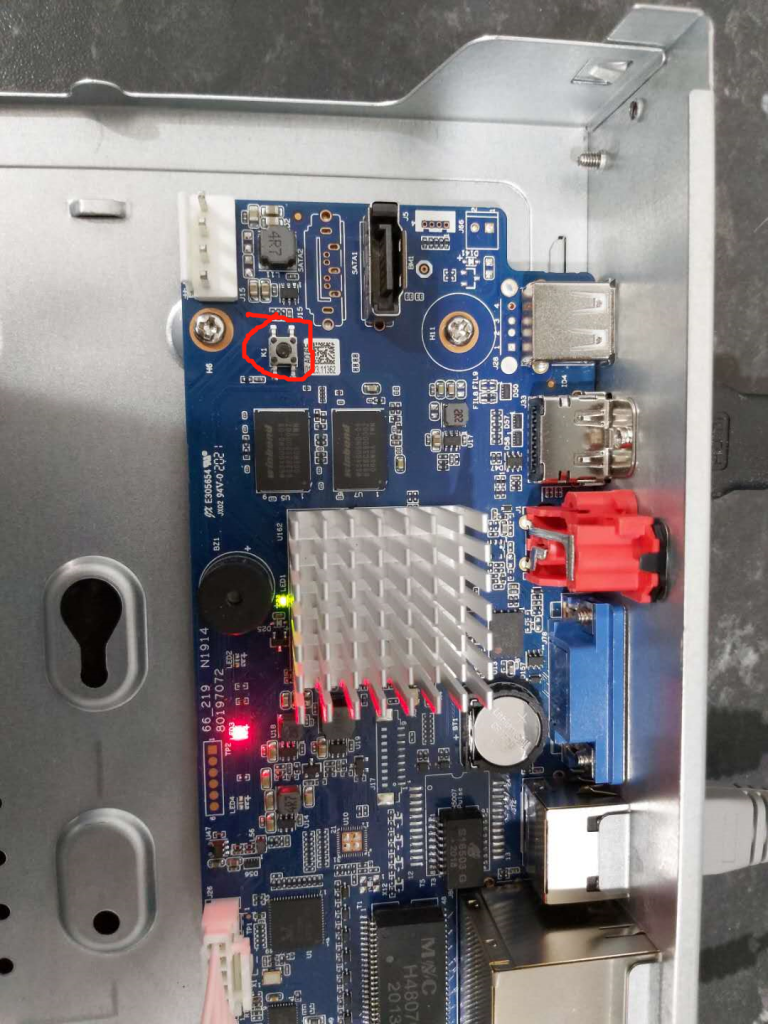
There are a few reasons why you may want to reset a Dahua NVR.
- Forgot password
- Chose the wrong monitor settings (ie. you chose a resolution and now you can’t see anything)
- You just want to start again after stuffing something up.
The procedure is below:
- Power off the NVR
- Press and hold the reset button (in red) above
- Power on the NVR
- Keep the reset button pressed for 30 seconds
- You’ll see the initialisation screen and be asked to set up again. Create a new password. Please choose the same password as what the NVR was previously if you’ve already got cameras activated on it, otherwise the cams may not work (due to different passwords)
Step 1. Download and install the configtool – https://dahuawiki.com/ConfigTool this tool allows you to find the IP address of the NVR.
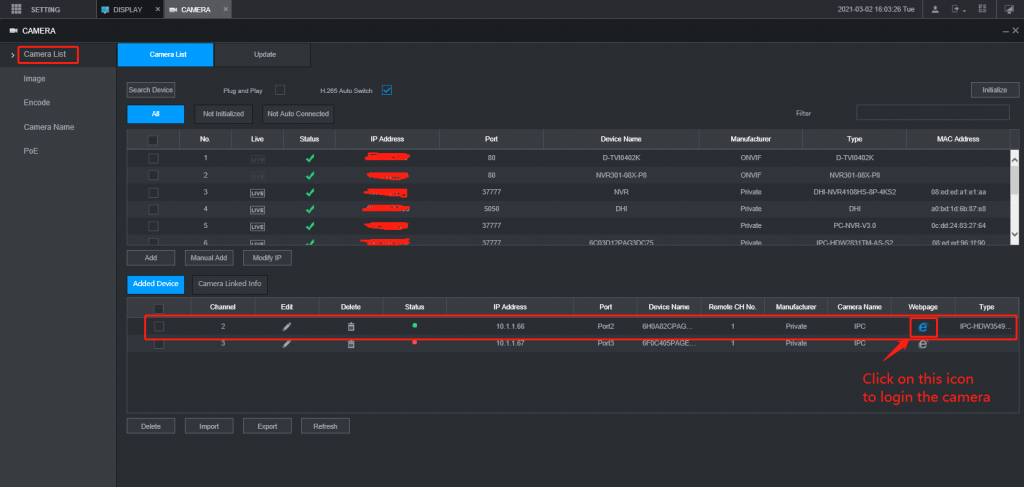
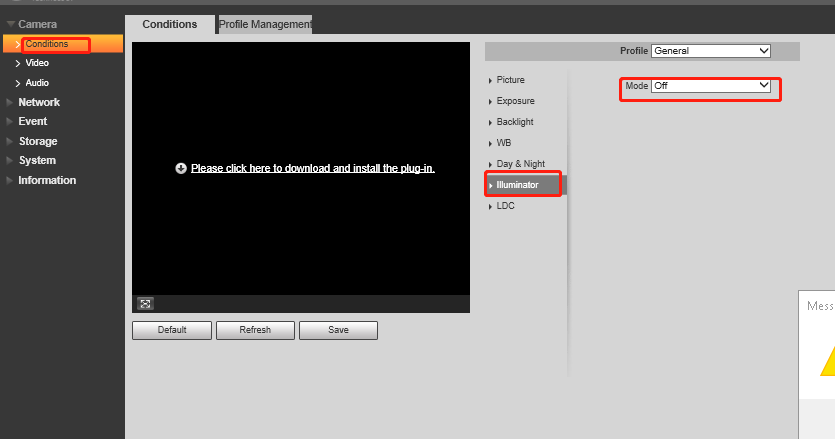
Step 2. Type the IP address into a browser, and use your login details to log into the system Note your PC must be using the same wifi as the NVR.
Step 3. the following step is: click on setting=> Camera list=> click on camera webpage as below, then you can web log in to the camera and turn white light off by changing the illuminator mode to off mode.
View your recorder and cameras on the go. With Dahua’s mobile application DMSS allows you to add Dahua recorders and cameras to the mobile app using P2P.
PREREQUISITES
- Smartphone (IOS device or Android)
- Plug the NVR into your router or switch using a network cable.
- DMSS already downloaded in your mobile device. (note the app was called IDMSS or DDMSS previously. Its now called DMSS)
- P2P must be turned on from the recorder and connected to a network with internet access.
Note there are some changed on the NVR – please make these changes carefully. ie. TURN ON DHCP
Another video for just the mobile app.
Full instructions are available here – https://dahuawiki.com/Mobile/iDMSS_P2P_Setup
A. Prepare the NVR
-
Connect the NVR to the internet
-
Plug the NVR into your router or switch using a network cable.
-
Confirm the internet is working (e.g., test with a laptop on the same router).
-
-
Enable P2P (Cloud Access)
-
On the NVR monitor → right-click → go to Main Menu → Network → P2P (or Cloud).
-
Tick Enable.
-
Wait for the status to show Online.
(If it stays Offline, check the NVR has a correct IP address, gateway, and DNS set under “TCP/IP”.)
-
-
Note the NVR’s Serial Number
-
Go to Main Menu → System → System Info → Version.
-
Write down the Serial Number (or scan the QR code from that screen). SN is also on the sticker under the machine
-
-
Confirm the admin account
-
Default username: admin
-
Password: set your secure password (change default if not already done).
-
B. Set Up the DMSS App
-
Download the DMSS app
-
Search DMSS on the App Store or Google Play and install it.
-
-
Register a DMSS account for the customer
-
Open DMSS → tap Me → Login / Register → Sign Up.
-
Choose Email and enter the customer’s email address.
-
A verification code will be sent to that email — enter it to complete registration.
(If the customer already has an account, skip this step.)
-
C. Add the NVR to the App (Installer or Customer)
-
Open DMSS, go to the Home or Device tab.
-
Tap “+” (Add Device).
-
Choose SN / Scan.
-
Either Scan the QR code from the NVR screen or enter the Serial Number manually.
-
Select NVR as the device type.
-
Enter:
-
Device Name (e.g., “House NVR”)
-
Username: admin
-
Password: NVR password
-
-
Tap Save.
The app should show the NVR as Online if P2P is working correctly.
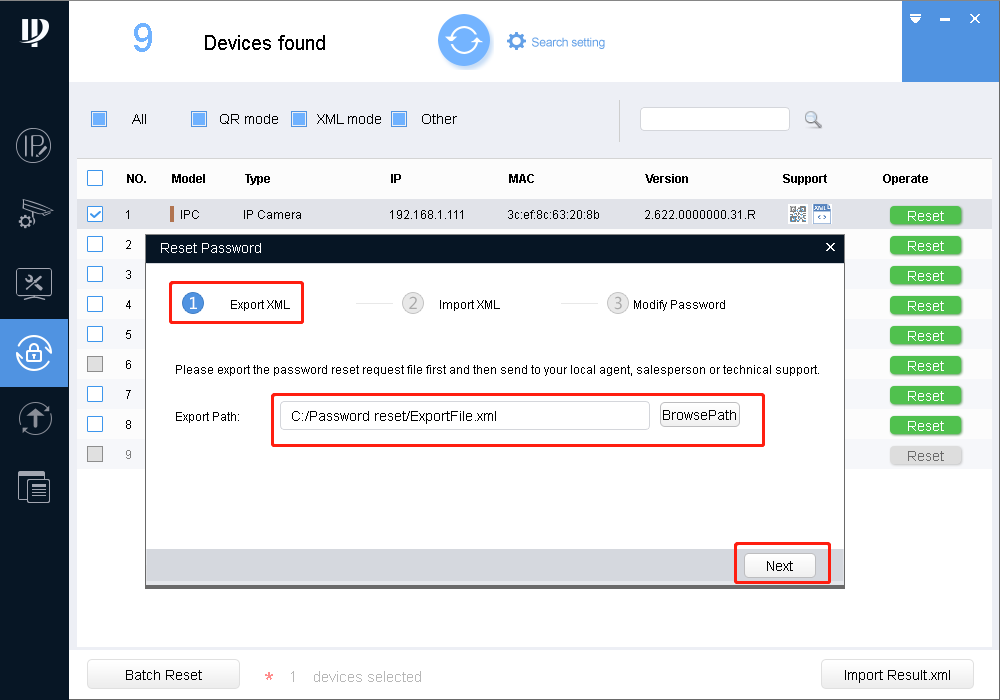
There are 2 methods: QR Code Method / XML Method.
For both, we have to use the ConfigTools software and go to password reset
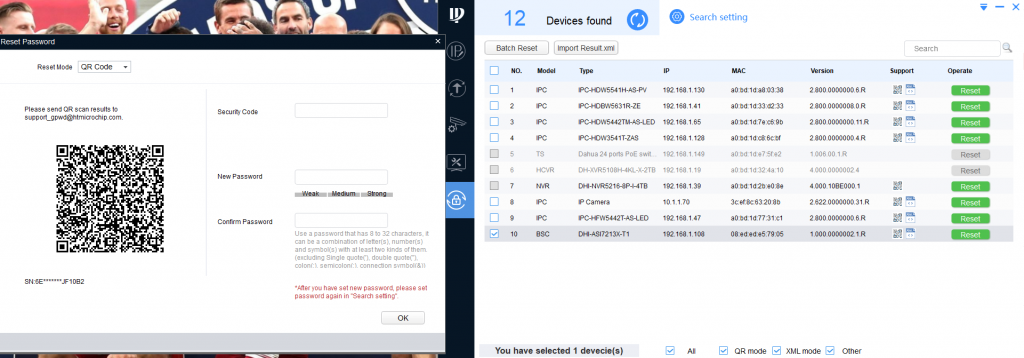
QR code Method
If you have put in an email address when setting up the password, we can use the qr code process.
In the ConfigTools, go to last option, Password reset > Click on Reset for the terminal > the QR code in the left side will come up
XML Method
If the email address was not put in or the user does not have access to that email,
Click Reset > Choose Reset Mode: XML File > Export the file and email to us.
We will send a reset file that has to be put in on the next step to create a new password
During this process from exporting to file to importing the reset file, neither close the ConfigTool software nor turn off or reboot the camera.
Note: For the XML file, please try to send between 8:30 – 3.30pm Mon – Fri.
Note: Both the reset file and the code from the qr code scan will be valid for 24 hours.
2. Reset using the physical reset button (under the SD card slot)
Many Dahua cameras include a recessed RESET button hidden beneath the SD card slot. This is often the fastest way to reset the password and revert to factory defaults.
Steps to follow:
-
Power off the camera.
-
Open the SD card cover and locate the tiny RESET hole or button.
-
Insert a small, non-metallic pin (e.g., toothpick) and hold the button down.
-
While pressing, power the camera on.
-
Continue holding the reset button for 10–15 seconds until the camera’s indicator light blinks or changes state.
-
Release the button and allow the camera to reboot. Once it restarts, the credentials will reset to default:
-
Username:
admin -
Password: <--- this will usually adopt the NVR's password when plugged in
-
Note: This process also restores factory settings, erasing all configuration customizations.
Formatting the SD card manually via the web interface of the camera
Open the web interface of the camera.
Proceed to Setup → Storage → Destination → Local tab.
Choose the card and click on the Format button. After this, it should automatically reboot, and the formatting should be finished as soon as it reboots.
The list of the ports for Dahua P2P cloud is: UDP 0~65535
TCP 9116,9118
TCP 80, 443
TCP 12367, 12366, 12337
UDP 53
UDP 8800
UDP 8802
UDP 8803
UDP 8900
UDP 8810~8815
Before you start, connect the cams to the poe switch.Connect your poe switch to your modem.Ensure your PC is connected to the same modem even via wifi.
1. Download and install CONFIGTOOL https://dahuawiki.com/ConfigTool
2. Open config tool – this should show the 2 cams which are connected to the poe switch along with the others.
3. Activate the cams. Choose the same password as the NVR
4. Connect the LAN cable that is connected into the NVR into one of the POE ports of the NVR.
5. You should see the cams connected to the NVR listed. Note down the IP address / subnet / gateway.
6. Connect the LAN cable what was just connected into the POE port of the NVR back into the LAN port.
7. You should see the 2 cams connected to the POE switch listed among other things. Ensure the IP address is in the same RANGE as the cams connected to the NVR. eg. 192.168.0.XXX (the last 3 digits can be different). The gateway and subnet should be the same as those connected to the NVR.
8. Add the cams to the NVR via the NVR – manually, using IP address, username (admin) and password.
That should be it.
Forgetting passwords can be a pain in the bum, but its a bigger pain if you don’t know how to reset the Dahua password.
Instructions below:
https://dahuawiki.com/PasswordReset
If you’ve not selected an email recovery option and security questions were not selected, please follow these instructions instead
First Step – Download config tool (if you don’t have it already) – https://dahuawiki.com/ConfigTool
- Check power supply: Ensure the camera is powered on and receiving power.
- Verify connections: Confirm that all video and power cables are securely connected to the DVR/NVR.
- Inspect camera status in NVR: Ensure the camera is correctly added to the NVR and is online.
- Reboot the system: Try restarting both the camera and the NVR to reset connections.
- Download the latest firmware: Obtain the latest firmware from the Dahua website.
- Access the camera’s web interface: Log in to the camera’s web interface using its IP address.
- Navigate to “System” > “Upgrade”: Go to the “System” tab and select “Upgrade.”
- Upload the firmware file: Click “Browse,” select the firmware file, and click “Upgrade.”
- Wait for the process to complete: Do not power off the camera during the upgrade process.
- Check recording schedule: Ensure the camera is set to record continuously or based on motion detection.
- Verify storage: Check if the hard drive or SD card has sufficient space and is functioning correctly.
- Confirm camera-NVR connection: Make sure the camera is properly connected and recognized by the NVR.
- Inspect recording settings: Verify that the correct parameters (resolution, bitrate) are configured for recording.
- Log in to the camera’s web interface: Use the camera’s IP address to access its configuration page.
- Go to “Event” settings: Navigate to “Event” > “Video Detection.”
- Enable motion detection: Toggle the motion detection option to “On.”
- Set detection areas: Define the areas in the camera’s view where motion should be detected.
- Adjust sensitivity: Set the sensitivity level according to your preferences.
- Link to actions: Configure the actions to take place when motion is detected, such as recording or sending alerts.
- Clean the IR LEDs and lens: Wipe away any dust or dirt from the IR LEDs and the lens.
Adjust IR intensity: Increase the IR intensity in the camera’s settings for better night illumination.
Remove nearby reflective surfaces: Ensure there are no reflective objects close to the camera that might bounce back IR light.
Install additional IR lighting: If needed, consider installing additional infrared illuminators to enhance night vision.
Check the camera’s location: Ensure the camera is positioned where it can effectively use its IR capabilities without obstruction
- Use the ConfigTool: Download and open the ConfigTool on a computer connected to the same network as the camera.
- Select the camera: Find your camera in the ConfigTool list.
- Assign a new IP address: Enter a new IP address that is within your network’s range and click “Save.”
- Configure via the web interface: Alternatively, log in to the camera’s web interface and adjust the IP settings under “Network Configuration.”
- Check for a built-in microphone: Confirm that the camera has an integrated microphone or that an external one is connected.
- Enable audio recording: In the camera’s web interface, navigate to “Settings” > “Audio” and ensure that audio recording is enabled.
- Verify NVR settings: Ensure the NVR is configured to record and play back audio.
- Check playback settings: During playback, ensure that audio is enabled and the volume is turned up.
- Access the NVR’s interface: Log in to the NVR using a connected monitor or via the web interface.
- Go to “Camera Management”: Navigate to the section where cameras are added or managed.
- Click “Add Camera”: The NVR should automatically detect cameras on the same network.
- Enter camera credentials: If prompted, enter the camera’s username and password.
- Manually add the camera: If the camera isn’t auto-detected, manually input its IP address. (find the IP address via Dahua config tool)
- Set up port forwarding: Configure port forwarding on your router for the camera’s IP address and relevant ports.
- Use the DMSS app: Download the DMSS app and add your camera using its serial number or IP address.
- Enable P2P: In the camera’s settings, enable the P2P (Peer-to-Peer) function to simplify remote access.
- Test remote connection: Use the DMSS app or a web browser to access the camera remotely and verify the connection.
General CCTV Questions (15)
There are a massive selection of camera designs out there to choose from. As a home or business owner looking to start a DIY surveillance system project, the three basic designs you will likely be looking at are bullets, domes, and turrets. So what are they exactly, and what differentiates them?
Firstly they all all have same / similar internal components, so the difference is basically physical.
BULLET CAMERAS
Bullet cameras look more like a guns than they do bullets. Bullet cameras stick out / stand out. This is the camera to choose if you want something that is easy to install and stands out. The downsides for this camera is that it looks less aesthetically pleasing something important in residential homes. Also, if the camera is reachable, it can be hit and the camera could be facing a wall.
Thus this type of camera is commonly installed in
- hard to reach places
- locations where you want it to stand out
- can be installed on walls or eaves
DOME CAMERAS
Dome cameras are the most aesthetically pleasing of all camera types. Some key points to note about domes:
- harder to install vs a bullet due to moving parts inside
- is pleasing to look at, less obvious
- not able to easily discern direction as to which it is facing
- has a cover so harder to damage – commonly used in areas which are reachable
- can be installed on walls as well as eaves
- One main negative about the dome is if the dome cover is dirty, it can cause blurry images at night (due to the IR reflecting off the cover)
TURRET CAMERAS
Similar to dome cameras, but don’t have a cover on them. They are probably one of the most popular camera choices as they are seen as an inbetweener of the dome and the bullet. You may not be able to tell, but its basically a ball in a socket, so it has a full range of motion. It is thus slightly easier to install than a dome.
- used in all sorts of installs
- can be installed on walls, eaves easily
- people will be able to see what direction they are looking at
- less susceptible to dirt stains than dome.
- more obvious camera vs the dome, less obvious than the bullet
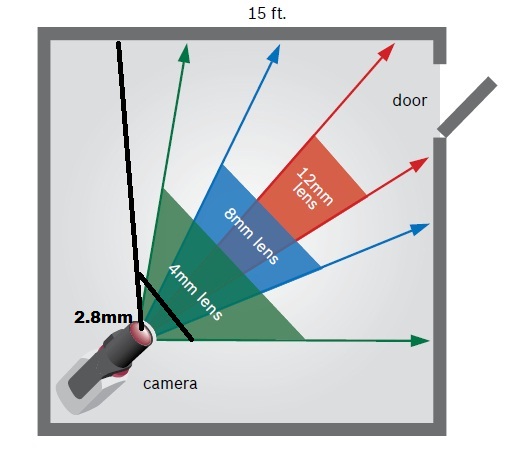
The most popular lens selections by far are 2.8mm and 4mm. These give the widest angle of view.
The below image gives an indication of the angle of view of each lens.
2.8mm gives around 90 degrees viewing angle.
4mm on average gives around 75 degrees viewing angle.
Things to note:
the more narrower the lens, the focus is further away. Eg. typical 4mm lens is focus 4-10 metres. typically 2.8mm is 1-6 metres. This means that for areas like the front door where you are capturing someone 1-4 metres away, 2.8mm is ideal.
Sides of homes, 4mm may be more ideal.
Driveways which are say 10 metres long will get more ideal image with 4-6mm if what you’re trying to see is closer to the entrance of the driveway.
Lens Simulator – https://www.securitywholesalers.com.au/tools/resolution-simulator/
If you want another explanation, please watch the below:
The cameras send the information on the data it captures to the DVR or NVR. The video record then:
- transmits the information to the screen
- records the information on the local hard disc which resides within the video recorder.
- connects to a router which broadcasts it across the web
This broadcasting is what allows you to access your feed from any computer, iphone or Android device.
Typical connection diagram of an Analog / TVI system. With a digital system, cabling will be CAT5/6 and usually no power supply to the cameras is required.
We are an Authorised Hikvision Partner. All your gear comes locally from Australia – the same place authorised Hikvision installers and integrators get their gear from, thus you will be able to benefit from 3 years warranty.
All Hikvision IP cameras and recording device (NVR’s/DVR’s) are covered by a 3 year back-to-base manufacturer warranty.
The same thing applies to our Dahua equipment too.
(Note disk drives limited to 1 one year)
Our warranty is limited to the replacement of faulty items or parts and does not include damage due to incorrect fitting of parts or accessories.
Consumer Law, Return, Refund and Exchange Policy:
(a) ACL: Certain legislation including the Australian Consumer Law (ACL) in the Consumer and Competition Act 2010 (Cth), and similar consumer protection laws and regulations may confer you with rights, warranties, guarantees and remedies relating to the provision of goods or services to you by us via the Site which cannot be excluded, restricted or modified. Our liability is governed solely by the ACL and these Terms.
(b) Goods: If you are a consumer as defined in the ACL, the following notice applies to you: “Our goods come with warranties and guarantees that cannot be excluded under the Australian Consumer Law (Consumer Guarantees). You are entitled to a replacement or a refund for a major failure and for compensation for any other reasonably foreseeable loss or damage. You are also entitled to have the goods repaired or replaced if the goods fail to be of acceptable quality and the failure does not amount to a major failure
(c) Our warranties: To the extent permitted by law, we exclude all express and implied warranties, and all material and work is provided to you without warranties of any kind, either express or implied. We expressly disclaim all warranties including but not limited to implied warranties of merchantability and fitness for a particular purpose.
(d) Manufacturer warranties: Certain products, including particular models of IP security cameras and DVR/NVR equipment, may come with a manufacturer’s warranty. The manufacturer’s warranty is in addition to but may overlap with any rights and remedies you may have under applicable law, including any Consumer Guarantees. If you are not considered a “consumer” within the meaning of the ACL, the manufacturer’s warranty may be your sole remedy. You should check the manufacturer’s warranty, as many manufacturers’ warranties do not apply in a business or commercial setting. Please contact the manufacturer if you would like to make a claim under the manufacturer’s warranty.
(e) Repair, replacement or a refund: If you wish to seek repair, replacement or a refund for a product, please contact us and we will explain the requirements to you. This may include you providing evidence of the faulty product to us.
(f) Refund: You are not entitled to a refund for change of mind. If you are entitled to a refund, we will only give you the refund once evidence of faulty product is received by us, or we have received the product at our warehouse and inspected it and assessed whether it is eligible for a refund under these Terms. Any refund we make will be by the same payment method used to purchase the product.
(g) Installed: Subject to this clause, we will not accept for return any product that has been used, connected, installed, attempted to be connected or installed, or if your product is custom-made or is a special buy product.
(h) Packaging: You must adequately package any product you are returning for our collection to ensure that it is not damaged during return delivery to our warehouse. You are also responsible for arranging the return delivery and the costs involved. Please keep your receipt. If the product is deemed to be faulty, email us the postage costs and we’ll reimburse you the postage costs
(i) Duty of care: You have a duty of care for the product while it is in your possession. If you damage products, then subsequently return the products, you may be liable to pay to repair the product to its original condition. In these circumstances, where a repair is not economically viable, no refund will be made.
More Terms & Conditions here – https://www.securitywholesalers.com.au/terms-and-conditions/
There are lots of retailers who sell 20m length for around $30 – Bunnings included, but if you’d like to save even more money check out this ebay store: https://www.ebay.com.au/itm/10m-20m-30m-50m-Cat6-Network-Ethernet-Cable-100M-1000Mbps/282460689664
Environmental, Health & Safety (EH&S).
You can address OH&S requirements with a video surveillance system that helps you provide a secure and safe working environment for your employees and visitors. Furthermore, it can also help gather evidence when investigating OH&S injury claims.
Advantages of CCTV Systems for Business
- Accessibility – Live feeds can give you the ability to quickly and easily view access points in multiple areas of your facility.
- Profitability – With digital video surveillance, you can have greater control over loss from workplace theft of accidents. It may also help lower liability and insurance costs, especially when being sued.
- Productivity – Surveillance can discourage workplace violence, harassment and poor customer service.
- Reliability – New technology mean no more broken or worn-out tapes, and no more costly maintenance.
- Remote access – Many units can help you oversee your business from anywhere you have remote connectivity.
When it comes to the installation of CCTV cameras, the optimal height depends on various factors, including the purpose, location, and environment of the surveillance area. While there is no universally “best” height, I can provide some general guidelines and suggestions based on commonly recommended practices from reliable sources in the security industry.
- The Security Industry Authority (SIA) in the United Kingdom suggests installing cameras at a height between 2.4 to 3 meters (7.9 to 9.8 feet) for general surveillance purposes. This height range helps capture facial features and provides a good overall view of the area.
- The New York City Police Department (NYPD) recommends mounting CCTV cameras at a height of 10 to 12 feet (3 to 3.7 meters) for general surveillance in outdoor areas. This height reduces the risk of vandalism or tampering while providing a clear view.
- The Australian Government’s Attorney-General’s Department advises positioning cameras at a height of around 3 meters (9.8 feet) for facial identification and to ensure the cameras are out of reach to deter tampering.
- The Home Office in the United Kingdom suggests installing cameras at a height that allows for a good downward view, ensuring coverage of the area while avoiding obstructions such as trees, buildings, or signage.
It’s important to note that these guidelines are not absolute and may vary depending on specific circumstances. Factors such as the nature of the surveillance, desired field of view, lighting conditions, and the type of camera being used should be considered in conjunction with the recommended heights.
When installing CCTV cameras, it is always advisable to consult with a professional security installer or a certified CCTV expert who can evaluate your specific needs and provide tailored advice based on the unique requirements of your surveillance setup
When a dome camera is mounted outside, it can collect dirt and dust, especially in an exposed installation locations. Dirt and dust on the dome will reflect IR light back into the camera lens, causing blurry picture and affecting your camera’s night performance. It can be a problem even when daytime video looks good. We recommend cleaning your camera dome a few times a year or as required (usually after rains)
The dome of most cameras are made of hardened polycarbonate. It is extremely durable, but can be damaged if cleaned improperly.
To clean the dome:
- To clean dust or loose dirt, use compressed air.
- To clean smudges or stuck on dirt, use warm water with a few drops of a mild dish soap and a clean microfiber cloth.
CAUTION:
The following products can damage the dome and cause IR distortion and a reduction in clarity.
Do not use any of the below:
- Anti-Bacterial or harsh (extra-strength) detergents
- Ammonia, alcohol, or other solvents
- Paper towels, newspaper, or other rough materials
These will impact the cover and make a permanent bad picture. This isn’t covered by warranty of you damage your dome.
Sensor lights can indeed be beneficial for CCTV systems as they can enhance the overall effectiveness of surveillance. Here are some points supported by reliable sources:
- Increased Visibility: Sensor lights can improve visibility during nighttime or low-light conditions, allowing CCTV cameras to capture clearer images. The additional illumination helps overcome the limitations of cameras in low-light environments, making it easier to identify people and objects.
According to the Home Office’s “Guidance on the Use of Security Lighting” (UK), adequate lighting is essential for CCTV systems to achieve effective results. Proper lighting ensures that CCTV images are clear and usable.
- Deterrence of Criminal Activity: Sensor lights can act as a deterrent to potential criminals. The sudden illumination triggered by motion can startle or draw attention to individuals in unauthorized areas, discouraging them from engaging in criminal activities. This deterrent effect can enhance the security of your premises.
The Crime Prevention Through Environmental Design (CPTED) principles, supported by various law enforcement agencies and security experts, emphasize the importance of lighting as a preventive measure to reduce criminal opportunities.
- Prompt Alert and Recording: Sensor lights can be integrated with CCTV systems to trigger alerts and initiate recording when motion is detected. This feature ensures that any activity in the illuminated area is captured and recorded, providing valuable evidence for investigations if needed.
The Best Practices for Video Security by the Security Industry Association (SIA) highlights the importance of integrating motion sensors with CCTV systems to improve the effectiveness of surveillance and enhance incident response.
While sensor lights can be beneficial, it’s crucial to ensure proper placement and calibration to minimize false triggers and optimize their effectiveness. Consulting with a professional CCTV installer or security expert is recommended to determine the ideal positioning of sensor lights and their integration with CCTV systems based on the specific requirements of your surveillance setup.
As a CCTV expert, I can provide guidance on whether PTZ (Pan-Tilt-Zoom) cameras are necessary for your home surveillance. However, it’s important to note that PTZ cameras may not be the most common choice for residential applications. Here are a few points to consider:
- Coverage Area: Evaluate the size of your property and the areas you wish to monitor. PTZ cameras are known for their ability to pan, tilt, and zoom, which makes them suitable for covering large areas or areas that require flexible monitoring. If you have a substantial property with expansive outdoor spaces, PTZ cameras can help you achieve comprehensive coverage.
- Flexibility and Control: PTZ cameras offer the advantage of remote control, allowing you to move the camera lens and zoom in or out to focus on specific areas of interest. This flexibility can be useful if you want the ability to actively monitor different areas or track moving objects within your surveillance zone.
- Cost Considerations: PTZ cameras tend to be more expensive compared to fixed cameras due to their additional features and motorized mechanisms. If your surveillance needs can be adequately met by fixed cameras, which provide a fixed field of view, they may offer a more cost-effective solution for home security.
- Professional Installation: Proper installation and configuration of PTZ cameras require expertise to ensure optimal performance. Consider consulting with a professional security installer who can assess your specific needs and determine if PTZ cameras are suitable for your home.
NOTE – VERY FEW PEOPLE WILL GET PTZ CAMERAS FOR THEIR HOME.
Ultimately, the decision to install PTZ cameras in your home depends on your specific requirements, budget, and the level of control and flexibility you desire in your surveillance system. It’s always advisable to consult with a professional installer to receive personalized recommendations based on your unique circumstances.
Ah, the eternal question of CCTV camera numbers! As a witty CCTV expert, I’ll give you a lighthearted response:
Well, according to the “Official CCTV Camera Counting Handbook for Comedy Purposes” (which I may or may not have just made up), the recommended number of CCTV cameras is directly proportional to the level of paranoia multiplied by the square root of your imagination divided by the circumference of your average doughnut. Oh, and don’t forget to carry the pizza!
But in all seriousness, determining the exact number of CCTV cameras you need requires a more practical approach. Assess the size of the area, identify critical points to monitor, consider potential blind spots, and take into account your specific security requirements. It’s always best to consult with a professional CCTV installer who can provide a tailored recommendation based on your unique circumstances.
A Serious response is below:
Determining the number of CCTV cameras needed depends on several factors, including the size and layout of the area to be covered, the purpose of surveillance, and the level of detail required. While it is challenging to provide an exact number without specific information about your situation, I can offer some general guidance supported by reliable sources in the security industry:
- Risk Assessment: Conduct a thorough risk assessment of the area you want to monitor. Identify key areas that require surveillance, such as entrances, exits, high-value assets, and blind spots. This assessment will help you determine the number of cameras needed to adequately cover those areas.
The “CCTV Operational Requirements Manual” by the UK Home Office recommends conducting a risk assessment to determine the required number and placement of CCTV cameras based on the specific risks associated with the environment.
- Field of View: Consider the field of view required for each camera. The field of view depends on the camera type, lens focal length, and the distance between the camera and the subject being monitored. For example, wide-angle lenses cover larger areas, while zoom lenses focus on specific details.
The “Video Surveillance Guidelines” by the Security Industry Association (SIA) suggests using the appropriate lens and camera combinations to achieve the desired field of view and image quality.
- Overlapping Coverage: It is generally recommended to have overlapping coverage between cameras to minimize blind spots and ensure comprehensive monitoring. This helps maintain continuity in tracking individuals or objects as they move through the surveillance area.
The “Video Surveillance Best Practices” guide by the National Institute of Justice (NIJ) in the United States recommends overlapping camera coverage to ensure effective surveillance without any gaps.
- Operational Goals: Consider your operational goals and specific surveillance requirements. For example, if you need facial recognition or license plate identification, you may require higher resolution cameras or additional cameras strategically placed to capture these details.
Remember, while we strive to ensure security, a touch of humor never hurts!
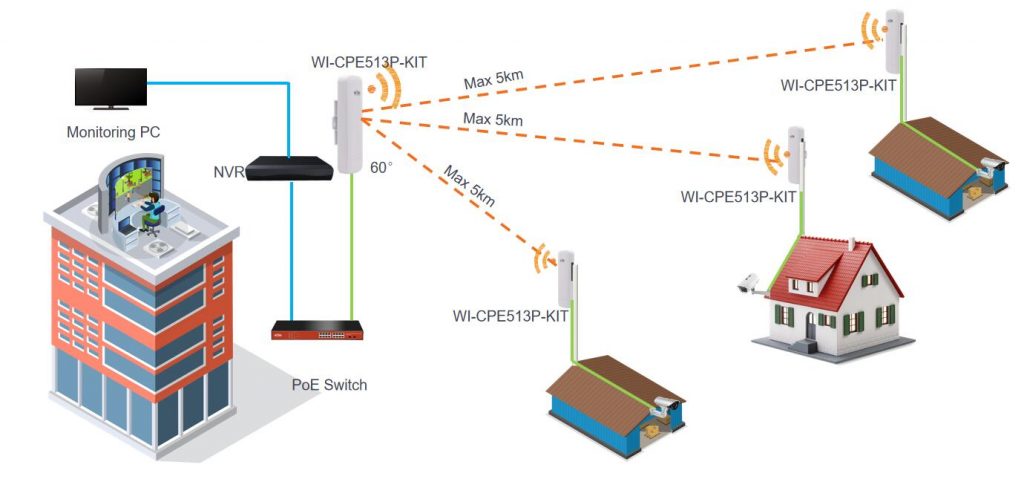
Adding cameras to a Network Video Recorder (NVR) via a point-to-point network and a PoE (Power over Ethernet) switch is a common and efficient way to expand your CCTV system. Here’s a step-by-step instructional guide to help you through the process:
Materials Needed:
- Network Video Recorder (NVR) with available PoE ports.
- PoE switch with enough ports for the number of cameras you want to add.
- IP cameras that support PoE.
- Ethernet cables for connecting the cameras and the PoE switch to the NVR.
- Monitor (if your NVR doesn’t have a built-in display).
Step 1: Prepare the Hardware:
- Set up your NVR in a suitable location with proper ventilation and power supply.
- Install the PoE switch in a convenient and accessible place, preferably close to the NVR.
- Mount the IP cameras at their desired locations, making sure they have a clear view of the areas you want to monitor. Use appropriate mounting brackets or housings if necessary.
Step 2: Connect the PoE Switch to the NVR:
- Use an Ethernet cable to connect one of the PoE switch’s LAN ports to an available LAN port on the NVR. This connection will allow the NVR to communicate with the cameras through the PoE switch.
Step 2.5: Set Up Point-to-Point Bridge:
- Choose a suitable point-to-point bridge that supports the necessary range and throughput for your CCTV setup. Point-to-point bridges typically come in pairs – one for each end of the wireless link.
- Install one bridge near the NVR and connect it to an available LAN port on the NVR using an Ethernet cable.
- Power up the bridge and configure it according to the manufacturer’s instructions. You’ll need to set up wireless parameters, such as SSID, security settings, and wireless channel.
- Install the second bridge near the PoE switch and connect it to an available LAN port on the PoE switch using an Ethernet cable.
- Power up the second bridge and configure it with the same wireless parameters as the first bridge. Make sure both bridges are set to operate in point-to-point mode.
- The two bridges will establish a wireless link between the NVR and the PoE switch, effectively connecting them together as if they were connected by an Ethernet cable.
After completing Step 2.5, continue with the original steps in the instructional guide from Step 3 onwards to connect the IP cameras to the PoE switch, power up the NVR, PoE switch, and IP cameras, and configure the IP cameras on the NVR.
Using a point-to-point bridge will allow you to create a wireless link between the NVR and the PoE switch, offering more flexibility in camera placement and reducing the need for long Ethernet cable runs. Ensure that the point-to-point bridge has adequate signal strength and stability for reliable camera feeds.
Step 3: Connect the IP Cameras to the PoE Switch:
- Take an Ethernet cable and connect one end to the Ethernet port on an IP camera.
- Connect the other end of the Ethernet cable to an available PoE port on the PoE switch. The PoE switch will provide both power and data connectivity to the camera.
Step 4: Power Up the NVR, PoE Switch, and IP Cameras:
- Plug in the power cables for the NVR and the PoE switch, and turn them on. Allow them to boot up and initialize.
- The PoE switch will automatically supply power to the connected IP cameras, so there is no need to plug them in separately.
Step 5: Configure the IP Cameras on the NVR:
- Access the NVR’s configuration interface through a web browser or the provided software.
- Navigate to the camera settings or configuration page on the NVR.
- The NVR should detect the connected IP cameras automatically. If not, check the connections and make sure the cameras are powered up.
- Assign unique names and IP addresses to each camera for easy identification and management.
Step 6: Test the Camera Feeds:
- Access the live view of your NVR to check if the cameras are working correctly.
- If all cameras are displaying video feeds on the NVR’s live view, then the setup is successful.
Step 7: Optional – Configure Additional Settings:
- Depending on your preferences, you can customize various settings for each camera, such as motion detection, recording schedules, and video quality.
- Ensure that you set up recording options to save footage to your NVR’s storage device or external storage.
Step 8: Monitor and Maintain:
- Regularly check the camera feeds and the NVR’s status to ensure that everything is functioning correctly.
- Keep the cameras and NVR firmware/software updated to take advantage of the latest features and security improvements.
By following these steps, you should be able to successfully add cameras to your NVR using a point-to-point network and a PoE switch. Enjoy enhanced surveillance and security with your expanded CCTV system!
Can I mix 6mp and 8mp cameras on the one NVR or do they all need to be the same MP?
You can definitely mix cameras as long as the video recorder is capable of handling them.
The CCTV Storage Calculator helps you estimate:
-
How many terabytes (TB) of storage you need
-
How many days of footage you can retain
-
The difference storage settings make (resolution, compression, frame rate)
It’s designed for Hikvision, Dahua, Uniview, Axis, and most modern IP camera systems.
How do I calculate storage for my CCTV system?
Using the tool is simple:
-
Open the CCTV Storage Calculator
-
Enter the number of cameras
-
Select the resolution of your cameras
-
Choose compression (H.265 is most common today)
-
Select recording type (24/7 or motion)
-
Adjust retention days if needed
-
View the estimated storage requirement instantly
The result will show the approximate hard drive size required.
Comment on this FAQ
You must be logged in to post a comment.
Hikvision AX Hybrid Alarm (1)
Hikvision AX Pro Alarm (14)
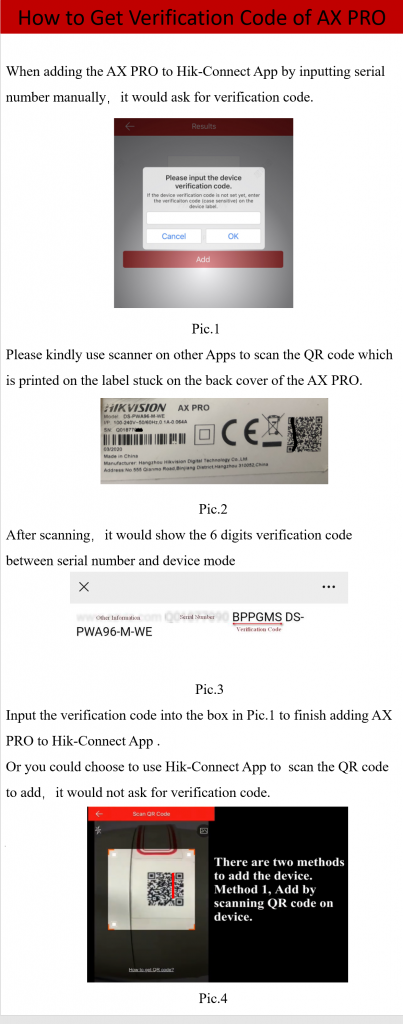
Hikvision AX PRO How to Invite Owner From Hik Proconnect (installer software)
Below is a quick guide to the most common sensors for the Hikvision AX Pro Alarm System
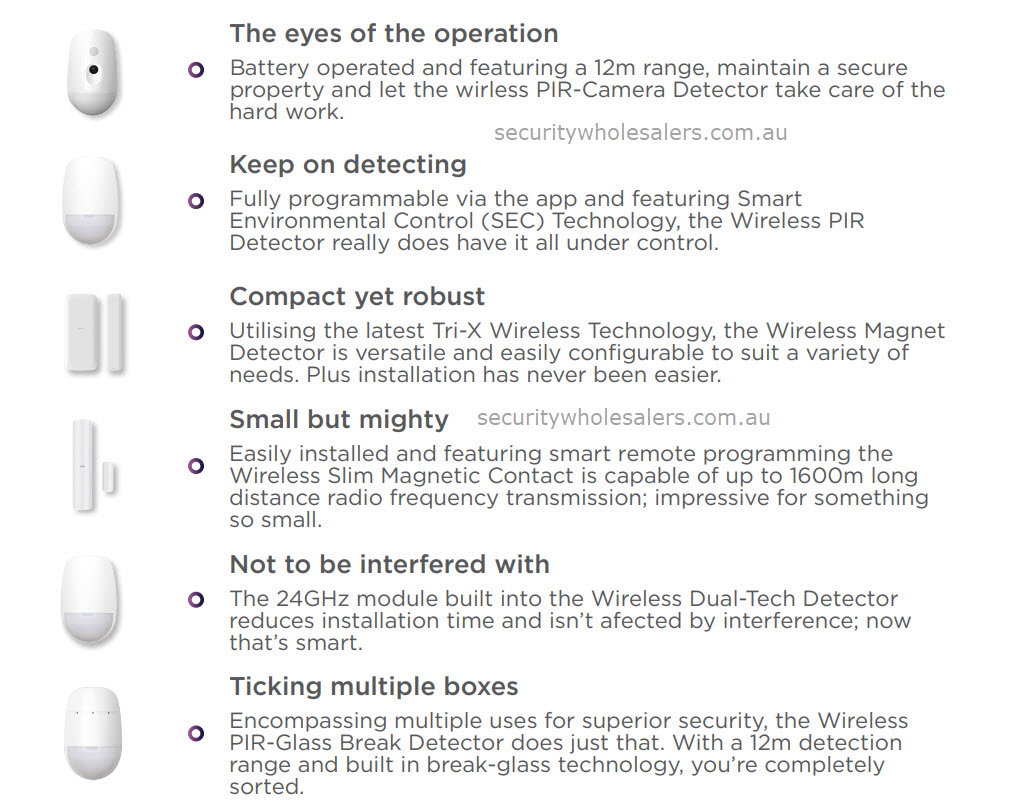
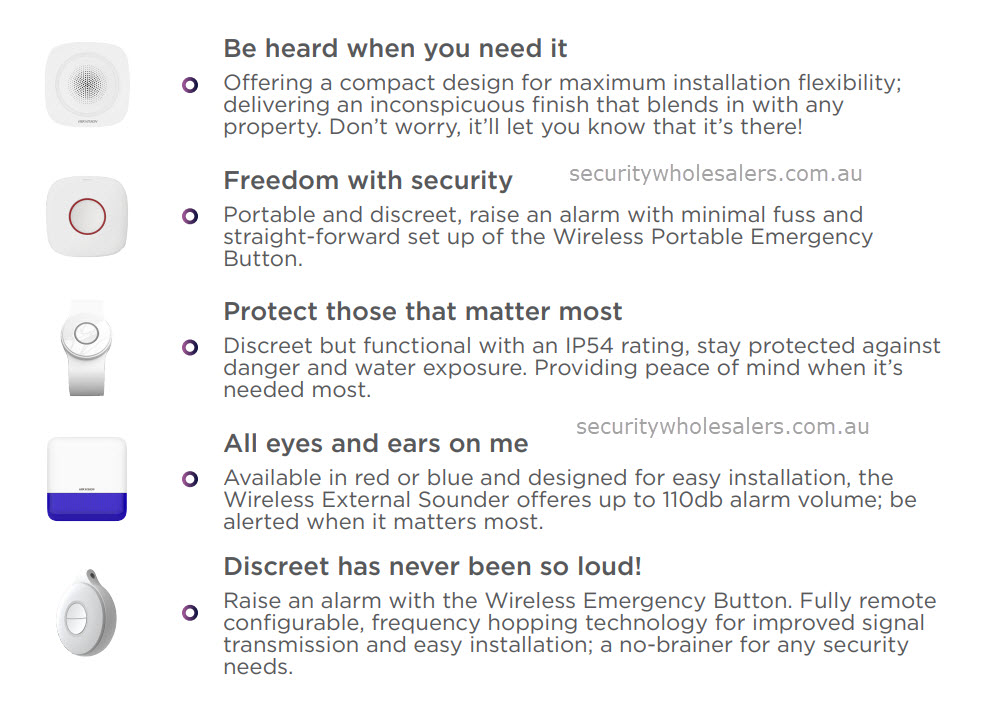
Below is a guide of the Sounders and Panic buttons
How to Unbind AX PRO Panel Hik-Connect
How to Upgrade AX PRO Wireless Control Panel by Browser
(HPC Management)
How to Login AX PRO Wireless Control Panel by Browser
How to Reset AX PRO Panel by Reset Button
How to Configure Wireless Keypad
in AX PRO Wireless Control Panel
How to Configure Wireless Repeater
in AX PRO Wireless Control Panel
How to Configure Automation Device in AX PRO Wireless Control Panel
How to Add Wireless Detector to AX PRO Wireless Control Panel
How to Add Tag in AX PRO Wireless Control Panel
HIkvision CCTV (60)
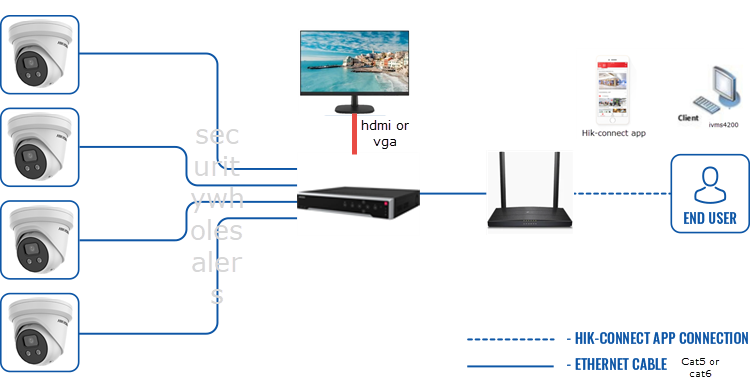
This FAQ deals with one of our most common questions.
“I’ve just bought a Hikvision IP kit from you – what do I do?”
What you need:
- the Hikvision camera/s
- The Hikvision NVR
- Precrimped CAT5E / CAT6 Cables or an installer who supplies the cables (with RJ45 ends). (1 per camera and 1 from the NVR to the modem)
- A monitor or TV (with VGA or HDMI connections) (you can buy a 22′ 1080p monitor from Officeworks for around 110.)
- Screw driver
- Ladder
Steps:
- Mark the Locations: Based on your layout plan, mark the spots where you will install the cameras.
- Run the CAT6 cables to the locations you require (1 per camera). The cables should come back to the location where your NVR is located. Note the NVR makes a running fan noise so a cupboard / walk-in is ideal.
- Connect & install the cameras to one end of the CATcable and connect the other end to the NVR. Please seal connections with electrical tape to protect against water ingress.
- Plug in the monitor via a VGA or HDMI cable to the NVR
- Connect an ethernet cable from the NVR to the modem (if you wish to do remote viewing).
- Turn on the NVR & Monitor – you should see a setup screen.
- Ensure you write down the username / password you choose. Its a pain in the bum to reset.
- After setup, you should see your cameras on the screen!
- To set up remote viewing, https://www.securitywholesalers.com.au/faq-items/can-use-hik-connect-set-remote-viewing/ (this is a useful video https://www.youtube.com/watch?v=sNtB7Cjm7HY) If you get stuck at this step, please consult an IT professional as it could be your modem or other issue.
- If you’ve bought an Acusense system – how to configure acusense here
Our other FAQ articles are good for troubleshooting https://www.securitywholesalers.com.au/faq-items/ or you can try Googling / Youtubing the problem.
If you still can’t resolve your issue, please email us – support@securitywholesalers.com.au. Please be as detailed as possible regarding the issue.
USEFUL VIDEO FOR SETUP
MORE DETAILED VIDEO FOR SETUP (for more complex arrangements)
A MORE DETAILED GUIDE – if the above didn’t give you enough info
️ What You’ll Need Before You Start
-
Hikvision IP cameras (one or more, depending on your system)
-
A Hikvision NVR (Network Video Recorder) with built-in PoE ports
-
Pre-crimped CAT5e or CAT6 cables (one per camera + one for internet connection)
-
A monitor or TV with HDMI or VGA input
-
Basic tools: screwdrivers, ladder, cable clips or ties, and waterproofing materials (e.g., tape, weather boots)
-
Optional: HDD pre-installed in the NVR, or a compatible hard drive to install yourself
Step 1: Plan and Run Cables
-
Plan camera placement: Identify key areas (entrances, driveways, perimeter) that require coverage.
-
Mark mounting positions on walls, eaves, or poles ensuring clear fields of view and minimal obstruction.
-
Run cables from each camera location back to where the NVR will be housed.
-
Use CAT5e or CAT6 cabling.
-
Secure the cables using clips or conduit.
-
-
Also run a network cable from your NVR to your internet modem/router if remote access is needed.
Step 2: Mount Cameras and Connect Cables
-
Mount cameras securely at the planned locations.
-
Connect one end of each network cable to the PoE port on the camera.
-
Connect the other end to a PoE port on the back of the NVR.
-
Waterproof all external RJ45 connections using tape, boots, or junction boxes to prevent corrosion or failure.
Step 3: Connect Monitor and Power Up
-
Connect a monitor or TV to the NVR using HDMI (preferred) or VGA.
-
Plug in the NVR power adapter and switch it on.
-
Power on the monitor/TV and select the correct input.
-
Wait for the NVR to boot into its initial setup wizard.
Step 4: NVR Setup Wizard
-
Choose language and time zone.
-
Create a strong admin password and write it down somewhere safe.
-
The NVR should auto-detect any connected cameras. Follow the on-screen instructions to assign channels.
-
Configure basic settings such as:
-
Date/time format
-
Display resolution
-
Recording schedule (optional at this stage)
-
Step 5: Confirm Live Camera View
Once setup is complete:
-
You should see all connected camera feeds on the monitor.
-
Check each feed for focus, angle, and clarity.
-
Adjust camera direction or zoom if needed.
Step 6 (Optional): Enable Remote Viewing via Hik-Connect
On the NVR:
-
Go to Configuration → Network → Advanced Settings → Platform Access.
-
Enable “P2P”.
-
Confirm that the status shows “Online”.
On your smartphone:
-
Download the Hik-Connect app from the app store.
-
Register or sign in to your Hik-Connect account.
-
Tap the “+” icon, then scan the QR code shown on your NVR screen.
-
Confirm the verification code when prompted.
-
Once added, tap Live View to see camera feeds remotely.
Step 7 (For AcuSense Camera Users)
If you have AcuSense cameras, follow these extra steps for intelligent detection:
-
On the camera:
-
Disable Basic Motion Detection
-
Enable Smart Events (e.g., line-crossing or intrusion detection)
-
Set detection type to Human/Vehicle
-
-
Under Linkage Method, configure alerts such as flashing light, siren, push notifications, or email alerts.
Step 8: Testing and Final Checks
-
Power cycle the system to ensure it starts up properly.
-
Test each camera feed again.
-
Test remote viewing by turning off Wi-Fi and checking the Hik-Connect app over mobile data.
-
Confirm the NVR date and time are correct.
-
Update firmware if needed using files from the official Hikvision site.
Troubleshooting Tips
-
No image? Check cable termination and try a different PoE port.
-
Remote access not working? Make sure P2P is online and your modem isn’t blocking traffic.
-
Camera not showing? Check if the NVR is set to DHCP and that cameras are on the same subnet.
-
Playback issues? Make sure the hard drive is correctly installed and formatted.
Quick Reference Table
| Step | Task |
|---|---|
| 1 | Plan layout and run cables |
| 2 | Mount cameras and connect to PoE ports |
| 3 | Connect monitor and power on NVR |
| 4 | Run through setup wizard |
| 5 | Confirm live camera view |
| 6 | Enable Hik-Connect for remote viewing |
| 7 | Configure AcuSense smart events (if applicable) |
| 8 | Test system thoroughly |
Yes, all our products come from Australian distributors of Hikvision.
We ourselves are a Platinum Hikvision Partner.
Click here to see Our Partner Certificate
Purchasing through authorised Hikvision Australia Partner ensures that you receive the benefits of our email technical support in addition to Hikvision Australia’s full warranty.
How to reset passwords on either an NVR or IP Camera?
The following quick guide by Hikvision takes you through the steps to do this.
IMPORTANT TO NOTE BEFORE STARTING:
This relies on emailing items to Hikvision tech support for their help to reset. Hikvision Tech support only operate Monday to Friday business hours. They can take 2 hours to reply, thus if you send it at around 3.30, you may not get a reply. In the time you are waiting need to keep SADP tool open and running.
PART 1 – TO RESET PASSWORD ON HIKVISION NVR (scroll down for resetting for cams)
> email us the XML file (not the CSV file) and Serial Number (*Full serial number on SADP) to us. We will be emailing this file to Hikvision for them to provide a reset file. NOTE – Hikvision is only open during business hours, so you must send it to us before say 3pm on a business day to allow ample time to reply.
- Hikvision is only open 9-5 Monday to Friday, thus please send it before 2pm on a weekday so you can get the reset code back on the same day.
Hikvision_IPC_NVR_Password_Reset_Guide
PART 2 – RESET CAM PASSWORDS – TO RESET PASSWORD ON HIKVISION CAMERAS CONNECTED TO NVR,
THINGS TO NOTE:
- only Australian region products can be reset
- Hikvision is only open 9-5 Monday to Friday, thus please send it before 4pm on a weekday so you can get the reset code back on the same day.
- Only if you purchased goods from us, can we reset it – if you bought it elsewhere, please speak to the reseller who sold you the product
- email the serial number / xml file to us at enquiries@securitywholesalers.com.au
ALTERNATIVE STEP FOR CAMERA IF YOU HAVE RESET BUTTON UNDER SD CARD SLOT:
- Ensure the camera is NOT POWERED. Hold the reset button.
- While the reset button is held, power it back up (connect the ethernet cable)
- Continue to hold the reset button down for say 30 seconds then let go of the button.
- this should now be reset.
IF YOU’D LIKE TO WATCH A VIDEO REGARDING THE SADP METHOD:
Hikvision Australia’s website has firmware updates for available IP cameras.
https://www.hikvision.com/au-en/
Use the search bar to try and find your product. Firmware updates are usually available on the product page.
IF YOU BOUGHT EQUIPMENT FROM US:
You will need to contact us if you can’t find your camera listed or if you require firmware for your NVR / DVR.
You will need to also provide the full serial number of the device as well as your current firmware.
This is to ensure upgrades are done properly. In some instances middlle firmware is required before upgrading to the latest version.
We do not recommend doing intercom firmware upgrades. Please check with us if there is any doubt.
If you didn’t buy equipment from us, please contact the people who you bought the equipment from.
This video explains how to set it up on your phone:
(excuse the monotonic tone)
Note – to use this effectively you’ll likely need to change sensitivities and block certain regions from triggering the alarm on the NVR.
This FAQ deals with one of our most common questions.
“I’ve just bought a Hikvision IP kit from you – what do I do?”
What you need:
- the Hikvision camera/s
- The Hikvision NVR
- Precrimped CAT6 Cables or an installer who supplies the CAT6 cables (with RJ45 ends). (1 per camera and 1 from the NVR to the modem)
- A monitor or TV (with VGA or HDMI connections) (you can buy a 22′ 1080p monitor from officeworks for $98)
Steps:
- Run the CAT6 cables to the locations you require (1 per camera). The cables should come back to the location where your NVR is located
- Connect & install the cameras to one end of the cable and connect the other end to the NVR
- Plug in the monitor via a VGA or HDMI cable to the NVR
- Connect a cable from the NVR to the modem (if you wish to do remote viewing)
- Turn on the NVR / Monitor – you should see a setup screen.
- Ensure you write down the username / password you choose. Its a pain in the bum to reset.
- After setup, you should see your cameras on the screen!
- To set up remote viewing, https://www.securitywholesalers.com.au/faq-items/can-use-hik-connect-set-remote-viewing/ (this is a useful video https://www.youtube.com/watch?v=sNtB7Cjm7HY) If you get stuck at this step, please consult an IT professional as it could be your modem or other issue.
Our other FAQ articles are good for troubleshooting https://www.securitywholesalers.com.au/faq-items/ or you can try Googling / Youtubing the problem.
If you still can’t resolve your issue, please email us – support@securitywholesalers.com.au. Please be as detailed as possible regarding the issue.
Hikvision has released a press release regarding the products that are sold by companies who are not authorised by Hikvision, and these Hikvision products are imported from overseas without any quality assurance done to comply with the Australian standards. These products are known as “grey market” products.
Products from these unauthorised channels can be counterfeit, used, modified, or damaged. On top of that, these “grey market” products have been altered in different ways to make the products function in the Australia region. Therefore, the products are no longer in the original factory condition, and the official Hikvision warranty is void.
Aside from that, products purchased through unauthorised channels can have different firmware versions in the products and will not support future firmware upgrades without further tampering of the products. You will not be able to upgrade to the latest English-language firmware, and if you perform a factory default, you risk changing the interface of the products to the Mandarin language. After this is done, you are unable to revert the language settings back to English.
Purchasing through authorised Hikvision Australia Partner ensures that you receive the benefits of our email technical support in addition to Hikvision Australia’s full warranty.
With such a small price difference between buying Hikvision products from official distributors and buying “grey market” products from unauthorised distributors, we highly recommend making sure you are getting the genuine products to save your time and resources in the long-term.
If you suspect you are being sold “grey market” products, please contact Hikvision’s Tech Support hotline at 1300 976 305. They will be able to verify the product’s distributor through the serial number of the product.
Rest assured the products you buy from here are genuine. View our Hikvision partner certificate here –

Double check that your setup of the remote viewing is done properly:
Refer to this – https://www.securitywholesalers.com.au/faqs/can-use-hik-connect-set-remote-viewing/
Otherwise, it may be that your modem is blocking some of your required ports.
Below is a list of ports required to be open.
Step 1 – Click on https://appstore.hikvision.com/ on your mobile phone.
Step 2 – Click to download Hik Connect
Step 3 – You can either navigate to your Download folder using a file browser app or simply begin the install by clicking on the completed download in your mobile browser.
Step 4- Android will ask you to grant permission to either the file browser or your web browser to install the app. Grant the permission and it should bounce you back to the installation screen. If not, navigate back to your Download folder after granting the permission to try again.
The app should safely install.
Step 1 – Go to System > Network > TCP/IP.
Tick “Enable DHCP” and “Enable Obtain DNS…” then click Apply
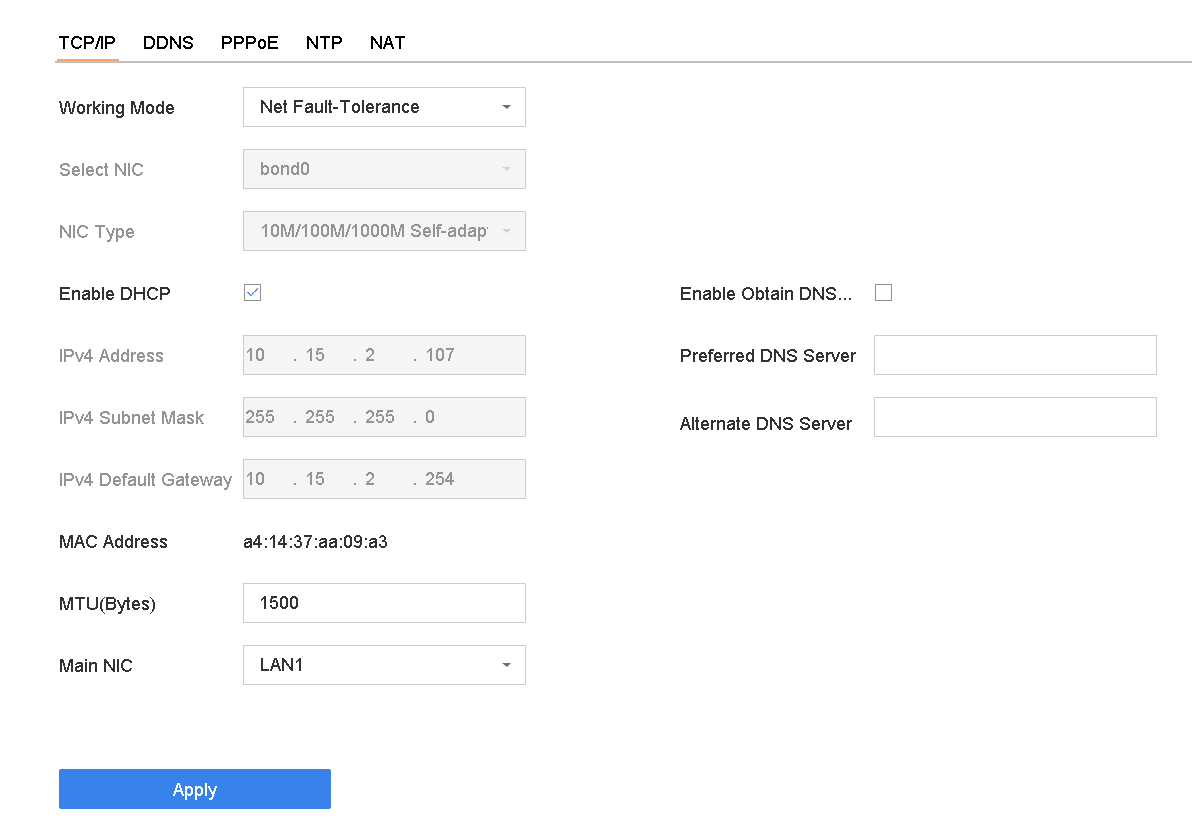
Step 2 – Go to System > Network > Advanced > Platform Access.
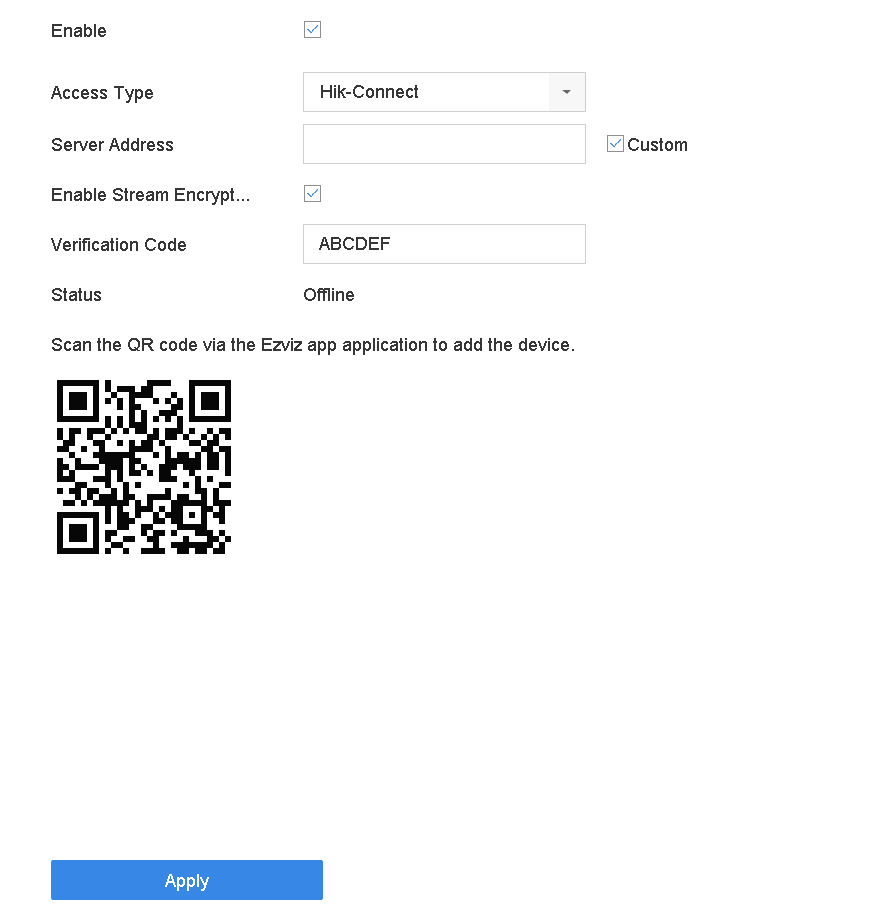
Step 3 Check Enable and a Service Terms window will pop up. Create your verification code, check to agree to the service terms and click OK.
Step 4 Click Apply.
Step 5 Add the device to your Hik-Connect account by scanning the QR code
Step 1
Open up SADP program (download here – https://www.securitywholesalers.com.au/faqs/hikvision-sadp-tool-can-download/ SADP will give you the IP address of the recorder . You should see the IP address next to the NVR model number.
Step 2
Open up an Internet browser and type in the IP address of the NVR.
Note some browsers will have plugin issues with Live-view, so you may need to use the below plugin for Chrome. IE Tab – Chrome Web Store (google.com)
Step 3
Log in using username and password of the recorder.
Step 4
Go to Configuration > Network > Advanced Settings > Other.
Tick “Enable Virtual Host”. Note – if you have V5.0 NVR, then please go to Device Access then the More tab
Step 5
Go to Configuration > System > Camera Management > Click on the blue link next to the camera you wish to log into.
Step 6
Log into the camera. (same username / password as the NVR if the NVR activated the camera)
There you have it – you’re now logged into the camera and ready to perform actions on the camera.
——————————————–
If the above steps don’t work, please follow the steps below:
STEP 1
CONNECT A CABLE FROM your PC (ie. ethernet cable from your PC to your CAMERA PORT (so if you have a 4ch and 4 cameras, you’ll need to unplug 1 cam and plug in there))
STEP 2
Load up SADP – you should see all the IP addresses of the cams listed.
STEP 3.
Change the PC subnet / gateway / to match that of the cams. IP should be in the same ‘network’
Network adapter / Right click on active connection / Properties / TCP/IP4 / Properties – change details here.
STEP 4
Enter the IP address of the CAMERA into the browser. If your settings for step3 were correct, you should be able to log in.
CCTV Unbinding guide below:
Below is a sample configuration.
1. Camera: DS-2CD7126G0-IZS(2.8~12mm)
This indoor dome camera has face capture function and suitable for 3m meters face capture.
2. DeepinMind NVR: iDS-7716NXI-I4/16P/X(B)
This NVR supports Facial Recognition for up to 8 channels; Support 16 face libraries, up to 100,000 face pictures per library and support 100,000 pictures in total. It can send the email that contains alarm info to the customer.
You may wish to adjust your mainstream / substream framerates to make changes to the recording time. eg. if 20fps is giving you 30 days, 10fps will give you 60 days. 5fps can give you 120 days.
Step-by-Step Instructions
Step 1: Log into the NVR
- Access the NVR’s Web Interface:
- Open a web browser on a computer connected to the same network as your Hikvision NVR.
- Enter the IP address of the NVR in the browser’s address bar (e.g.,
http://192.168.1.100).
- Log in with Your Credentials:
- Enter your username and password. The default username is
admin, and the default password is12345or the password you set during initial configuration.
- Enter your username and password. The default username is
Step 2: Navigate to Camera Settings
- Access the Configuration Tab:
- Once logged in, go to the Configuration tab located at the top of the page.
- Navigate to Video/Audio Settings:
- In the left-hand menu, click on Video/Audio under the Camera section.
Step 3: Adjust the FPS for Mainstream Recordings
- Select the Camera:
- From the drop-down menu or list, select the camera for which you want to change the FPS settings.
- Modify Main Stream Settings:
- Under the Video tab, locate the Main Stream (Event) or Main Stream (Normal) settings section.
- You will see options for Resolution, Bitrate Type, Video Quality, Frame Rate, and other settings.
- Change the Frame Rate (FPS):
- Find the Frame Rate setting.
- Use the drop-down menu to select the desired FPS for the main stream recording (e.g., 15 FPS, 20 FPS, 25 FPS, etc.).
- Save the Settings:
- After adjusting the FPS, click Save or Apply to confirm the changes.
Step 4: Repeat for All Cameras
- Repeat Steps for Each Camera:
- Go back to the camera selection menu and choose the next camera.
- Repeat the process of adjusting the FPS for the main stream recording for each camera connected to the NVR.
Step 5: Verify the Changes
- Check the Settings:
- Ensure that the FPS settings have been successfully applied to all cameras.
- You can do this by revisiting the Video/Audio settings for each camera and confirming the FPS value.
- Test the Cameras:
- Monitor the live feed or playback recordings to verify that the desired FPS settings are in effect.
Additional Tips
- Firmware Update: Ensure that your NVR firmware is up to date to avoid any compatibility issues.
- Browser Compatibility: Some older NVR interfaces work best with Internet Explorer or require specific plugins. Ensure your browser is compatible.
- Network Stability: Make sure your network is stable to avoid interruptions while applying these settings.
By following these steps, you should be able to change the FPS settings for mainstream recordings for all cameras connected to your Hikvision V4.0 NVR.
This is a common problem whereby users would change the resolution of the NVR so that it no longer displays on any screens they have.
The objective is to reset the NVR’s default settings.
Step 1
Open up SADP program (download here – https://www.hikvision.com/en/support/tools/destop-tools/sadp-for-windows/ SADP will give you the IP address of the recorder . You should see the IP address next to the NVR model number.
Step 2
Open up an Internet browser and type in the IP address of the NVR.
Step 3
Log in using username and password of the recorder.
Step 4
SYSTEM > MAINTENANCE > DEFAULT – Restore all parameters to Default settings.
Question: How can I view my Hikvision cameras on a PC?
Answer:
Viewing your Hikvision cameras on a PC can be done using Hikvision’s software or through a web browser. Here’s a step-by-step guide to help you access and view your cameras on your PC:
Method 1: Using the iVMS-4200 Client Software
Step 1: Download and Install iVMS-4200
- Visit Hikvision’s Website:
- Go to the Hikvision official website and navigate to the Support or Downloads section.
- Download iVMS-4200:
- Find and download the iVMS-4200 software for your operating system (Windows or macOS).
- Install the Software:
- Run the downloaded installer and follow the on-screen instructions to install the iVMS-4200 software on your PC.
Step 2: Add Your Cameras to iVMS-4200
- Open iVMS-4200:
- Launch the iVMS-4200 software on your PC.
- Device Management:
- Go to the Device Management section.
- Add Device:
- Click on Add to add a new device.
- Enter the required information, such as the camera’s IP address, username, and password (default username is
adminand the password would be the one you set).
- Save the Device:
- Click Add or OK to save the camera to the device list.
Step 3: View the Camera Feed
- Main View:
- Navigate to the Main View tab in iVMS-4200.
- Select Camera:
- Drag and drop the camera from the device list to the viewing window.
- Live View:
- The live feed from the camera should now be visible in the viewing window.
Method 2: Using a Web Browser
Step 1: Find the Camera’s IP Address
- SADP Tool:
- Download and install the SADP Tool from the Hikvision website.
- Use the SADP Tool to scan your network and find the IP address of your Hikvision camera.
- Router’s Device List:
- Alternatively, you can check your router’s connected devices list to find the camera’s IP address.
Step 2: Access the Camera’s Web Interface
- Open a Web Browser:
- Open a web browser (such as Chrome, Firefox, or Internet Explorer) on your PC.
- Enter the Camera’s IP Address:
- Type the camera’s IP address into the browser’s address bar and press Enter.
- Log into the Camera:
- Enter the camera’s username and password (default username is
adminand the default password might be the one you set).
- Enter the camera’s username and password (default username is
Step 3: View the Camera Feed
- Live View:
- Once logged in, navigate to the Live View tab or section of the web interface.
- The live feed from the camera should be displayed in the web browser.
Troubleshooting Tips
- Browser Compatibility:
- Some browsers may require plugins or may not support the camera’s web interface. Internet Explorer is often recommended for full functionality.
- Network Configuration:
- Ensure your camera and PC are on the same network subnet.
- Firmware Updates:
- Keep your camera’s firmware up to date for the best performance and compatibility.
- Firewall Settings:
- Ensure that your PC’s firewall or network firewall is not blocking the camera’s IP address or the ports used by the camera.
By following these steps, you should be able to view your Hikvision cameras on your PC using either the iVMS-4200 client software or a web browser.
Accessing the Camera via the NVR’s Web Interface
- Access the NVR’s Web Interface:
- Open a web browser on a computer connected to the same network as the NVR.
- Enter the IP address of the NVR in the browser’s address bar (e.g.,
http://192.168.1.100). - Log in with your NVR’s username and password (default username is
admin).
- Navigate to the Camera Configuration:
- After logging in, go to the Configuration tab on the top menu.
- On the left-hand menu, click on Camera Management.
- Find the list of connected cameras. (IF at this point you can’t log into the cameras, then Go to NETWORK > ADVANCED SETTINGS > OTHER and ENABLE VIRTUAL HOST)
- Access the Camera’s Web Interface:
- Locate the ColorVu camera you wish to configure.
- Click on the Remote Configuration or Connect link/button next to the camera. This should open a new window or tab with the camera’s web interface.
- If prompted, log in with the camera’s credentials (default username is
adminand the password is usually the same as the NVR or set during the initial configuration).
- Configure the Light Settings:
- Once logged into the camera’s web interface, navigate to the Configuration section.
- Go to Image or Video/Audio settings.
- Look for Supplement Light Settings or Lighting Settings.
- Adjust the Light Mode (e.g., Auto, Manual, Off) and other related settings such as intensity and schedule.
- Save the changes.
this video shows the light settings – https://www.youtube.com/watch?v=T7x_OR9ldFw
This quick guide shows you how to set up an accurate perimeter guarding system and continuous/event recording with an AcuSense camera and AcuSense NVR or a normal IPC and an AcuSense NVR.
STEP 1 – Log into your camera via your NVR via a web browser. Follow the steps in this link below. These acusense operations are only available on the camera and not the NVR, so this step is important.
Open up SADP program (download here – https://www.securitywholesalers.com.au/faqs/hikvision-sadp-tool-can-download/ SADP will give you the IP address of the recorder . You should see the IP address next to the NVR model number.
Step 2
Open up an Internet browser eg. internet explorer and type in the IP address of the NVR. The IP address of the NVR is obtained in step 1.
Step 3
Log in using username and password of the recorder.
Step 4
Go to Configuration > Network > Advanced Settings > Other.
Tick “Enable Virtual Host”
Step 5
Go to Configuration > System > Camera Management > Click on the blue link next to the camera you wish to log into.
Step 6
Log into the camera. (same username / password as the NVR if the NVR activated the camera)
There you have it – you’re now logged into the camera and ready to perform actions on the camera.
NOW YOU CAN COMMENCE PART 2.
ACUSENSE Step 1. Go to Event > Basic event and disable motion detection. ONLY SMART EVENT TO BE USED WITH ACUSENSE CAMS
IMPORTANT THINGS TO NOTE:
Don’t save any lines etc on the NVR itself. Do this on the Camera page only. If you save settings on the NVR page, it will overwrite the Camera’s settings.
On the NVR web menu, please ensure storage requirements are as you require them.
- Log into the IP address of the NVR. (if you’re not sure as to the IP addrress of the NVR, download SADP)
- Go to Configuration > System > Camera (on the right side you should see links to access the cameras).
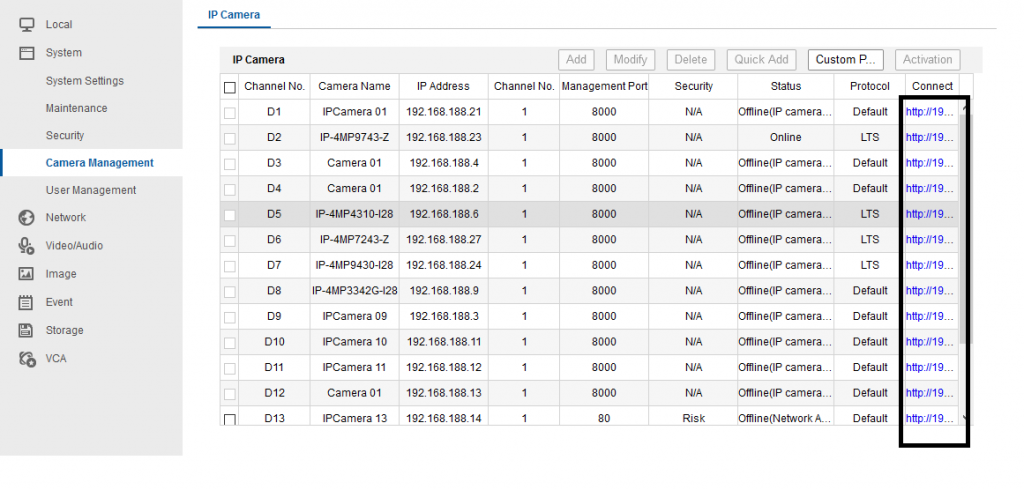
Note- if you cannot find the links visible, please go to:
Network > Advanced Setting > Other >Enable Virtual Host. The links will appear after you enable this.
Yes, you can use them standalone with the strobe or speaker on the camera or with a normal NVR. The filtering gets done in the camera as the camera has deepinview algorithm for human and vehicle filtering.
Key points:
AcuSense cameras don’t support intrusion/line crossing detection and motion detection at the same time.
Continuous recording is recommended when cameras work in AcuSense mode.
Yes.
Hikvision’sAcuSense Live-Guard Solution works as an arming/disarming solution via APP/NVR alarm inputinterface.Themain function includes Away Arm,Stay Arm,Dis-Arm,ClearArm, etc
NVR Firmware for I Series – V4.40.010 / Acusense V5.5.150 https://www.securitywholesalers.com.au/firmware/liveguard/
Note – this is Beta firmware. Hikvision is due to release the proper version end of January 2021.
SADP stands for search active device protocol, it’s Hikvision’s free and simple utility for searching Hikvision products (including IP cameras and DVRs/NVRs) in the local network.
Its commonly used for:
- resetting password
- Finding out what firmware is currently used
- changing IP addresses
We have recently been advised of a hack involving changing the on screen display of users.
Below are some steps from Hikvision themselves:
- Change your NVR password – its likely too easy. Create strong passwords that consist of a combination of uppercase and lowercase letters, numbers, and special characters. It is crucial for passwords to be a minimum of eight characters long and avoid easily guessable information such as names, birthdates, or common words. https://www.sourcesecurity.com/security-videos/password-security-securing-hikvision-dvr-nvr-and-ip-camera.html
- 2. Upgrade your firmware From Hikvision AU website
- 3. DISABLE UPnP for your router. Disable UPnP (Universal Plug and Play): Suggest that your customers disable the UPnP feature on their routers. UPnP can be exploited by hackers to gain unauthorized access to devices on the network. By deactivating UPnP, only authorized devices and services will be allowed to connect to the network.
- 4. Edit the On Screen Display to remove the message https://www.youtube.com/watch?v=Qtjl8AFnTEQ
By adhering to these recommendations, customers can significantly reduce the risk of their CCTV systems being compromised and prevent unauthorised access.
BELOW IS THE FULL EMAIL FROM HIKVISION
We have discovered and determined that certain Hikvision NVRs and DVRs may be impacted by a scripted application.
“When the UPnP/NAT feature is enabled and the ports are open, the hacker scans the router to find the IP addresses/ports and then tries brute force attacks utilising generic passwords in an attempt to log into the device”
By accessing the camera or NVR/DVR web page they then over right the OSD Text Overlay and display the message:
“Your CCTV is vulnerable and can be exposed,
Fix it pls – DIY or Telegram me – faxociety”
The devices may be affected if:
- Weak passwords that contain only letters and numbers are used
- They are exposed directly on the open Internet when UPnP/NAT feature is enabled or Port forwarding using default port settings;
We recommend that actions be taken to mitigate potential risks. Please ensure the following hardening practices are employed to provide additional resilience for your customers.
- As always, password strength is critical. Ensure your customers set up complex passwords containing letters (uppercase and lowercase), numbers, and special characters.
- Please avoid using the same password multiple times when deploying security systems.
- In general, we recommend that you disable the UPNP/NAT feature on devices, this will not affect communication with the Hik-Connect server.
In order to delete the text overlay access the devices via your browser, navigate to the menu configuration, image, OSD setting, and then delete the texts. Please then take the above preventative actions.
1. On your Hik Connect app, click on SERVICES
2. Authorise your installer email to your hik connect account
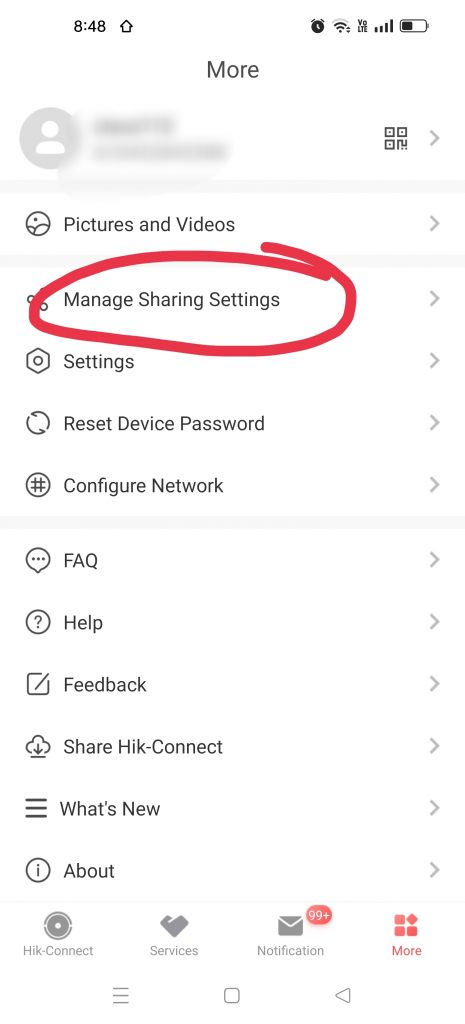

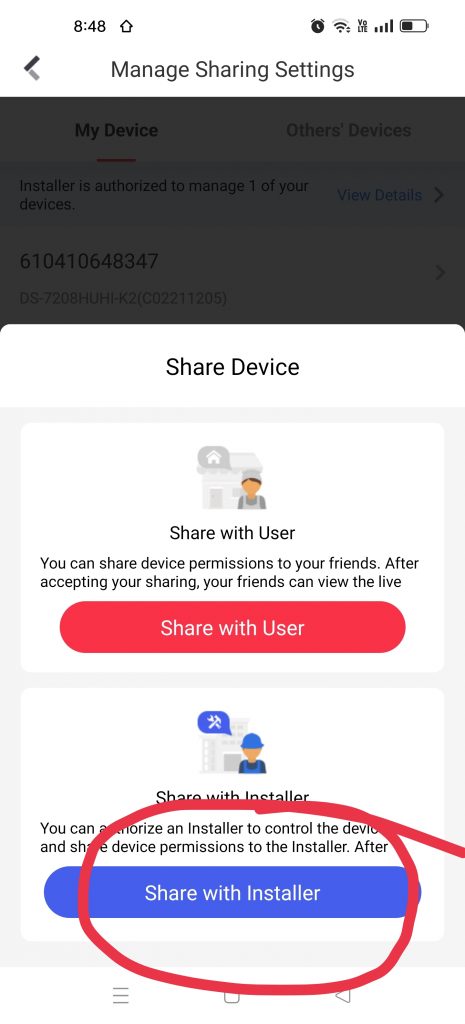
then enter your installer’s provided email ID.
When done providing support, you can remove access to the installer as well.
This below guide will take you step by step through the process
Some cams, especially newer cams adding to an older NVR need to be added via ONVIF.
Step 1: Log into the camera.
Enable ONVIF on the camera.
– this video shows you that you need to log in, enable ONVIF, and add a user to the camera under username admin. NOTE only the first 1/2 of the video is relevant. Disregard the part where they log into the 3rd party NVR.Step 2: Add to the NVR manually (not plug and play)
username = admin password = password of the camera (which is likely the same as the NVR if it adopted the NVR password)
==============
When a camera is plugged into the PoE ports on the back of a Hikvision NVR, it is NOT on your normal LAN.
-
The NVR creates a private PoE network (usually
192.168.254.x) -
Your PC is on a different network (e.g.
192.168.1.x) -
You cannot browse to the camera IP directly from your PC
So you must access the camera through the NVR.
METHOD 1 (Most common & correct)
Log into the camera via the NVR’s Virtual Host
This works on most Hikvision & HiLook NVRs, even older firmware.
Step-by-step (via monitor + mouse)
-
Connect a monitor & mouse to the NVR
-
Log in as admin
-
Go to:
Menu → Camera → Camera Management → IP Camera -
Locate the camera that is plugged in
-
It will usually show:
-
IP like
192.168.254.2 -
Status: Inactive / Offline / Password error
-
-
-
Click the camera and choose Edit or Modify
-
Look for Virtual Host (or “Web” / “Link” icon)
-
Click Virtual Host
This opens the camera’s own web interface, tunneled through the NVR.
Camera login credentials
-
Username:
admin -
Password:
-
Either the camera’s original password, OR
-
On many older systems: the same password as the NVR admin
-
⚠️ If you see “Wrong password”, it means:
-
The camera was previously initialised elsewhere
-
Or it has a different admin password
Once logged into the camera
Now do the following:
-
Go to:
Configuration → Network → Advanced → Integration Protocol -
Enable:
-
☑ ONVIF
-
☑ Hikvision-CGI (if present)
-
-
Create an ONVIF user
-
Username:
onvif -
Password: (strong password)
-
Permission: Administrator
-
-
Save / Apply
Now the camera is ready to be added manually via ONVIF.
METHOD 2 (If Virtual Host does NOT exist – very old firmware)
Some very old NVR firmware does not support Virtual Host.
In that case, do this:
Use this method only if the NVR firmware is very old and does NOT support Virtual Host, or you cannot access the camera via the NVR.
Step-by-step
-
Disconnect the Ethernet cable from the NVR’s LAN port
-
This is the port that normally goes to the modem/router.
-
-
Plug that Ethernet cable into one of the NVR’s PoE camera ports
-
You are temporarily using the NVR’s PoE network as your access path.
-
-
Leave the camera plugged into a different PoE port on the NVR
-
Both your computer and the camera are now on the same PoE subnet
-
Typically:
192.168.254.x
-
-
Connect your computer to the Ethernet cable
-
Disable Wi-Fi on your computer (important).
-
Your PC will now receive an IP from the NVR’s PoE network.
-
-
Run the Hikvision SADP Tool
-
The camera should now appear.
-
Note the camera IP address (usually
192.168.254.2,.3, etc.).
-
-
Log into the camera via web browser
-
Enter the camera IP address in your browser.
-
Username:
admin -
Password:
-
Either the camera’s original password, or
-
On many older systems, the same password as the NVR admin.
-
-
-
Enable ONVIF on the camera
-
Go to:
Configuration → Network → Advanced → Integration Protocol -
Enable:
-
☑ ONVIF
-
☑ Hikvision-CGI (if available)
-
-
Create an ONVIF user:
-
Username:
onvif -
Password: strong password
-
Permission: Administrator
-
-
Save / Apply.
-
-
(Optional but recommended)
Confirm the camera IP remains in the192.168.254.xrange. -
Restore normal cabling
-
Plug the Ethernet cable back into the NVR LAN port
-
Reconnect NVR to the router/modem.
-
-
Add the camera to the NVR using ONVIF
-
Go to:
Menu → Camera Management → IP Camera -
Add the camera manually using:
-
Protocol: ONVIF
-
IP address: camera IP
-
Username/password: ONVIF user created above
-
-
Common gotchas (very important)
❌ “I tried typing the camera IP in my browser and it didn’t load”
That is expected behaviour when the camera is on the NVR PoE network.
❌ “Wrong username or password”
Means one of:
-
Camera was previously initialised
-
Camera admin password ≠ NVR admin password
-
ONVIF user does not exist yet
⚠️ Factory reset note
On older Hikvision cameras, factory reset often:
-
Requires holding reset button while powering
-
May NOT clear password without SADP (depends on model)
Enabling two-way audio on your Hikvision camera allows you to communicate through the camera using a built-in or external microphone and speaker. Here’s how you can set up and use two-way audio on your Hikvision camera:
Step 1: Verify Audio Capabilities
- Check Camera Specifications:
- Ensure that your Hikvision camera model supports two-way audio. Not all cameras have built-in microphones and speakers or the necessary audio input/output ports.
- Microphone and Speaker:
- If your camera does not have built-in audio hardware, you will need an external microphone and speaker connected to the camera’s audio input/output ports.
Step 2: Connect Audio Devices
- Connect External Microphone and Speaker:
- If your camera requires external audio devices, connect a microphone to the camera’s audio input port and a speaker to the audio output port.
Step 3: Access the Camera’s Web Interface
- Find the Camera’s IP Address:
- Use the SADP Tool or check your router’s connected devices list to find the camera’s IP address.
- Log into the Camera:
- Open a web browser and enter the camera’s IP address.
- Log in with your camera’s username and password (default username is
adminand the password is the one you set).
Step 4: Enable Audio in Camera Settings
- Navigate to Configuration:
- Go to the Configuration or Settings menu in the web interface.
- Audio Settings:
- Find the Audio or Audio/Video section.
- Enable the audio input and output options. This might be labeled as Enable Audio, Enable Microphone, or similar.
- Adjust Audio Parameters:
- Adjust the volume and quality settings for the microphone and speaker as needed.
Step 5: Configure Two-Way Audio in Software or App
- Hik-Connect App:
- Open the Hik-Connect app on your smartphone or tablet.
- Select the camera you want to use for two-way audio.
- Tap the Microphone icon to start a two-way audio session.
- Speak into your device’s microphone to communicate through the camera’s speaker.
Step 6: Test the Two-Way Audio
- Test Communication:
- Speak into the microphone and listen through the camera’s speaker to ensure audio is being transmitted correctly.
- Test the audio from the camera’s location to ensure you can hear responses clearly.
Troubleshooting Tips
- Check Connections: Ensure that all audio devices are properly connected and functioning.
- Update Firmware: Make sure your camera’s firmware is up to date to support the latest features and fixes.
- Adjust Audio Levels: If the audio is too low or too loud, adjust the microphone and speaker volume settings in the camera’s web interface.
- Network Configuration: Ensure your network is stable and has sufficient bandwidth to support audio streaming.
By following these steps, you should be able to enable and use two-way audio on your Hikvision camera, allowing for effective communication through the camera.
Step-by-Step Guide to Reset a Hikvision Camera via the Reset Button
Step 1: Locate the Reset Button
- Identify the Reset Button:
- The reset button is typically located inside the camera housing. Depending on the model, you may need to remove the camera’s cover or dome to access it.
- For some models, the reset button might be a small pinhole button that requires a paperclip or similar tool to press.
Step 2: Prepare the Camera
- Power Off the Camera:
- Disconnect the power supply to the camera. If the camera is powered via PoE (Power over Ethernet), disconnect the network cable.
Step 3: Perform the Reset
- Press and Hold the Reset Button:
- Press and hold the reset button using a suitable tool (such as a paperclip for pinhole buttons).
- While holding the reset button, reconnect the power supply or network cable to the camera.
- Hold the Button for 10-15 Seconds:
- Continue to hold the reset button for approximately 10-15 seconds. You may observe the camera’s indicator lights flashing during this time.
- Release the Button:
- After 10-15 seconds, release the reset button.
Step 4: Wait for the Camera to Reboot
- Camera Reboot:
- Allow the camera a few minutes to reboot. The camera will reset to its factory default settings during this process.
Step by step to reset your Hikvision camera:
- Locate the Reset button on the camera (this is under the SD card slot of most cams)
- Power off the camera by disconnecting the camera power supply cable or the PoE cable
- Press and hold the reset button;
- Power up the camera
- Keep holding the reset button for 15–20 seconds;
- Release the reset button.
After the camera reset, you need to use the SAPD tool or a web browser to setup it again since it will lose all the previous configuration including IP address.
If you have an NVR, usually when you plug the hikvision camera in, it will Auto Activate and set the NVR password as the new camera password.
What Should I Do If My Hikvision Camera Shows “IP Camera Does Not Exist”?
Question: What should I do if my Hikvision camera shows “IP camera does not exist”?
Answer:
If your Hikvision camera shows the error message “IP camera does not exist,” it indicates a connectivity issue between the camera and the NVR or network. Here’s a step-by-step guide to troubleshoot and resolve this issue:
Step 1: Check Physical Connections
- Verify Power Supply:
- Ensure that the camera is properly powered. If using a PoE switch or NVR, check that the Ethernet cable is securely connected and providing power.
- If using a separate power adapter, confirm that it is plugged in and functioning correctly.
- Check Ethernet Cables:
- Ensure that the Ethernet cable connecting the camera to the network or NVR is properly connected and not damaged.
- Try replacing the Ethernet cable with a known working one to rule out cable issues.
Step 2: Confirm Network Configuration
- IP Address Conflicts:
- Ensure that the IP address of the camera does not conflict with any other devices on the network.
- Use the SADP Tool to scan your network and verify the IP address of the camera.
- Subnet and Gateway:
- Make sure the camera’s IP address is on the same subnet as the NVR.
- Check the gateway settings to ensure they are correctly configured.
Step 3: Use the SADP Tool for Troubleshooting
- Download and Install SADP Tool:
- Download the SADP Tool from the Hikvision website and install it on your computer.
- Scan for Devices:
- Open the SADP Tool and let it scan your network for Hikvision devices.
- Check Camera Status:
- Find your camera in the list and check its status. If it shows as “Inactive,” you need to activate it by setting a new password.
- Modify Network Settings:
- If necessary, use the SADP Tool to modify the camera’s IP address, subnet mask, and gateway settings to ensure they match the network configuration.
Step 4: Access the Camera’s Web Interface
- Log into the Camera:
- Open a web browser and enter the camera’s IP address.
- Log in with the camera’s username and password (default username is
adminand the default password might be12345or the one you set).
- Check Camera Settings:
- Navigate to the network settings and ensure that all configurations are correct.
- Check for firmware updates and apply them if necessary.
Step 5: Add the Camera to the NVR Manually
- Access the NVR’s Camera Management:
- Log into your NVR’s web interface or use the local interface.
- Navigate to Configuration > Camera Management.
- Manual Camera Addition:
- Click on the Add or Manual Add button.
- Enter the camera’s IP address, port, username, and password.
- Choose the correct protocol (e.g., Hikvision or ONVIF).
- Save the settings and check if the camera appears online.
Step 6: Reset the Camera
- Factory Reset:
- If all else fails, perform a factory reset on the camera. Locate the reset button (usually a small pinhole) and press it for about 10-15 seconds while the camera is powered on.
- After the reset, reconfigure the camera and try adding it to the NVR again.
Step 7: Additional Troubleshooting
- Firmware Compatibility:
- Ensure that both the NVR and the camera are running the latest firmware versions to avoid compatibility issues.
- Network Equipment:
- Check if other network devices (switches, routers) are functioning correctly and not blocking the camera’s connection.
- Consult Support:
- If the issue persists, contact our support for further assistance.
By following these steps, you should be able to troubleshoot and resolve the “IP camera does not exist” error and get your Hikvision camera back online.
If the IP camera and NVR are both new, then Hikvision’s cams and NVR will automatically active in most cases, this is becuase the NVR will auto activate cameras connected into it, but this will only work with newer firmware.
In a scenario where they dont,
Question: How do I add a Hikvision IP camera to my NVR?
Answer:
Adding a Hikvision IP camera to your NVR involves a few steps to ensure the camera is properly connected and configured. Here’s a step-by-step guide to help you add your IP camera to your Hikvision NVR:
Step 1: Connect the Camera and NVR to the Network
- Power Up the Devices:
- Connect the Hikvision IP camera to a power source.
- Connect the NVR to a power source.
- Network Connection:
- Use an Ethernet cable to connect the IP camera to the same network as the NVR, typically through a network switch or router.
- If your NVR has PoE ports, you can connect the IP camera directly to one of the PoE ports on the NVR. This will provide both power and network connectivity to the camera.
Step 2: Access the NVR’s Web Interface
- Find the NVR’s IP Address:
- You can find the IP address of your NVR by checking your router’s connected devices list or using the SADP Tool, which scans the network for Hikvision devices.
- Log into the NVR:
- Open a web browser on your computer.
- Enter the NVR’s IP address in the address bar.
- Log in with your NVR’s credentials (default username is usually
adminand the default password might be12345or the one you set).
Step 3: Add the IP Camera to the NVR
- Navigate to Camera Management:
- Go to the Configuration or System Settings section.
- Click on Camera Management or Camera Settings.
- Add the Camera:
- Click the Add or Manual Add button to add a new camera.
- Enter the IP address of the Hikvision IP camera. If the camera is connected directly to the NVR via a PoE port, select the corresponding PoE port.
- Enter the camera’s username and password (default username is
adminand the password is the one you set during initial configuration for the camera). - Choose the protocol (e.g., Hikvision or ONVIF).
- Save the Configuration:
- Click OK or Save to add the camera to the NVR.
- The NVR will start communicating with the camera and should display the camera’s video feed.
Step 4: Verify the Connection
- Check the Camera Status:
- Go back to the Camera Management page and ensure the camera status shows as Online.
- Live View:
- Go to the Live View section to check if the camera’s feed is displayed correctly. This may or may not work depending on the browser. You may need internet explorer to get this working.
Troubleshooting Tips
- Firmware Compatibility: Ensure that both the NVR and the IP camera are running the latest firmware versions to avoid compatibility issues.
- Network Configuration: Double-check the IP address and network settings to ensure the camera and NVR are on the same subnet.
- Resetting Devices: If the camera doesn’t appear, try resetting the camera to factory settings and reconfigure it.
- SADP Tool: Use the SADP Tool to find and activate the camera if it’s not recognized by the NVR.
By following these steps, you should be able to successfully add your Hikvision IP camera to your NVR and start monitoring your security feed.
FOR SOME CAMS – YOU MAY ALSO NEED TO ENABLE ONVIF USER ON YOUR CAMERA.
1. Log into the Hikvision Camera Web Interface
-
Locate the camera’s IP address on your network. You can use Hikvision’s SADP Tool, Batch Configuration Tool, or an ONVIF device scanner.
-
Open a web browser (Chrome, Firefox, or Internet Explorer) and enter that IP in the address bar.
-
Log in using your Admin username and password. If you’re using default credentials, you may be prompted to change the password during first login. If you plugged it into the NVR, the username / password may be the NVRs one.
2. Enable ONVIF on the Camera
-
Navigate to Configuration → Network → Advanced Settings → Integration Protocol.
-
Tick the checkbox for Enable ONVIF (sometimes labeled “Enable Open Network Video Interface”).
-
On some firmware versions, you may also need to tick Enable Hikvision-CGI and set the authentication method to digest/basic or Digest & ws-username token.
-
Click Save (or Apply) to commit the changes.
3. Create an ONVIF User
-
Still in the Integration Protocol section, click Add to open the ONVIF user dialog.
-
Create a new user — pick a username (e.g.,
onvifuser), assign a secure password, and set the permission level to Administrator. -
Click OK or Add, then Save the settings.
4. Optional but Recommended Adjustments
-
Disable Illegal Login Lock: Go to Configuration → Security → Security Service, and untick Enable Illegal Login Lock to prevent the camera from locking due to repeated connection attempts.
-
Sync the camera’s time: Go to Configuration → System Settings → Time Settings, and select Sync with Computer Time (or use NTP). This ensures ONVIF authentication works properly.
-
Adjust Authentication Methods: If integration issues occur, go to Configuration → Security → Authentication and set RTSP/Web authentication to digest/basic.
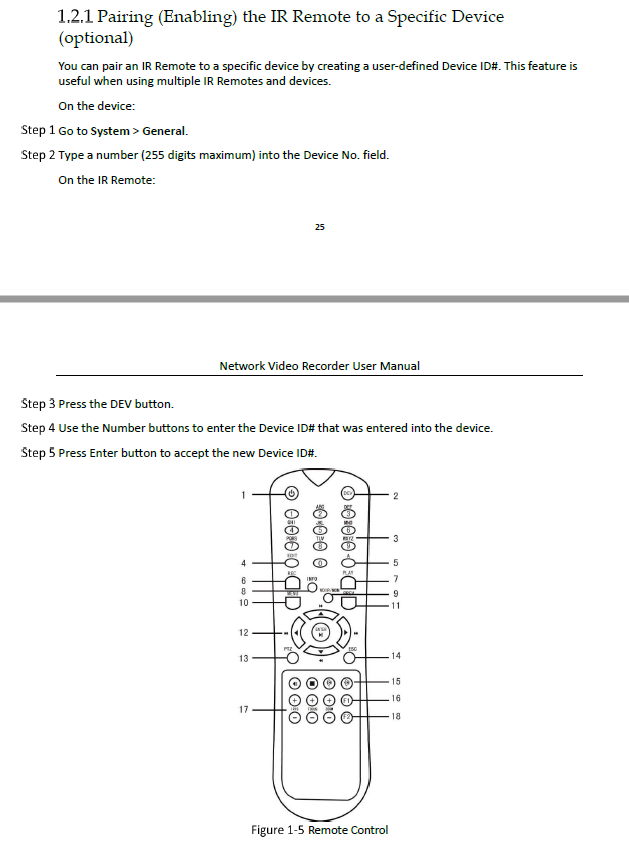
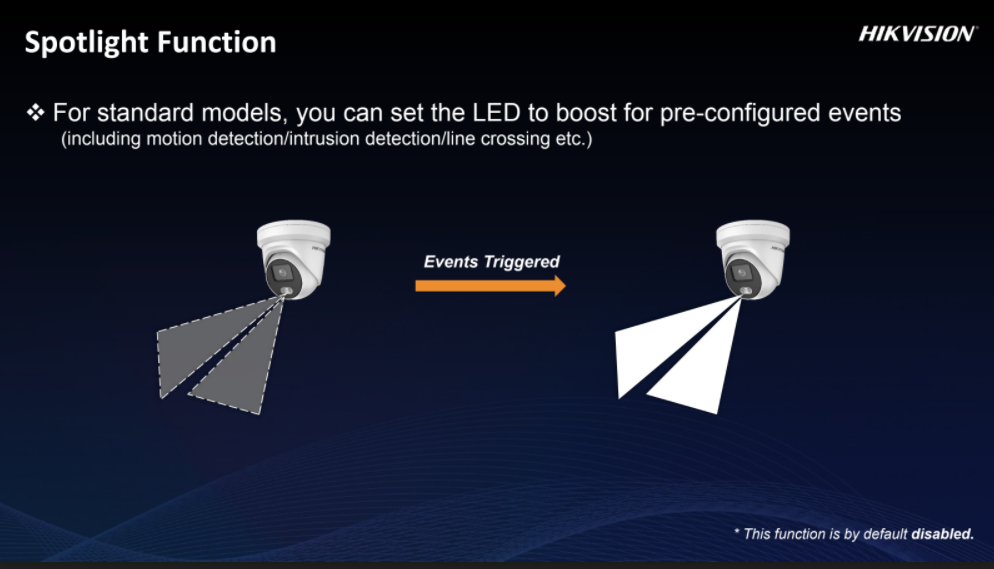
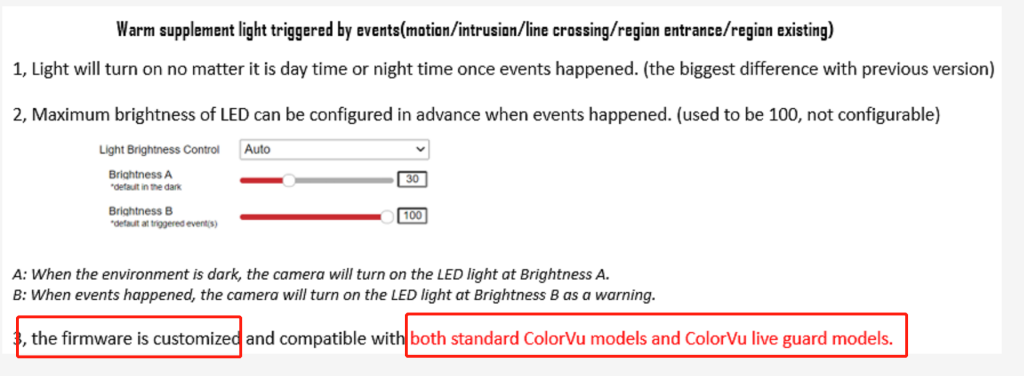
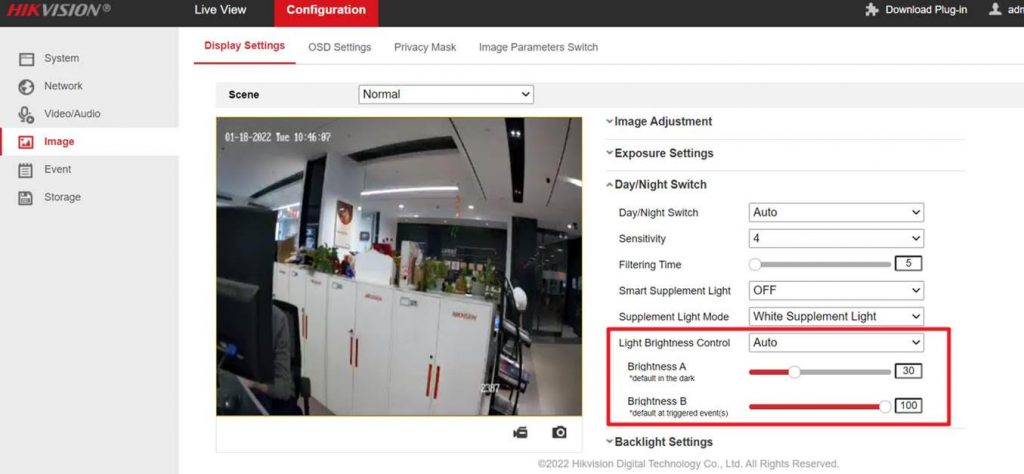
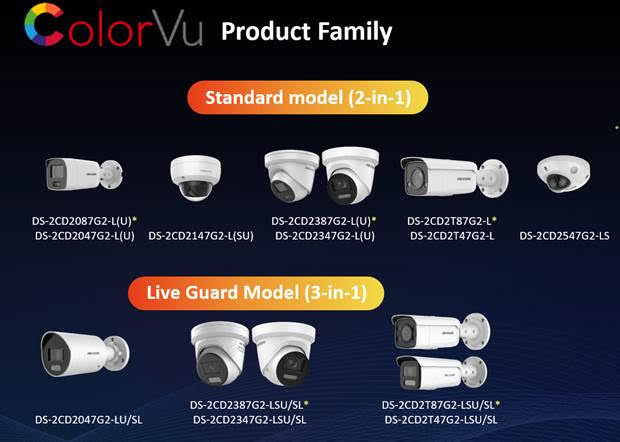
Download at your own risk. This is custom firmware to allow G5 /SL model cameras to adjust the brightness of the LED when event is triggered. Firmware 5.7.2_220223_Firmware_adjustingBrightness
This quick guide shows you how to set up an accurate perimeter guarding system and continuous/event recording with an AcuSense camera and AcuSense NVR or a normal IPC and an AcuSense NVR.
NOTE – IF YOU HAVE A LATE MODEL V5 NVR and a late model camera, the configuration has changed and can be found here (you no longer need to log into the camera):
How to set up Liveguard in V5 NVR and Hik-Connect APP with new baseline firmware
STEP 1 – Log into your camera via your NVR via a web browser. Follow the steps in this link below. These acusense operations are only available on the camera and not the NVR, so this step is important.
Open up SADP program (download here – https://www.securitywholesalers.com.au/faqs/hikvision-sadp-tool-can-download/ SADP will give you the IP address of the recorder . You should see the IP address next to the NVR model number.
Step 2
Open up an Internet browser eg. internet explorer and type in the IP address of the NVR. The IP address of the NVR is obtained in step 1.
Step 3
Log in using username and password of the recorder.
Step 4
Go to Configuration > Network > Advanced Settings > Other.
Tick “Enable Virtual Host”
Step 5
Go to Configuration > System > Camera Management > Click on the blue link next to the camera you wish to log into.
Step 6
Log into the camera. (same username / password as the NVR if the NVR activated the camera)
There you have it – you’re now logged into the camera and ready to perform actions on the camera.
NOW YOU CAN COMMENCE PART 2.
ACUSENSE Step 1. Go to Event > Basic event and disable motion detection. ONLY SMART EVENT TO BE USED WITH ACUSENSE CAMS
Here is a quick start guide as to how to configure Acusense cams.
Quick config guide of Acusense function (PDF)
Some customers have advised they are getting max bandwidth issues with their 8MP cameras. Below are recommended settings from Hikvision to ensure you don’t have bandwidth issues while retaining the full 8MP resolution.
1. Main stream (normal) resolution is still 8MP, Bitrate type is Variable, Frame rate is 15, Max. Bitrate is 6144 kbps, Video encoding H.264, H264+ or H265 or H265+, I frame interval is 40.
2. Main stream (Event) resolution is still 8MP, Bitrate type is Variable, Frame rate is 15, Max. Bitrate is 6144 kbps,
3. Sub stream resolution choose the highest one but lower than 1920 * 1080, Bitrate type is Variable, Frame rate is 15, Max. Bitrate is 768 kbps, Video encoding H.264.
If you don’t have I Frame interval settings, please kindly disregard.
NOTE – If you have decoding issues eg. no resource when viewing cams at the same time:
please go to NVR local monitor, Configuration – Live view – Layout – More settings. Change Stream Type from Auto to Sub stream. So in multi-play mode it uses sub stream while viewing single live view it uses main stream resolution.
A common question relating to blurry images relates to vandalproof domes – night time images can appear blurry or foggy due to dirty/greasy dome bubble, reflection from nearby objects or loose foam ring around the camera lens.
Hikvision has produced the following document to help troubleshoot and solve these issues.
Your hikvision camera could potentially send you notifications when faces are detected.
Please excuse the quality of the video, but the content is good
Hik-Connect is a new service introduced by Hikvision which integrates the dynamic domain name service (HiDDNS) along with alarm push notification service. It provides an easy way for devices to connect to the Internet.
APP STORE LINK – https://itunes.apple.com/au/app/hik-connect/id1087803190?mt=8
ANDROID LINK – https://www.me-app.net/HikvisionAppStore
USEFUL VIDEO TO SEE HOW THIS IS SETUP DONE – https://www.youtube.com/watch?v=sNtB7Cjm7HY
FULL HIK CONNECT USER MANUAL – Hik-connect-Mobile-Client-Software-(iOS)-User-Manual
This Video shows you how to upgrade your Camera firmware from the NVR.
Hikvision Australia’s website has firmware updates for available IP cameras.
https://www.hikvision.com/au-en/Support/Downloads/Firmware/IPC
NOTE this is only for IPC.
You will need to contact us if you can’t find your camera listed or if you require firmware for your NVR / DVR.
You will need to also provide the full serial number of the device as well as your current firmware.
This is to ensure upgrades are done properly. In some instances middlle firmware is required before upgrading to the latest version.
We do not recommend doing intercom firmware upgrades. Please check with us if there is any doubt.
The below FAQ explains how to configure the motion detection alarm via Hikvision IVMS4200. This is useful if you’d like to know when an event occurs on one of your cameras.
Please kindly read the below FAQ to find out how to configure / set up event recording with the storage server on IVMS4200.
This FAQ explains how to download playback videos from the Hikvision IVMS4200
Video which explains how to share / receive device on the Hikvision App. (allows you to share your feed with other Hik Connect accounts)
Instructions as to how to configure preset / patrol and patterns on a Hikvision PTZ
Instructions as to how to extract Hikvision video files using the browser.
- Check power supply: Ensure the camera is powered on and receiving adequate power.
- Verify video connections: Check that video cables (BNC or Ethernet) are properly connected to the DVR/NVR.
- Inspect the camera status in NVR: Ensure the camera is correctly added and recognized by the NVR.
- Restart the camera and NVR: Power cycle both devices to reset connections.
✅ Step-by-step Troubleshooting
1️⃣ Check the Power
-
Ensure the camera is actually powered on.
-
If powered by PoE (Power over Ethernet):
-
Check the PoE switch or the NVR’s PoE port.
-
Try plugging the camera into another PoE port.
-
Verify the total PoE power budget is not exceeded.
-
-
If powered by separate power adapter:
-
Check the adapter and the outlet.
-
Test with a different known-working power adapter.
-
-
2️⃣ Inspect the Cables and Connections
-
For IP cameras:
-
Check the Ethernet cable for damage or loose connections.
-
Swap the cable with a known good one.
-
-
For analogue cameras:
-
Check both the BNC video cable and the power cable.
-
Make sure the connectors are properly seated.
-
Test with a different coaxial cable and/or balun.
-
3️⃣ Test the Camera on Another Port or Recorder
-
Plug the camera into a different port on the NVR/DVR.
-
If possible, test the camera on another recorder to rule out a bad port.
4️⃣ Ping the Camera (IP Cameras)
-
If it’s an IP camera on the network:
-
Find the camera’s IP using SADP tool or NVR’s interface.
-
Open Command Prompt and run:
-
If there’s no response, the camera is not connected to the network properly.
-
5️⃣ Check Camera Settings
-
If the camera is added manually by IP, ensure:
-
The IP address matches the camera.
-
The password is correct.
-
The camera’s encoding (e.g., H.264) is compatible with the NVR.
-
-
If using plug-and-play, try deleting and re-adding the camera on the NVR.
6️⃣ Firmware Issues
-
Mismatched firmware can sometimes cause compatibility problems.
-
Make sure both the NVR and camera firmware are up-to-date.
-
7️⃣ Camera Hardware Fault
-
If after all of the above the camera still shows no signal, test another camera on the same port.
-
If another camera works, your original camera may be faulty.
-
If no camera works on that port, the port or the recorder may have failed.
Hikvision Camera Diagnostic Sheet
Camera Location/ID: ___________________________
Date: ___________________
Technician: ___________________________
Step 1: Power Check
✅ Is the camera powered on?
☐ Yes
☐ No
Power source:
-
☐ PoE (via NVR/Switch)
-
☐ 12V DC Adapter
If PoE:
-
Port LED indicator lights up?
☐ Yes
☐ No -
Try another PoE port:
☐ Works
☐ Doesn’t Work
If Adapter:
-
Voltage tested OK?
☐ Yes
☐ No -
Tried different adapter?
☐ Yes
☐ No
Step 2: Cabling Check
✅ Inspect cables and connections:
-
Cable securely plugged in at both ends?
☐ Yes
☐ No -
Visible cable damage?
☐ Yes
☐ No -
Tried a new cable?
☐ Yes
☐ No
Step 3: Recorder/Port Check
✅ Test on another port:
☐ Works
☐ Doesn’t Work
✅ Test another camera on this port:
☐ Works
☐ Doesn’t Work
✅ Test this camera on another recorder (if available):
☐ Works
☐ Doesn’t Work
Step 4: Network Check (IP Cameras)
✅ Camera detected by SADP tool?
☐ Yes
☐ No
✅ Camera responds to ping?
☐ Yes
☐ No
✅ Correct IP address and subnet?
☐ Yes
☐ No
✅ Password correct?
☐ Yes
☐ No
✅ Protocol and stream type compatible?
☐ Yes
☐ No
Step 5: Firmware/Settings
✅ NVR firmware up-to-date?
☐ Yes
☐ No
✅ Camera firmware up-to-date?
☐ Yes
☐ No
✅ Camera added properly on NVR?
☐ Yes
☐ No
Findings & Next Steps:
✅ Conclusion:
-
☐ Camera operational after troubleshooting
-
☐ Camera likely faulty — recommend replacement
-
☐ Recorder/port issue — further testing needed
-
☐ Other: ___________________________
Comment on this FAQ
You must be logged in to post a comment.
- Download the latest firmware: Visit the Hikvision website and find the latest firmware for your camera model.
- Access the camera’s web interface: Log in to the camera’s web interface using its IP address.
- Navigate to “Maintenance”: Go to “Configuration” > “Maintenance” > “Upgrade.”
- Upload the firmware file: Click “Browse,” select the firmware file, and click “Upgrade.”
- Wait for the process to complete: Do not power off the camera during the update.
- Check recording schedule: Ensure the camera is set to record continuously or on motion detection.
- Verify storage availability: Check if the hard drive has sufficient space and is functioning correctly.
- Confirm camera-NVR connection: Make sure the camera is properly connected to the NVR.
- Inspect the recording settings: Verify that the correct recording parameters (resolution, bitrate) are configured.
Why is my Hikvision camera not recording?
If your Hikvision camera is not recording as expected, here are the key areas to check and resolve the issue:
✅ 1. Check the Recording Schedule
-
Make sure the camera is configured to record at the desired times.
-
For continuous recording, ensure the schedule is set to “Continuous” for all days and times.
-
For motion detection recording, confirm that motion detection is enabled and properly configured in the camera settings, and that the schedule reflects this mode.
-
Verify that no time periods are left blank in the schedule grid.
-
✅ 2. Verify Storage Availability
-
Check the NVR/DVR’s hard drive status:
-
Ensure the hard drive is installed, detected, and formatted.
-
Confirm that there is sufficient free space available.
-
Look for any disk errors or warnings in the system logs that could indicate a failing drive.
-
If the drive is full and overwrite is disabled, the system may stop recording.
-
✅ 3. Confirm Camera-to-NVR Connection
-
Make sure the camera is properly added and connected to the NVR:
-
The camera should appear online in the NVR’s camera list.
-
Check that the camera stream is visible on the live view.
-
Resolve any “offline” or “disconnected” status before proceeding.
-
✅ 4. Inspect Recording Settings
-
Verify that the correct recording parameters are configured:
-
Resolution and bitrate should be set within the NVR’s supported range.
-
Ensure the stream selected for recording (main stream or sub stream) is properly configured.
-
Check that recording is enabled for the specific camera on the NVR.
-
Additional Tips:
-
Reboot the NVR/DVR and camera if changes don’t take effect immediately.
-
Ensure the system time and date are correct — incorrect time can lead to gaps in recording or inaccessible footage.
-
Review the NVR’s log files for any errors or alerts related to recording.
- Log in to the camera’s web interface: Use the camera’s IP address to access its web interface.
- Go to “Event” settings: Navigate to “Configuration” > “Event” > “Basic Event” or “Smart Event.”
- Enable motion detection: Toggle the motion detection option to “On.”
- Define detection area: Draw the areas on the camera’s view where motion detection should be active.
- Adjust sensitivity: Set the sensitivity level according to your requirements.
- Link actions: Configure what happens when motion is detected, such as recording, sending notifications, or triggering alarms.
- Check network bandwidth: Ensure your network can handle the data stream from the camera, especially if multiple cameras are in use.
- Adjust camera settings: Lower the camera’s resolution or bitrate to reduce the load on the network.
- Optimize streaming: Use the sub-stream for live view in the NVR or software to reduce bandwidth usage.
- Check device performance: Ensure the device you are using to view the camera (PC, NVR) is not overloaded with other tasks.
- Use the SADP tool: Download and open the SADP tool on a computer connected to the same network as the camera.
- Select the camera: Choose your camera from the list displayed by SADP.
- Assign a new IP address: Input a new IP address that is within your network’s range and click “Save.”
- Configure via web interface: Alternatively, log in to the camera’s web interface and adjust the IP settings under “Network Configuration.”
- Check for a built-in microphone: Ensure the camera has an integrated microphone or an external one connected.
- Enable audio settings: In the camera’s web interface, go to “Configuration” > “Audio” and ensure that audio is enabled.
- Check NVR settings: Verify that the NVR is configured to record audio along with video.
- Test playback: During playback, ensure the volume is turned up and that the audio track is selected.
- Enable port forwarding: Set up port forwarding on your router for the camera’s IP address and ports (e.g., HTTP, RTSP).
- Use Hik-Connect app: Download the Hik-Connect app and add your camera using its serial number or IP address.
- Configure DDNS (optional): Set up a Dynamic DNS service if you have a dynamic IP address.
- Enable remote access: Ensure the camera’s network settings allow for remote access and that the Hik-Connect service is active.
- Clean the camera lens: Use a soft, lint-free cloth to clean any dirt or smudges from the lens.
- Adjust the focus manually: If the camera has a manual focus ring, adjust it until the image is clear.
- Check camera settings: Verify that the camera’s resolution and image settings are optimized for clarity.
- Update firmware: Ensure the camera’s firmware is up to date, as updates can improve image quality.
PART 1: Enable Smart Event (Line Crossing Detection) via NVR Local UI
✅ Step 1: Log in to the NVR (monitor connected to NVR)
-
Use your mouse to right-click → select Menu.
-
Log in with your admin credentials.
✅ Step 2: Access Smart Event
-
Go to Menu > Camera > Smart Event.
-
Select your Camera (e.g., D1).
-
Choose Line Crossing Detection from the list.
-
Tick Enable.
✅ Step 3: Configure Line
-
Click Draw Area.
-
Use your mouse to draw a line on the video view.
-
Left click to start, left click to end.
-
Double-click to finish.
-
-
Set the Direction (A→B, B→A, or both).
-
Set the Sensitivity (default is ~60–70%).
-
Set Target Detection (e.g., human only — if your model supports it).
✅ Step 4: Set Schedule & Linkage
-
Go to the Schedule tab.
-
Set to All Day or define active hours.
-
-
In Linkage Action, tick:
-
Trigger Recording
-
Notify Surveillance Center
-
(Optional) Buzzer, Email, etc.
-
-
Press Apply to save.
PART 2: Enable Audio Recording via NVR Local UI
✅ Step 1: Confirm Audio is Enabled in Camera Stream
-
Go to Menu > Camera > Video.
-
Select your camera channel.
-
Ensure Stream Type = Video & Audio.
-
Click Apply.
✅ Step 2: Confirm Audio Recording
-
Go to Menu > Record > Parameters.
-
Select your camera.
-
Confirm Stream Type = Video & Audio.
-
Click Apply.
✅ Step 3: Check Audio During Playback
-
Go to Menu > Playback.
-
Select the camera and time.
-
Use the bottom control bar → Click the speaker icon.
-
Turn up your monitor’s volume (audio is played through the NVR’s HDMI/VGA output).
Comment on this FAQ
You must be logged in to post a comment.
What You’ll Need
-
Hikvision NVR (older firmware, e.g. 3.3.x or 4.x.x)
-
Hikvision IP camera (unactivated)
-
Windows PC with SADP Tool installed
-
Ethernet cables
⚙️ Step 1 — Physical Connections
-
Disconnect the LAN cable from the NVR’s LAN port (the one going to your modem/router).
-
Plug that LAN cable into one of the PoE ports on the NVR.
-
Connect your PC to another PoE port on the NVR.
-
Connect the new camera to any remaining PoE port.
At this stage:
The NVR PoE ports form an isolated subnet (e.g. 192.168.254.x).
The PC and camera are on that same subnet.
Step 2 — Launch and Use SADP Tool
-
Open SADP Tool on your PC.
-
It will automatically discover the NVR and the unactivated camera.
-
Select the unactivated camera.
-
Enter a password — use the same password as your NVR.
-
Click Activate → it should now show as Activated.
Step 3 — Assign the Correct IP Address
-
After activation, note the camera’s default IP (usually
192.0.0.64). -
Match it to your NVR’s existing PoE subnet.
-
Example:
→ Assign new camera 192.168.254.5.
-
-
In SADP:
-
Tick Enable DHCP (optional) or enter manually:
-
IP Address:
192.168.254.5 -
Subnet Mask:
255.255.255.0 -
Gateway:
192.168.254.1
-
-
Enter the camera password and click Modify.
-
️ Step 4 — Add the Camera Manually in the NVR
-
On the NVR monitor, go to Menu → Camera → Camera Management.
-
Select an empty channel and click Add or Manual Add.
-
Enter:
-
IP Address:
192.168.254.5 -
Protocol: Hikvision
-
Management Port: 8000
-
Username:
admin -
Password: (same as NVR)
-
-
Click OK / Add — the camera should change from Offline → Online.
✅ Step 5 — Test Live View
-
Go to Main Menu → Live View on the NVR.
-
Confirm the camera image appears.
-
If it’s offline, recheck:
-
IP in same subnet (e.g. 192.168.254.x)
-
Username/password match
-
Camera shows Active in SADP
-
Step 6 — Reconnect the NVR to the Network
-
Unplug the modem/router cable from the PoE port.
-
Reconnect it to the NVR’s LAN port.
-
The NVR now has Internet again while keeping the PoE subnet for cameras.
Example IP Layout
| Device | IP Address | Role | Notes |
|---|---|---|---|
| NVR (LAN) | 192.168.1.100 | Internet connection | Connected to router |
| NVR (PoE gateway) | 192.168.254.1 | Isolated subnet | Camera network |
| Camera 1 | 192.168.254.2 | Existing camera | Working |
| Camera 2 | 192.168.254.3 | Existing camera | Working |
| New Camera | 192.168.254.5 | Newly added |
Comment on this FAQ
You must be logged in to post a comment.
Use Chrome/Edge With the IE Tab Extension (Recommended)
1. Install IE Tab
-
Open Chrome or Edge.
-
Go to the Chrome Web Store → search “IE Tab”.
-
Install and allow the extension.
2. Activate IE Mode
-
After installing, click the IE Tab icon next to your address bar.
-
It will open a new browser tab running an embedded Internet Explorer engine.
3. Enter Your NVR / Camera IP Address
Type your device’s IP:
(or whatever your recorder’s IP is)
4. Log In and Allow the Plugins
-
The system may ask to install the WebComponents plugin.
-
Allow/Install if prompted.
-
Refresh the page inside the IE Tab.
5. View Live View
Live View, Playback, and Configuration pages will now work fully and consistently.
Why IE Tab Works
Hikvision’s older firmware uses:
-
NPAPI plug-ins
-
ActiveX controls
These only run inside an Internet Explorer rendering engine.
IE Tab bundles that engine inside Chrome/Edge → so Live View loads instantly.
Comment on this FAQ
You must be logged in to post a comment.
Live Guard Function is used to notify the user when cctv detect any suspicious event by flash light alarm and send push notification to Hik-connect APP
Step-by-Step Guide: Arm / Disarm Hikvision Live Guard via Phone App
(Late-model Hikvision NVR + Late-model Hikvision Cameras)
This setup is designed for customers using a new baseline Hikvision NVR with modern deterrent cameras (such as ColorVu 3.0 with siren/strobe).
The goal is to allow the customer to:
-
Arm the system from their phone
-
Disarm the system from their phone
-
Use Silent Arm mode
-
Set automatic schedules for arming/disarming
-
Trigger camera strobe + siren when an event occurs
-
Receive push notifications in Hik-Connect
This feature is called Live Guard.
How-to-set-up-Live-guard-in-NVR-and-Hik-Connect-APP-via-Web-GUI (4) <-- the full PDF guide from Hikvision Australia.
What Live Guard Does
Live Guard allows the system to respond to suspicious activity by:
-
Flashing the camera warning light
-
Activating the camera siren/audio warning
-
Sending push notifications to the Hik-Connect mobile app
How-to-set-up-Live-guard-in-NVR-and-Hik-Connect-APP-via-Web-GUI (4) <-- the full PDF guide from Hikvision Australia.
Supported Example Devices (From the PDF)
-
Hikvision NVR: DS-7604NI-M Series (new baseline firmware)
-
Hikvision Camera: DS-2CD2387 ColorVu with siren/strobe
How-to-set-up-Live-guard-in-NVR-and-Hik-Connect-APP-via-Web-GUI (4) <-- the full PDF guide from Hikvision Australia.
Part A — Configure Live Guard in the NVR (Web Interface)
Step 1 — Log into the NVR Web GUI
-
Open the NVR IP address in a browser
-
Log in as admin
-
Go to:
Event → Smart Event → Intrusion Detection
(or Line Crossing / Motion Detection)
How-to-set-up-Live-guard-in-NVR-and-Hik-Connect-APP-via-Web-GUI (4) <-- the full PDF guide from Hikvision Australia.
Step 2 — Set Up the Detection Rule
-
Draw the detection area or intrusion zone
-
Configure:
-
Minimum target size
-
Maximum target size
This helps reduce false alarms.
How-to-set-up-Live-guard-in-NVR-and-Hik-Connect-APP-via-Web-GUI (4) <-- the full PDF guide from Hikvision Australia.
Step 3 — Enable Notifications + Siren/Strobe Linkage
In the event linkage options:
-
Enable Notify Surveillance Center
-
Tick Light and Audio Alarm Linkage
-
Click Save
This is the key step that enables Hik-Connect control and deterrence.
How-to-set-up-Live-guard-in-NVR-and-Hik-Connect-APP-via-Web-GUI (4) <-- the full PDF guide from Hikvision Australia.
Part B — Arm / Disarm from Hik-Connect App
Step 4 — Arm and Disarm Using the Shield Icon
Once the NVR is connected to Hik-Connect:
-
Open the Hik-Connect app
-
Select your NVR device
-
You will see a shield icon
-
Tap it to access:
-
Arm
-
Silent Arm
-
Disarm
How-to-set-up-Live-guard-in-NVR-and-Hik-Connect-APP-via-Web-GUI (4) <-- the full PDF guide from Hikvision Australia.
Part C — Create Areas (Optional but Recommended)
Customers often want different zones, such as:
-
Front yard armed at night
-
Warehouse armed 24/7
-
Office disarmed during business hours
Step 5 — Create Arm/Disarm Areas in the App
-
In Hik-Connect, tap the … menu on the device
-
Select Arm/Disarm Area
-
Tap the + icon (top left)
-
Add cameras into an area
-
Save
Now the customer can arm/disarm per zone.
How-to-set-up-Live-guard-in-NVR-and-Hik-Connect-APP-via-Web-GUI (4) <-- the full PDF guide from Hikvision Australia.
Part D — Linkage Settings + Scheduling
Step 6 — Configure Siren and Light Linkage Per Camera
Inside the area settings, configure each camera channel:
-
Audio Warning Linkage
-
Flashing Light Linkage
This ensures the deterrent activates correctly.
How-to-set-up-Live-guard-in-NVR-and-Hik-Connect-APP-via-Web-GUI (4) <-- the full PDF guide from Hikvision Australia.
Step 7 — Set Auto Arm / Auto Disarm Schedule
Customers can fully automate arming and disarming:
-
Go into the area linkage settings
-
Enable:
-
Auto Arm
-
Auto Disarm
-
Set the arm/disarm times
-
Confirm schedule
The system will now automatically arm/disarm every day.
How-to-set-up-Live-guard-in-NVR-and-Hik-Connect-APP-via-Web-GUI (4) <-- the full PDF guide from Hikvision Australia.
Result (What the Customer Gets)
Once everything is configured:
-
The customer receives push notifications
-
The camera flashes its warning light
-
The camera plays audible alarms
-
Only when the system is Armed and the rule is triggered
How-to-set-up-Live-guard-in-NVR-and-Hik-Connect-APP-via-Web-GUI (4) <-- the full PDF guide from Hikvision Australia.
Comment on this FAQ
You must be logged in to post a comment.
Here’s the safest step-by-step way to remove a hard drive from a Hikvision NVR:
- Shut the NVR down properly from the menu if you can.
- Turn the power off at the switch or unplug the power lead.
- Disconnect all cables so you can move the recorder easily.
- Put the NVR on a stable table.
- Get your Phillips-head screwdriver ready.
Then do one of these methods, depending on the NVR style:
A. Standard lid / top-cover Hikvision NVR
This is the most common type.
- Remove the screws at the back of the recorder.
- Slide the lid backwards and lift it off. Hikvision describes this as unfastening the rear screws and pushing the cover backward to remove it.
- Find the hard drive inside.
- Gently unplug the two cables from the HDD:
- SATA data cable
- Power cable
- Remove the screws holding the HDD to the bracket or base.
- Lift the hard drive out carefully.
B. Front panel / lockable drive-bay Hikvision NVR
Some larger units have a front door and key.
- Unlock the front panel with the key.
- Open the front panel.
- If it is a simple plug-pull bay, pull the drive out once released. Hikvision says some models use a front panel that opens with the attached key, then the HDD is inserted or removed through the front.
- If it has a drive caddy/handle, press the release button, pop the handle out, and pull the HDD tray out.
- Use a Phillips screwdriver to remove the HDD from the caddy if needed. Hikvision’s HDD case method uses screws on the sides of the case.
After removing it
- Put the lid or tray back.
- Refit the screws.
- Reconnect the cables.
- Power the NVR back on.
A few important cautions:
- Do not pull a drive while the NVR is still running unless you are certain that exact model supports hot swapping. Hikvision warns to disconnect power if the device does not support hot-swap.
- If the drive contains footage you need, removal may stop recording and could affect access to stored video.
- Handle the HDD gently and avoid static.
Comment on this FAQ
You must be logged in to post a comment.
Intercom (15)
Hikvision Australia’s website has firmware updates for available IP cameras.
https://www.hikvision.com/au-en/
Use the search bar to try and find your product. Firmware updates are usually available on the product page.
IF YOU BOUGHT EQUIPMENT FROM US:
You will need to contact us if you can’t find your camera listed or if you require firmware for your NVR / DVR.
You will need to also provide the full serial number of the device as well as your current firmware.
This is to ensure upgrades are done properly. In some instances middlle firmware is required before upgrading to the latest version.
We do not recommend doing intercom firmware upgrades. Please check with us if there is any doubt.
If you didn’t buy equipment from us, please contact the people who you bought the equipment from.
This is a comprehensive guide with lots of videos providing guidance for setting up Hikvision IP Intercoms.
Cabling requirements:
> ethernet cable from every Door Station to Poe Switch
> ethernet cable from every indoor Monitor to Poe Switch
> ethernet cable from Poe Switch to the modem (if you wish to set up remote communication)
Need to unlock a gate?
If you need to open/ control 1-2 door / gate strikes, run 4 core cabling from the Intercom Door Station to the respective strikes. These strikes need to be powered separately, ie. the door station will not be able to power these strikes.
GEN 2 Guides
Watch the below video to get cracking.
ONE DOOR STATION AND ONE MONITOR – in case the first video was too fast. Set up is quick and easy and doesn’t use IVMS4200.
INTRODUCTION VIDEO + HOT TIPS
OR ONE DOOR STATION AND ONE MONITOR IVMS4200 Method:
If you need the indoor monitor to connect through wifi instead of data cable – https://www.youtube.com/watch?v=TklIto_nVh8
How to add more monitors (requires a PC running IVMS4200)
How to add keypad:
How to add maglock?
How to add exit button?
How to add more door stations:
——————–
THE MOST USEFUL GUIDES FROM HIKVISION
HOW TO CONFIGURE DOOR STATION AND EXTENSION VIA LOCAL INTERFACE
HOW TO ADD A SINGLE INDOOR STATION TO THE DOOR STATION
HOW TO SET UP INDOOR EXTENSION ON IVMS4200
—————
Indoor Station Configuration Guide
Indoor Station Operation Guide
Indoor Station Quick Start Guide
Probably the most useful guide ever *** CLICK HERE ***
How to setup – guide from Pipl Systems – https://pipl.systems/setup-tutorial-hikvision-2nd-modular-intercom-system/
Add a second monitor – https://www.youtube.com/watch?v=-11RJ1S-8Xg
How to add a single sub-door station to the main door station
GEN 1 Guides
Please click to download.
How to set up HIKVISION intercom for first time
How to configure a Hikvision Villa Intercom System
Most common system – 1 door station – 1 monitor:
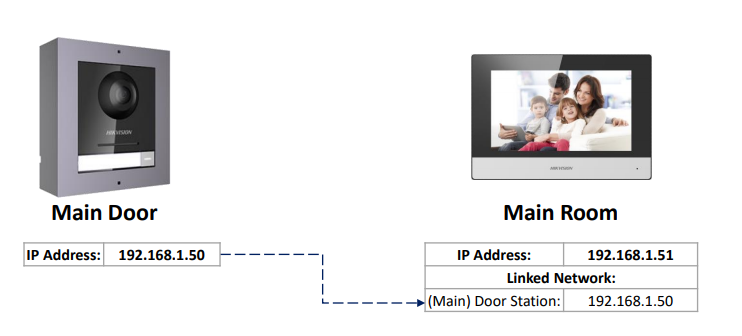
2 Scan the QR code via Hik Connect app to setup remote viewing
System with 1 door station, 1 main room and multiple sub room stations
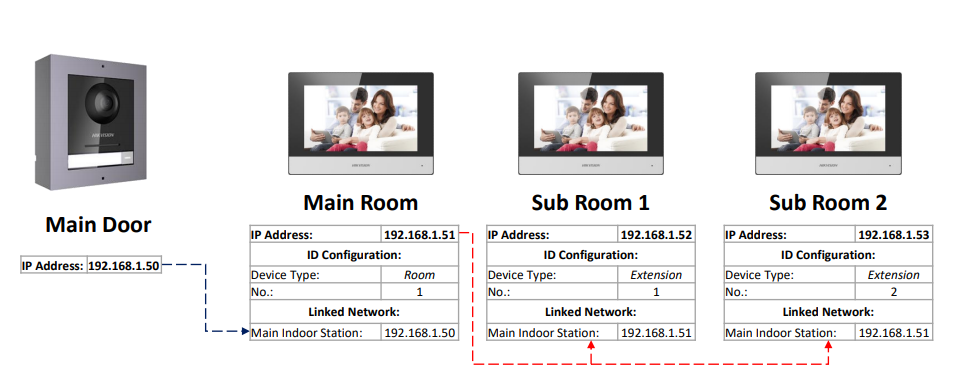
2. Add the subroom monitors using IVMS4200. (the IP addresses are examples only)
Apartment system
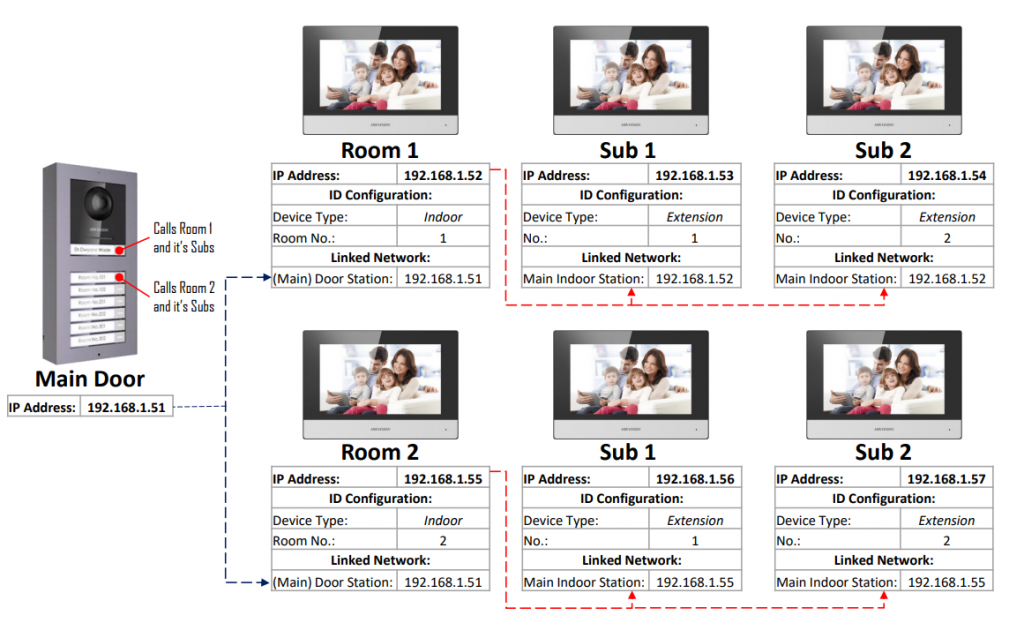
System with multiple door stations
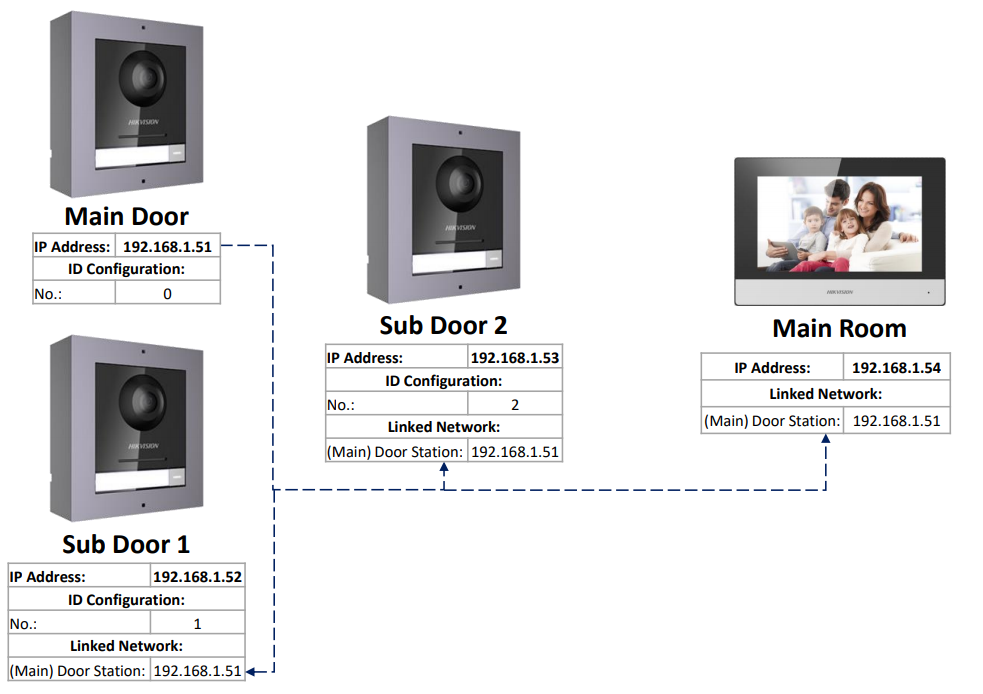
Some helpful hints
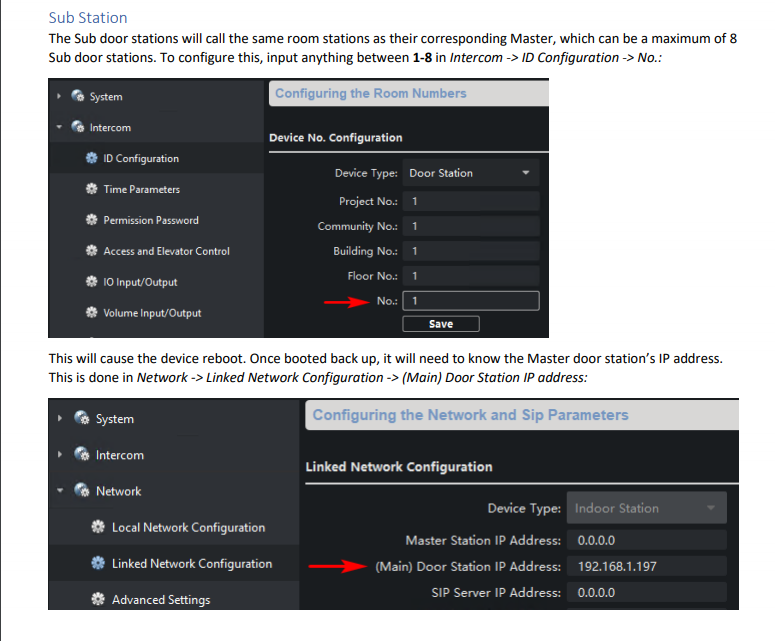
HIK CONNECT Only Master room stations should be added to Hik-Connect. Issues may occur if a Sub station is added. The app can be found on the iOS and Android app stores.
- Get the IP Address of the door station via HIkvision SADP tool
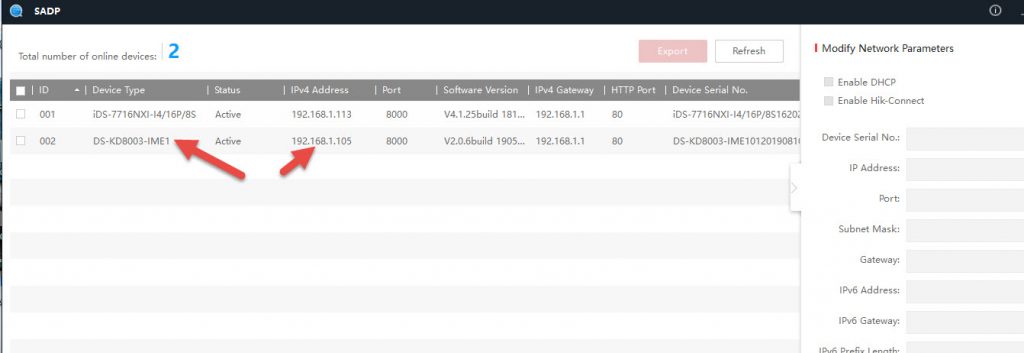
2. Download Hikvision IVMS4200 – https://www.hikvision.com/en/support/download/software/ivms4200-series/ (just download the first / basic one)
3. Add the device to IVMS4200 using the IP address – ensure you choose Synchronise time. Click Add
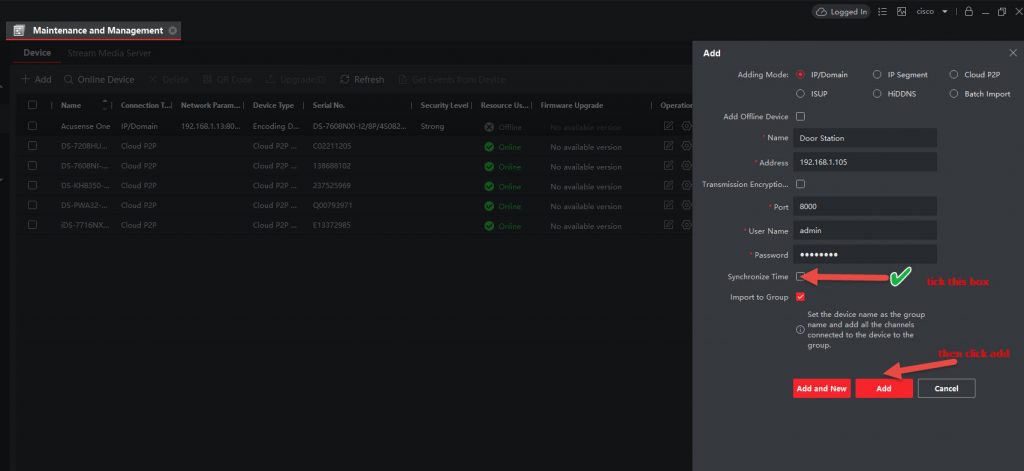
Thats it!
This tech guide from Hikvision helps you configure a Hikvision apartment intercom system.
SADP stands for search active device protocol, it’s Hikvision’s free and simple utility for searching Hikvision products (including IP cameras and DVRs/NVRs) in the local network.
Its commonly used for:
- resetting password
- Finding out what firmware is currently used
- changing IP addresses
Yes.
Hikvision CCTV cameras can be added to an indoor station thus allowing remote viewing directly from the indoor station for added security.
A typical Hikvision room station can have up to 16 cameras viewable – one at a time.
For a guide as to how to set this up, please see attached:
Gen1 Intercom – Tech_Note_Adding_IP_Cameras_to_To_Room_Station
Gen2 Intercom instructions below:
Step 1- Get SADP tool to get the IP address of the NVR.
Step 2 – use IVMS4200, add the room station to IVMS. Then add as per screenshot below:
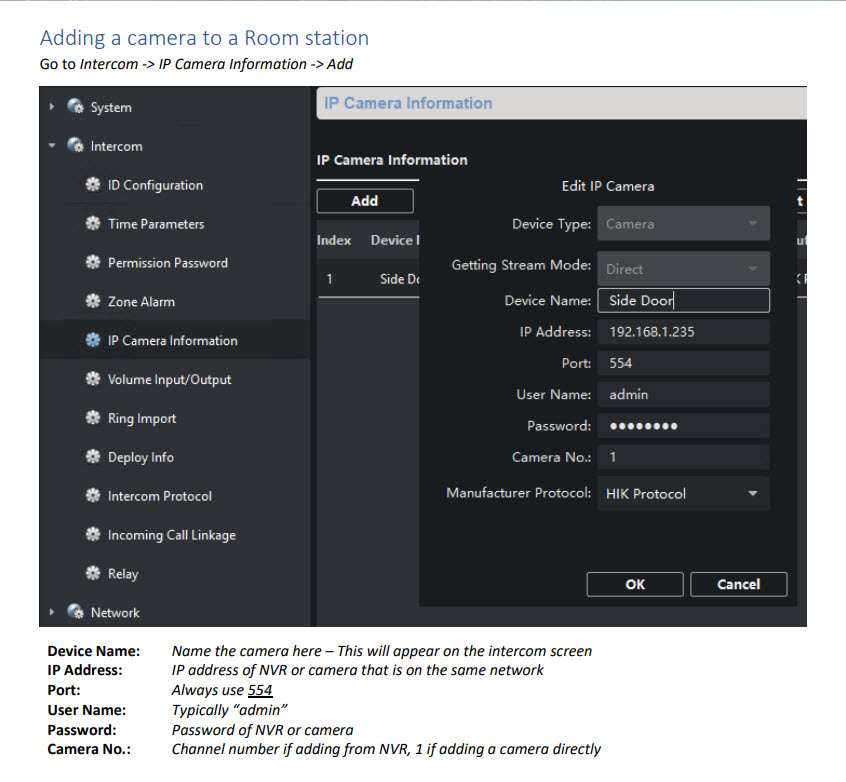
Otherwise via Intercom monitor:
Settings > 2 Icons on right (Configuration) > 3rd icon (device management) , Click on + sign and enter IP address. Port 554. username / password is the details of the camera.
These tech notes should assist you with this requirement.
Yes.
In an Intercom system with 2 or more indoor stations, each station can dial or call between each other by using the following dialing format.
0-
For Example:
To call the Main indoor station from any indoor station you would dial 0-0
To call the first indoor extension from any indoor station, included the main indoor station, you would dial 0-1
Please refer to page 5 of the user manual.
https://www.securitywholesalers.com.au/wp-content/uploads/2020/07/DS-KD8003-IME2-Installation-Guide.pdf
Page 8 onwards may also help https://www.hikvision.com/content/dam/hikvision/products/S000000001/S000000083/S000000129/S000000131/OFR002104/M000001550/User_Manual/UD20209B_Baseline_Video-Intercom-Module-Door-Station_User-Manual_V2.2.3.PDF
Most residential customers would use the Green and Blue cable
The Power would depend on the electric strike (to be powered separately). Further, the strike also has NO and NC setting. So, the strike has to also be on NO setting
For commerical sites, some of them may use NC, so in that case, we still use electric strike but use the pink, NC cable to connect to it
Sure, you’ll find this below:
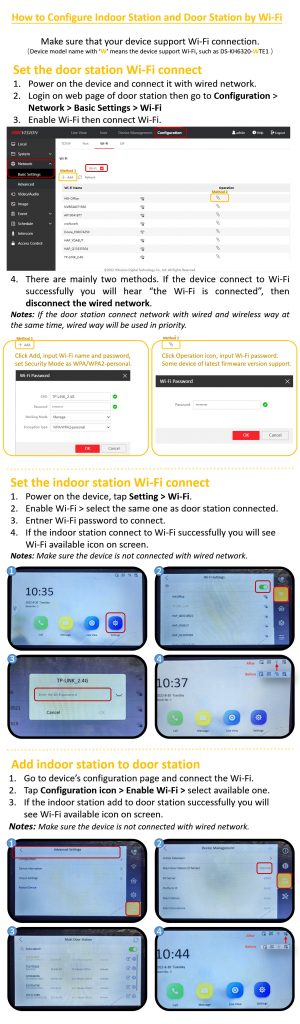
Comment on this FAQ
You must be logged in to post a comment.
Comment on this FAQ
You must be logged in to post a comment.
Other (7)
Did you just get charged Foreign exchange / Foreign Transaction fees for buying from Paypal?
PayPal Australia Pty Ltd is an Australian based entity with a ABN & ACN number, NOT an overseas entity.
Paypal’s processing requirement is that it’s all done locally to comply with APRA regulations as well as ensure there’s minimal processing latency for a transaction to be approved quickly.
https://abr.business.gov.au/ABN/View/93111195389
The User Agreement for processing between the Merchant & PayPal Australia Pty Ltd is valid in AU only & we’re considered a local processing entity, not a foreign one: https://www.paypal.com/au/webapps/mpp/ua/useragreement-full?locale.x=en_AU
The bank is likely trying to scam you out of some F/X fees on his card.
You can take the matter to Consumer Affairs as, legally, you have an Australian PayPal Consumer account with a local Bank / credit card used as a funding source & SHOULD NOT be charged f/X fees.
Our team at support are always on the look out to help you out!
The best way to help us help you is to send us an email to support@securitywholesalers.
Include your order number, pictures of issues, and detail what has gone wrong and our team will patch it up. Please be as descriptive as possible.
Provided items are in stock, orders placed before 8am Sydney time each business day are packed and sent the same day. We use the most efficient postage possible which is next business day delivery within the Startrack express post network (Australian capital cities and major metro areas- Perth CBD only). Regional areas outside the express post network may be 2-5 days.
Note – PO Boxes are not acceptable as the startrack service we use requires signature upon delivery.
We also use Couriers Please/Toll Priority for metro areas if will help get the parcel to you faster.
If you have not received your items within 4 business days of making your order please email us with your full name and order number and we will look into your delivery immediately. In most cases this means that an attempted delivery has occurred and that your parcel is waiting for you at your nearest post office for collection. Please check your spam box for any notification emails from us.
If you are not home at the time of delivery, for your convenience, your parcel will be left in a secure place if deemed safe to do so by the delivery driver. If they feel it is not safe to leave, or the parcel is too large, you will be left a card and your parcel will be taken to your local depot.
You can pay via:
- credit card via Paypal
- bank deposit (just choose bank deposit via the checkout)
- request an Invoice via the checkout (so you can get approval to pay)
To get a custom quote, just email sales@securitywholesalers.com.au
Simply provide a Live Chat team member proof of the competitor’s current advertisement or website address, showing the offer’s end date and any terms and conditions. A Live Chat team member may check the website to verify the lower price and availability of the product.
Once your price match request is verified, we will create an offer for you to purchase the product from us at the lower price.
What are the exclusions?
- Offers which include cash back, bonus, bulk purchase, quantity limits or packages.
- Pricing with included delivery or installation.
- Offers not available to the general public – including trade, special event, club or membership offers.
- Clearance, seconds, refurbished, ex-demonstration or display products.
- Products shipped from or sold by third-party sellers on marketplace, auction or classifieds websites.
- Products sold from websites which authenticity of the product is not verifiable
- Products supplied through unauthorised distributors (known as ‘grey market’ items) or delivered directly to customers from an overseas distributor.
- Pricing errors.
- Products with pricing set significantly lower than the recommended retail price or market value.
Are you having trouble activating your cameras? or having other issues?
Please follow the steps below.
1. DOWNLOAD SADP https://www.hikvision.com/en/Support/Downloads/Tools
2. DOWNLOAD WINRAR https://www.rarlab.com/download.htm
3. Install winrar, then use winrar to extract SADP
4. Connect an ethernet cable from your laptop / PC to the one of the camera ports at the back of the NVR
5. Run SADP as Administrator
6. DOWNLOAD https://www.teamviewer.com/ and provide us the login / password. NOTE – you must leave teamviewer on.
We will then be able to log in to help you with your issues.
Steps 1. Go to Configuration → Network → HiLookVision.
2. Select Access Type as HiLookVision.
3. Turn on Enable. The service terms will pop up. Click OK.
4. Click to set verification code (you’ll need to enter this code later in the app)
Use smartphone to download HiLookVision app. You can also download it from https://appstore.hikvision.com
Use HiLookVision app to scan the device QR (on the monitor), and you should see the cameras
Comment on this FAQ
You must be logged in to post a comment.