


Add Cameras to an NVR via a PoE switch and a Point To Point Bridge
Adding cameras to a Network Video Recorder (NVR) via a point-to-point network and a PoE (Power over Ethernet) switch is a common and efficient way to expand your CCTV system. Here’s a step-by-step instructional guide to help you through the process:
Materials Needed:
- Network Video Recorder (NVR) with available PoE ports.
- PoE switch with enough ports for the number of cameras you want to add.
- IP cameras that support PoE.
- Ethernet cables for connecting the cameras and the PoE switch to the NVR.
- Monitor (if your NVR doesn’t have a built-in display).
Step 1: Prepare the Hardware:
- Set up your NVR in a suitable location with proper ventilation and power supply.
- Install the PoE switch in a convenient and accessible place, preferably close to the NVR.
- Mount the IP cameras at their desired locations, making sure they have a clear view of the areas you want to monitor. Use appropriate mounting brackets or housings if necessary.
Step 2: Connect the PoE Switch to the NVR:
- Use an Ethernet cable to connect one of the PoE switch’s LAN ports to an available LAN port on the NVR. This connection will allow the NVR to communicate with the cameras through the PoE switch.
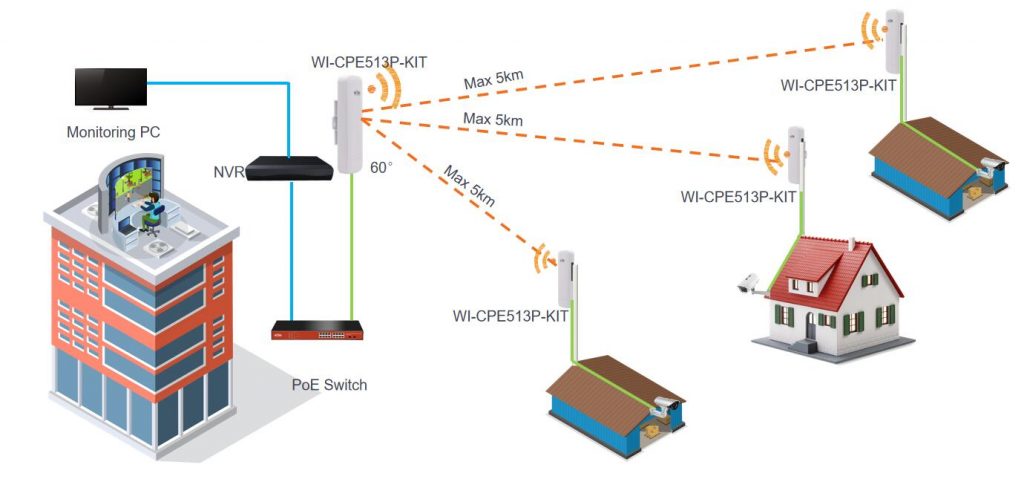
Step 2.5: Set Up Point-to-Point Bridge:
- Choose a suitable point-to-point bridge that supports the necessary range and throughput for your CCTV setup. Point-to-point bridges typically come in pairs – one for each end of the wireless link.
- Install one bridge near the NVR and connect it to an available LAN port on the NVR using an Ethernet cable.
- Power up the bridge and configure it according to the manufacturer’s instructions. You’ll need to set up wireless parameters, such as SSID, security settings, and wireless channel.
- Install the second bridge near the PoE switch and connect it to an available LAN port on the PoE switch using an Ethernet cable.
- Power up the second bridge and configure it with the same wireless parameters as the first bridge. Make sure both bridges are set to operate in point-to-point mode.
- The two bridges will establish a wireless link between the NVR and the PoE switch, effectively connecting them together as if they were connected by an Ethernet cable.
After completing Step 2.5, continue with the original steps in the instructional guide from Step 3 onwards to connect the IP cameras to the PoE switch, power up the NVR, PoE switch, and IP cameras, and configure the IP cameras on the NVR.
Using a point-to-point bridge will allow you to create a wireless link between the NVR and the PoE switch, offering more flexibility in camera placement and reducing the need for long Ethernet cable runs. Ensure that the point-to-point bridge has adequate signal strength and stability for reliable camera feeds.
Step 3: Connect the IP Cameras to the PoE Switch:
- Take an Ethernet cable and connect one end to the Ethernet port on an IP camera.
- Connect the other end of the Ethernet cable to an available PoE port on the PoE switch. The PoE switch will provide both power and data connectivity to the camera.
Step 4: Power Up the NVR, PoE Switch, and IP Cameras:
- Plug in the power cables for the NVR and the PoE switch, and turn them on. Allow them to boot up and initialize.
- The PoE switch will automatically supply power to the connected IP cameras, so there is no need to plug them in separately.
Step 5: Configure the IP Cameras on the NVR:
- Access the NVR’s configuration interface through a web browser or the provided software.
- Navigate to the camera settings or configuration page on the NVR.
- The NVR should detect the connected IP cameras automatically. If not, check the connections and make sure the cameras are powered up.
- Assign unique names and IP addresses to each camera for easy identification and management.
Step 6: Test the Camera Feeds:
- Access the live view of your NVR to check if the cameras are working correctly.
- If all cameras are displaying video feeds on the NVR’s live view, then the setup is successful.
Step 7: Optional – Configure Additional Settings:
- Depending on your preferences, you can customize various settings for each camera, such as motion detection, recording schedules, and video quality.
- Ensure that you set up recording options to save footage to your NVR’s storage device or external storage.
Step 8: Monitor and Maintain:
- Regularly check the camera feeds and the NVR’s status to ensure that everything is functioning correctly.
- Keep the cameras and NVR firmware/software updated to take advantage of the latest features and security improvements.
By following these steps, you should be able to successfully add cameras to your NVR using a point-to-point network and a PoE switch. Enjoy enhanced surveillance and security with your expanded CCTV system!