


Commercial
How to Install HiLook CCTV Systems
Installation Guide
What this guide covers
- How to plan cabling, PoE, recorder position, and switch layout before mounting anything
- What a normal HiLook install sequence looks like from first cable run to final handover
- How to avoid the setup mistakes that create later support calls around recording, AI alerts, and remote access
- Two worked examples showing what the actual solution looked like and why it was chosen
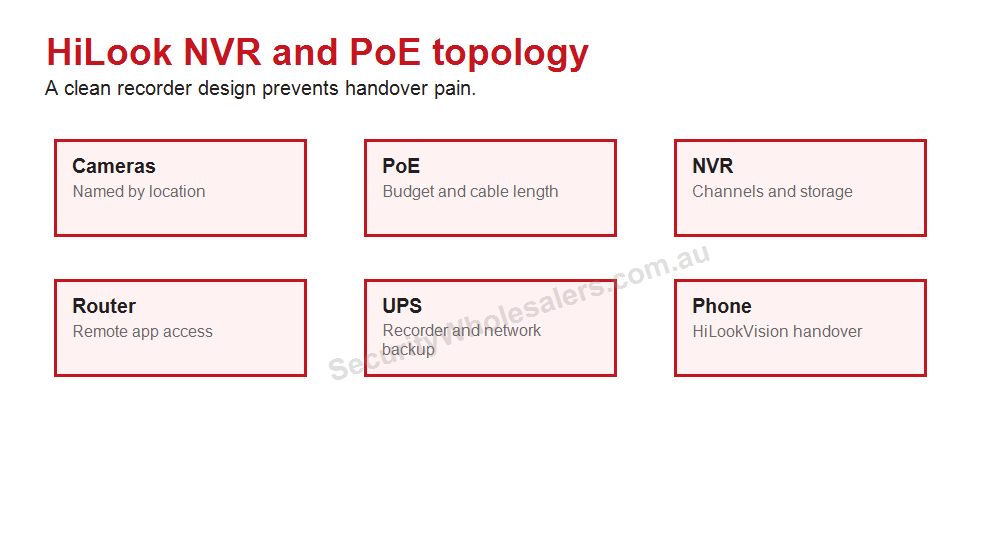
Start with the cable and power path, not the app
The mistake we see often is trying to get the cameras online before the physical design is settled. In simple terms, the recorder, PoE supply, switch position, and cable route decide whether the job will be reliable later. A clean HiLook handover starts with the camera and recorder path being stable on site, not with QR codes and phone setup.
For a basic four-camera job, that usually means deciding whether each camera will homerun back to a PoE NVR, whether a separate PoE switch is needed, where the recorder will live, whether there is UPS protection, and whether there is enough cabinet space and ventilation around the recorder. On larger sites, it also means working out whether one long cable run should really be a second switch in a remote zone.
What to confirm before cabling
- Which cameras are fixed and which, if any, are motorised or PTZ, because power budget and cable planning change.
- Whether the recorder has enough PoE ports and enough incoming bandwidth for the final camera count.
- Whether there are areas that should use a local PoE switch instead of very long homeruns back to the recorder.
- Whether the client wants microphones, deterrence features, or smart event alerts, because those decisions change placement and setup.
- Whether the recorder should be on a UPS so a short power dip does not corrupt recording or knock remote access offline.
Those checks sound basic, but they prevent most of the support calls that arrive later. If the camera list, recorder path, and cable plan are still moving around on install day, the handover usually becomes rushed and the site ends up with avoidable alert or playback problems.
How the cabling usually works
For most modern HiLook IP CCTV jobs, the best default is still Cat5e or Cat6 back to a PoE recorder or a PoE switch. Keep the cable path tidy, avoid unnecessary joins, label both ends, and test every run before the cameras are mounted for good. Where a site has detached buildings, remote sheds, gates, or a second warehouse zone, the cleaner answer is often a local switch or a point-to-point link rather than one oversized improvised cable route.
PTZ, long-range varifocal, or specialist cameras sometimes change the power conversation. If a camera needs PoE+, higher draw, or a specific injector path, build that into the design before the mounting day. This matters because a camera that powers up on the bench may still behave badly in the field if the final power path is marginal.
Step-by-step installation flow
Step 1: mark the views before the final mount
Before the cameras are fully tightened, confirm what each view is supposed to do. A front door camera may need a face view at close range. A driveway camera may need vehicle movement and plate-direction context. A rear door camera may be more about after-hours human movement than broad scene coverage. This is the stage where poor lens choice, bad height, or an overly wide angle should be corrected.
Step 2: run, label, and test the cabling
Run the Cat5e or Cat6 neatly, keep joins to a minimum, and label both ends before the ceiling tile or conduit path is forgotten. If a site uses a remote switch, label the uplink and the local ports clearly. Test each run before the final camera position is treated as finished. This is where a simple cable tester saves a lot of later fault-finding.
Step 3: build the recorder path properly
Install the hard drive, confirm it is recognised, and initialise it before any client handover begins. Set the recorder password properly, set the correct timezone, and name the channels in a way the site will understand later. A recorder called Channel 1, Channel 2, and Channel 3 is harder to use than one labelled Front Door, Reception, Rear Door, and Car Park.
Step 4: bring cameras online one at a time
Add or confirm each camera one by one instead of hoping the whole site will appear correctly in one pass. This helps catch failed ports, wrong credentials, duplicate IP addresses, or one camera on the wrong switch path. If a camera is not behaving, solve it before moving to the next one. That is faster than trying to untangle three separate issues at the end of the job.
Step 5: confirm recording before smart features
Make sure live view is stable, recording is writing correctly to the drive, and playback can be found by time and date. Only after that should the site move into AI rules, notifications, or user sharing. A camera that looks good on live view but is not recording correctly is not commissioned.
Step 6: enable only the smart events the client actually wants
Turn on the motion, human, vehicle, intrusion, deterrence, or perimeter rules that match the brief. Do not switch on every event because it is available. A cleaner setup usually gives better long-term results. If the site only wants after-hours alerting at the rear door and side gate, that should be the focus rather than trying to turn every camera into an alert generator.
Step 7: test the final workflow
Before leaving, test the things the customer will actually rely on: live view, playback, one real alert if notifications were promised, and the path to review footage after an incident. This is also the right time to confirm the recorder reboots cleanly and that the cameras return properly if the power path is interrupted and restored.
Step 8: hand over with notes the client can actually use
Show the client where the recorder is, which account is the owner account, how to find playback, and what to check first if they later change internet provider or replace a phone. A short written note is often more useful than a long explanation they will forget after the installer leaves.
Where installers usually lose time
- Mounting a camera before checking the real field of view and finding out later that the lens choice was wrong.
- Leaving the recorder on default time or wrong timezone, which makes later footage review painful.
- Assuming smart alerts are configured just because the camera advertises them.
- Putting the recorder somewhere with poor cooling, unstable power, or no clean network uplink.
- Handing over app access before local recording and playback have actually been proven.
Small office with reception, rear door, and two car spaces
Situation: The client wanted four cameras, app access for two directors, and reliable after-hours coverage without paying for features they would never use.
Solution used: Four fixed PoE cameras back to a HiLook PoE recorder, one UPS protecting the modem and recorder, and smart human and vehicle filtering enabled only on the rear door and car park views.
Why this was chosen: The job did not need a second switch, a PTZ, or site-wide deterrence. The better result came from getting the fixed views right, sizing the recorder properly, and making sure the app handover matched the director access they actually needed.
Installation notes: Each cable was labelled at both ends, the recorder was set to the correct timezone before QR setup, and playback plus alert testing were done before the users were invited into the app.
Warehouse with office front, roller door, yard, and detached side gate
Situation: The site had eight cameras planned at first, but the gate was far enough away that the original idea of running everything back to the recorder cabinet would have created a messy cable path and awkward fault-finding later.
Solution used: A central recorder for the main warehouse cameras, a local switch near the gate-side zone, and a clearer split between internal cameras, roller-door views, and the outer gate path.
Why this was chosen: The more reliable answer was to build two neat cable zones instead of forcing long homeruns. That also made future expansion easier and reduced the chance of one damaged outer cable taking too much time to diagnose later.
Installation notes: The gate-side equipment was protected in a cabinet, the switch uplink was tested before final commissioning, and smart alerts were limited to the outer risk points so the manager was not flooded with nuisance events.
What to test before handover
- Each camera has stable live view and stable recording.
- Playback is easy to find by time and date.
- Any AI rules the client expects are actually enabled, scheduled, and linked correctly.
- Remote access works after the local recorder setup is complete, not before.
- The client knows where the recorder is, how to log in safely, and what to do after an internet change or phone replacement.
When to ask for help
If the site has long cable runs, multiple buildings, awkward power conditions, a PTZ, a gate, or a switch layout that is starting to feel improvised, it is better to pause and tidy the design before the handover. That is usually cheaper than trying to explain unstable recording, missing alerts, or app faults later.
Relevant SecurityWholesalers pages
Frequently Asked Questions
-
Is HiLook usually easiest when all cameras run back to the NVR?
Yes, on many small home and office jobs that is the cleanest design. Once there are remote sheds, long driveways, or separate buildings, a switch layout may become cleaner.
-
Why do HiLook fixed-lens cameras still need careful placement?
Because a well-priced fixed camera still fails if it is mounted too high, aimed too wide, or asked to solve the wrong scene with the wrong lens.
-
Do I need to test playback before app setup?
Yes. The recorder should already be recording and playing back locally before phone setup is treated as complete.
-
Can a small HiLook job still need a UPS?
Yes, especially for small business sites where even a short power dip can cause missed recording or a messy restart.
-
What is the most common HiLook install mistake?
Treating the system as plug-and-play and skipping the checks around field of view, hard drive setup, time settings, and event testing.
-
Should I plan for extra channels even on a small HiLook job?
Usually yes. Many homes and small businesses add one or two cameras later, so an 8-channel path is often safer than a full 4-channel recorder from day one.
Related Pages
How to Choose a HiLook Camera
Choose the right fixed-lens or deterrence path before final mounting positions are locked in.
How to Choose a HiLook NVR
Work out whether the recorder is being undersized before the install day.
How to Get HiLook CCTV Online
Use this once the local recorder and cameras are already stable.