


-
×
 Hikvision Gen2 IP Intercom Kit for Homes (Flush Mount)
- Options:
White Monitor instead of Black
Subtotal: $570.00

This kit consists of the most commonly ordered items (to make it easier for you)
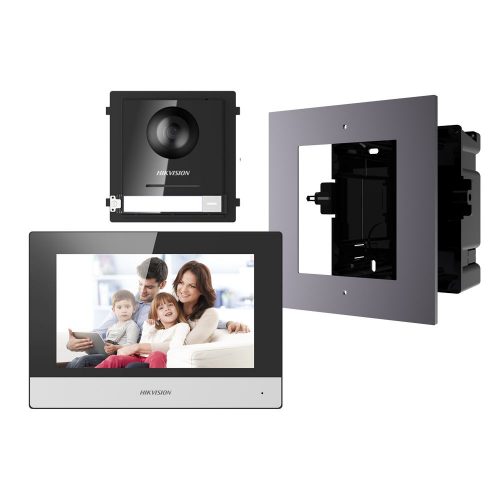
1 x Hikvision 2nd Gen IP Intercom DS-KD8003-IME1 Door Station with Camera, 1x Button, IP65, 12VDC/POE
1 x Hikvision 2nd Gen. Intercom DS-KD-ACF1 Door Station Gang Box, Flush Mount, Supports 1 Module
1 x Hikvision 2nd Gen IP Intercom, 7″ Touch Screen Room Station DS-KH6320-TE1 , 1024 x 600, 12VDC/POE
$570.00 inc GST +3 Year Warranty & Support
This kit consists of the most commonly ordered items (to make it easier for you)
1 x Hikvision 2nd Gen IP Intercom, Door Station with Camera, 1x Button, IP65, 12VDC/POE
1 x Hikvision 2nd Gen. Intercom, Door Station Gang Box, Flush Mount, Supports 1 Module
1 x Hikvision 2nd Gen IP Intercom, 7″ Touch Screen Room Station, 1024 x 600, 12VDC/POE
WIRING REQUIREMENTS;
> ethernet cable from Door Station to Poe Switch
> ethernet cable from the monitor to Poe Switch
> ethernet cable Poe Switch to the modem (if you wish to set up remote communication)
If you need to open/ control 1-2 door / gate strikes, run 4 core cabling from the Intercom Door Station to the respective strikes. These strikes need to be powered separately, ie. the door station will not be able to power these strikes.
DOOR STATION
The Hikvision 2nd Generation offers a flexible modular range of IP intercoms. The HIK-KD8003-IME1 is a door station with a 2MP HD camera which supports up to 8 extension modules. Being a modular and customisable design, this allows the SI to create an entry door panel consisting of one or all the following options; electronic tenant directory, digital keypad, nametag, RFID reader and display modules.
MOUNT MODULE
The Hikvision HIK-KD-ACF1-P is a door station gang box that is designed to support 1 module.
MONITOR
The Hikvision HIK-KH6320-TE1 is a 7 inch colour room station which is designed to work with the flexible 2nd Generation range of IP intercoms.

| Image | Name | Price | Buy |
|---|---|---|---|
 | Hikvision DS-3E1105P-EI 4 Port Smart POE Switch | $64.00 inc GST +3 Year Warranty & Support | |
 | Hikvision DS-KH6320-TE1 Gen2 Video Intercom 7-Inch Touch Screen Indoor Room Station | $246.00 inc GST +3 Year Warranty & Support | |
 | Hikvision DS-3E0310HP-E 8 Port Fast Ethernet Unmanaged POE Switch | $160.00 | |
 | Hikvision Gen2 DS-KD8003-IME1 Video Intercom Module Door Station (Surface Mount) | $178.00 | |
 | Hikvision Gen2 DS-KD8003-IME1/Flush Video Intercom Module Door Station (Flush Mount) | $301.00 inc GST +3 Year Warranty & Support |
var faq_accordion = false;var faq_scroll = true;var reveal_effect = ‘none’;
Hikvision Australia’s website has firmware updates for available IP cameras.
https://www.hikvision.com/au-en/
Use the search bar to try and find your product. Firmware updates are usually available on the product page.
IF YOU BOUGHT EQUIPMENT FROM US:
You will need to contact us if you can’t find your camera listed or if you require firmware for your NVR / DVR.
You will need to also provide the full serial number of the device as well as your current firmware.
This is to ensure upgrades are done properly. In some instances middlle firmware is required before upgrading to the latest version.
We do not recommend doing intercom firmware upgrades. Please check with us if there is any doubt.
If you didn’t buy equipment from us, please contact the people who you bought the equipment from.
This is a comprehensive guide with lots of videos providing guidance for setting up Hikvision IP Intercoms.
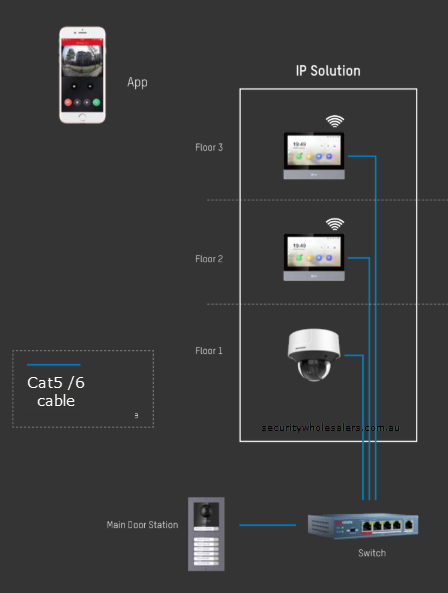
Cabling requirements:
> ethernet cable from every Door Station to Poe Switch
> ethernet cable from every indoor Monitor to Poe Switch
> ethernet cable from Poe Switch to the modem (if you wish to set up remote communication)
Need to unlock a gate?
If you need to open/ control 1-2 door / gate strikes, run 4 core cabling from the Intercom Door Station to the respective strikes. These strikes need to be powered separately, ie. the door station will not be able to power these strikes.
GEN 2 Guides
Watch the below video to get cracking.
ONE DOOR STATION AND ONE MONITOR – in case the first video was too fast. Set up is quick and easy and doesn’t use IVMS4200.
INTRODUCTION VIDEO + HOT TIPS
OR ONE DOOR STATION AND ONE MONITOR IVMS4200 Method:
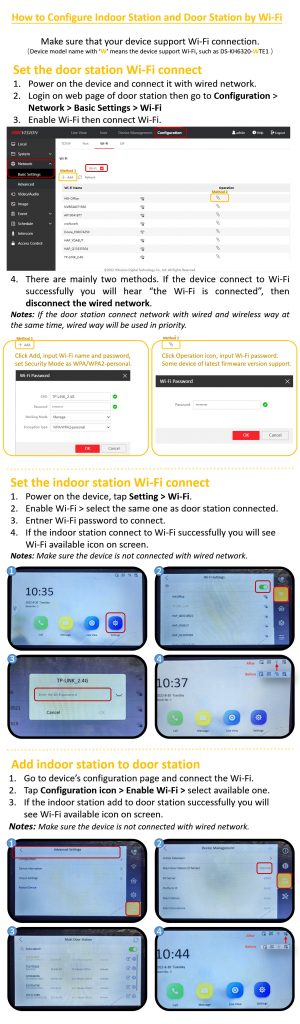
If you need the indoor monitor to connect through wifi instead of data cable – https://www.youtube.com/watch?v=TklIto_nVh8
How to add more monitors (requires a PC running IVMS4200)
How to add keypad:
How to add maglock?
How to add exit button?
How to add more door stations:
——————–
THE MOST USEFUL GUIDES FROM HIKVISION
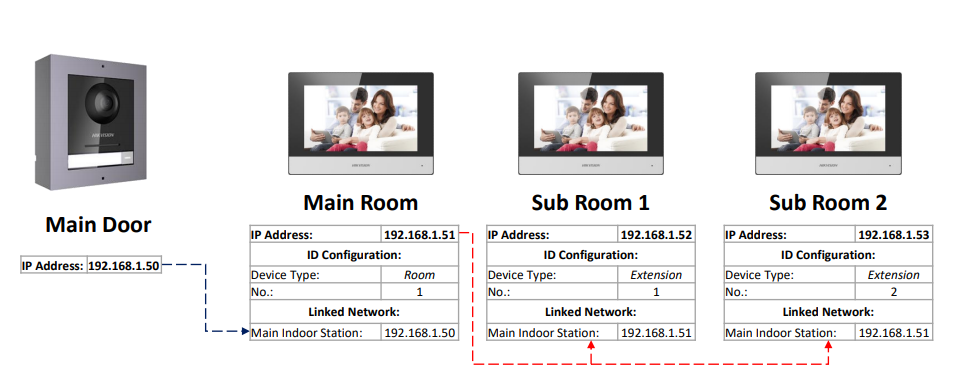
HOW TO CONFIGURE DOOR STATION AND EXTENSION VIA LOCAL INTERFACE
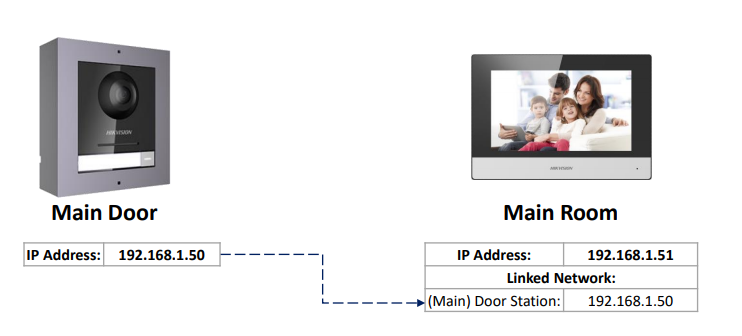
HOW TO ADD A SINGLE INDOOR STATION TO THE DOOR STATION
HOW TO SET UP INDOOR EXTENSION ON IVMS4200
—————
Indoor Station Configuration Guide
Indoor Station Operation Guide
Indoor Station Quick Start Guide
Probably the most useful guide ever *** CLICK HERE ***
How to setup – guide from Pipl Systems – https://pipl.systems/setup-tutorial-hikvision-2nd-modular-intercom-system/
Add a second monitor – https://www.youtube.com/watch?v=-11RJ1S-8Xg
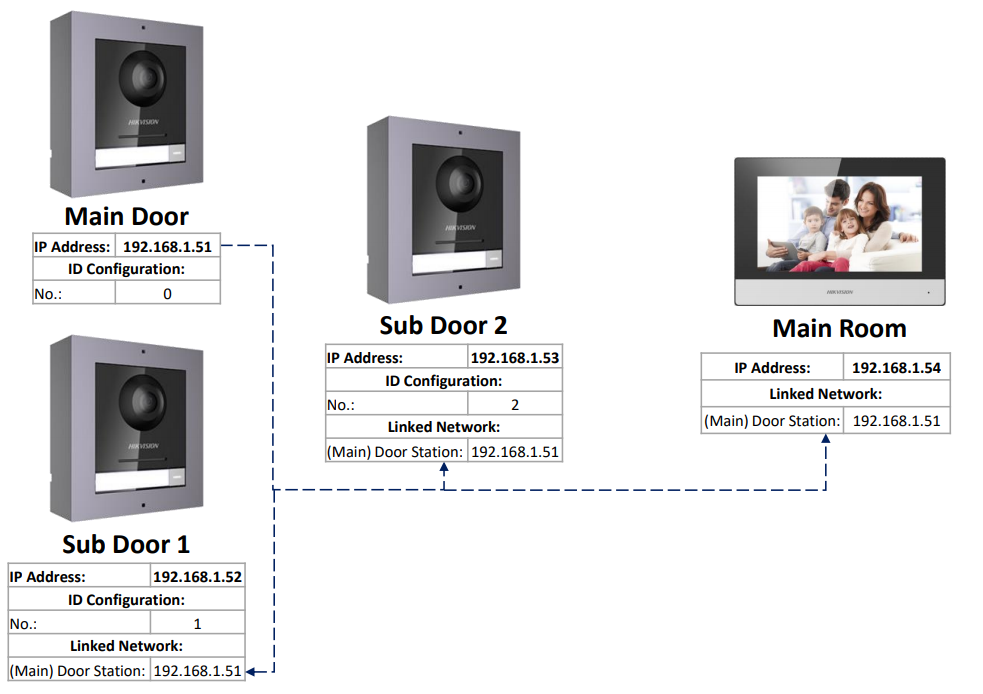
How to add a single sub-door station to the main door station
GEN 1 Guides
Please click to download.
How to set up HIKVISION intercom for first time
How to configure a Hikvision Villa Intercom System
HIK CONNECT Only Master room stations should be added to Hik-Connect. Issues may occur if a Sub station is added. The app can be found on the iOS and Android app stores.
2. Download Hikvision IVMS4200 – https://www.hikvision.com/en/support/download/software/ivms4200-series/ (just download the first / basic one)
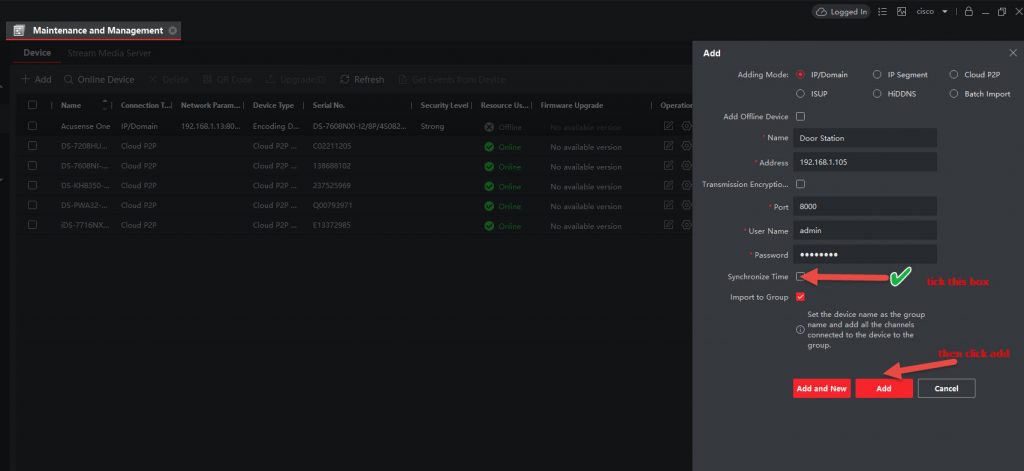
3. Add the device to IVMS4200 using the IP address – ensure you choose Synchronise time. Click Add
Thats it!
This tech guide from Hikvision helps you configure a Hikvision apartment intercom system.
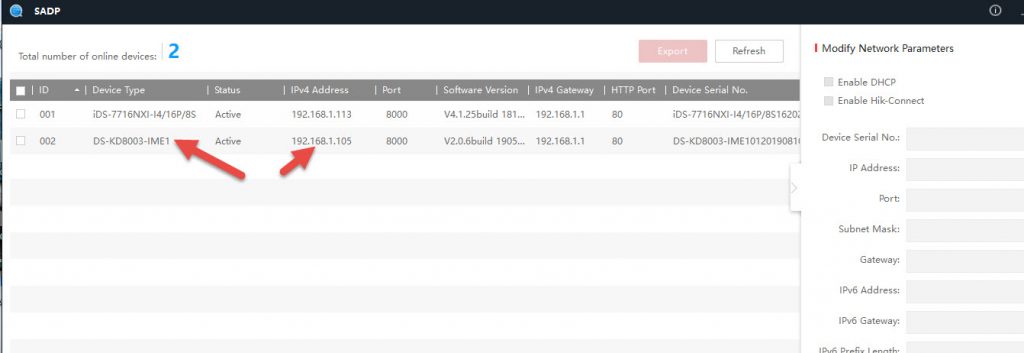
SADP stands for search active device protocol, it’s Hikvision’s free and simple utility for searching Hikvision products (including IP cameras and DVRs/NVRs) in the local network.
Its commonly used for:
SADP TOOL FOR WINDOWS – https://www.hikvision.com/au-en/support/tools/hitools/ –
Yes.
Hikvision CCTV cameras can be added to an indoor station thus allowing remote viewing directly from the indoor station for added security.
A typical Hikvision room station can have up to 16 cameras viewable – one at a time.
For a guide as to how to set this up, please see attached:
Gen1 Intercom – Tech_Note_Adding_IP_Cameras_to_To_Room_Station
Gen2 Intercom instructions below:
Step 1- Get SADP tool to get the IP address of the NVR.
Step 2 – use IVMS4200, add the room station to IVMS. Then add as per screenshot below:
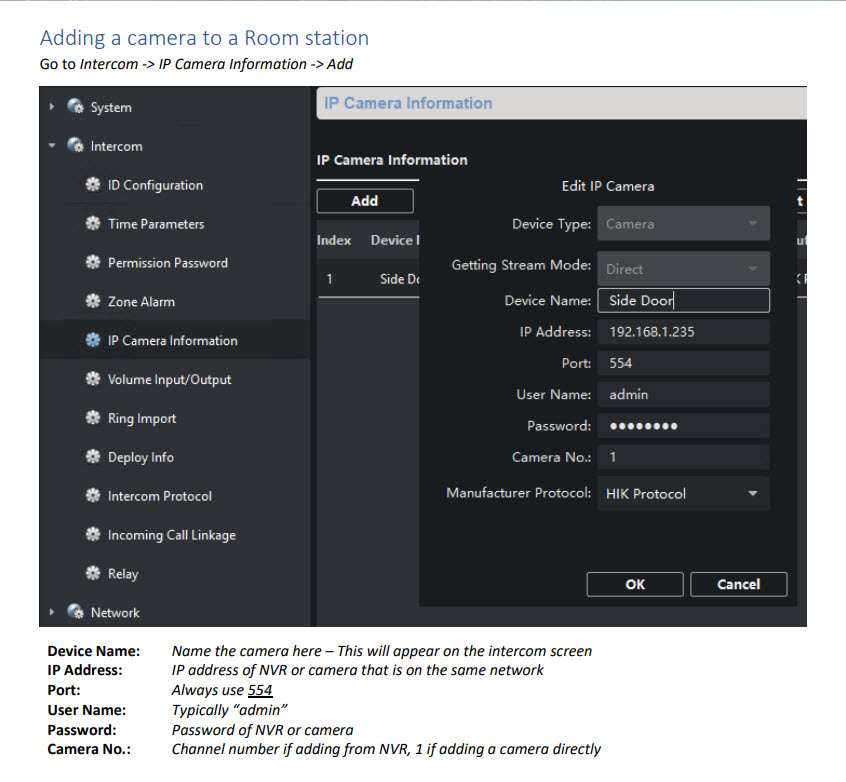
Otherwise via Intercom monitor:
Settings > 2 Icons on right (Configuration) > 3rd icon (device management) , Click on + sign and enter IP address. Port 554. username / password is the details of the camera.
These tech notes should assist you with this requirement.
Yes.
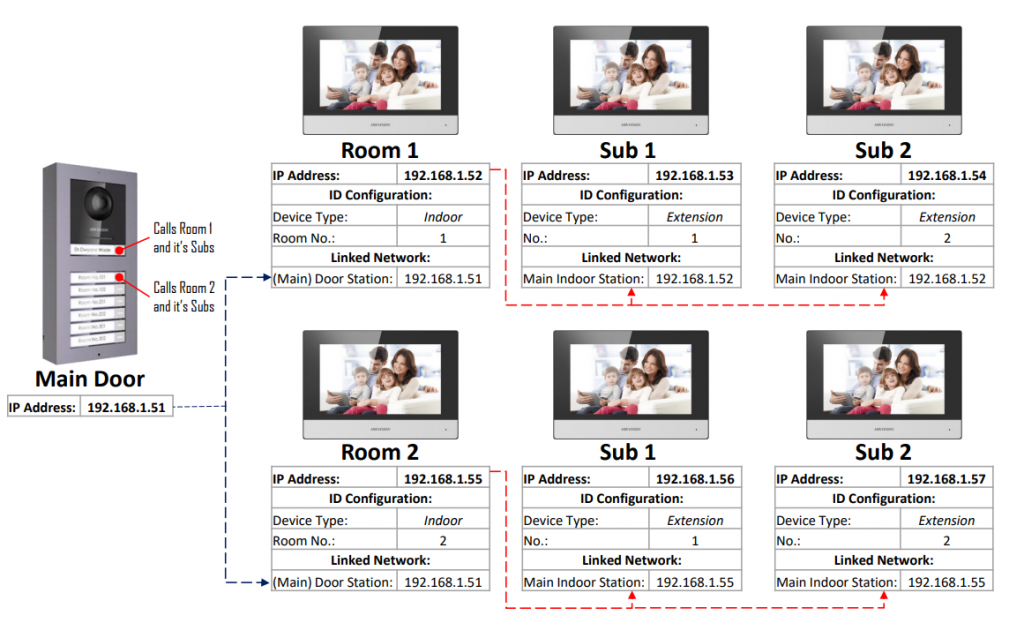
In an Intercom system with 2 or more indoor stations, each station can dial or call between each other by using the following dialing format.
0- (Main indoor unit is typically 0 and other extension units are 1 thru 5)
For Example:
To call the Main indoor station from any indoor station you would dial 0-0
To call the first indoor extension from any indoor station, included the main indoor station, you would dial 0-1
Please refer to page 5 of the user manual.
https://www.securitywholesalers.com.au/wp-content/uploads/2020/07/DS-KD8003-IME2-Installation-Guide.pdf
Page 8 onwards may also help https://www.hikvision.com/content/dam/hikvision/products/S000000001/S000000083/S000000129/S000000131/OFR002104/M000001550/User_Manual/UD20209B_Baseline_Video-Intercom-Module-Door-Station_User-Manual_V2.2.3.PDF
Most residential customers would use the Green and Blue cable
The Power would depend on the electric strike (to be powered separately). Further, the strike also has NO and NC setting. So, the strike has to also be on NO setting
For commerical sites, some of them may use NC, so in that case, we still use electric strike but use the pink, NC cable to connect to it
Sure, you’ll find this below:
Comment on this FAQ
Logged in as cedcommerce. Edit your profile. Log out?
/* */