


No products in the cart.
How to setup / install my new Hikvision system?
This FAQ deals with one of our most common questions.
“I’ve just bought a Hikvision IP kit from you – what do I do?”
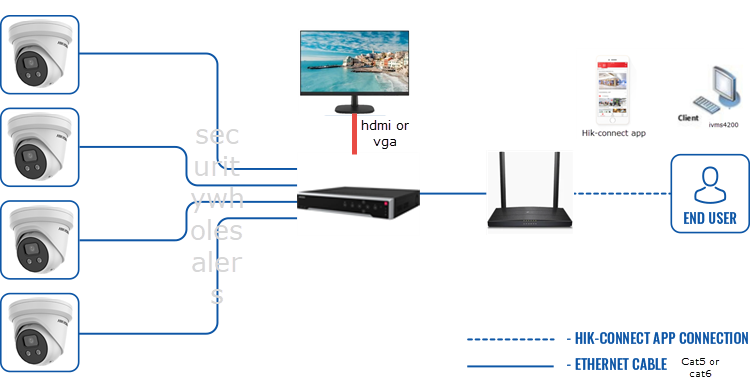
What you need:
- the Hikvision camera/s
- The Hikvision NVR
- Precrimped CAT5E / CAT6 Cables or an installer who supplies the cables (with RJ45 ends). (1 per camera and 1 from the NVR to the modem)
- A monitor or TV (with VGA or HDMI connections) (you can buy a 22′ 1080p monitor from Officeworks for around 110.)
- Screw driver
- Ladder
Steps:
- Mark the Locations: Based on your layout plan, mark the spots where you will install the cameras.
- Run the CAT6 cables to the locations you require (1 per camera). The cables should come back to the location where your NVR is located. Note the NVR makes a running fan noise so a cupboard / walk-in is ideal.
- Connect & install the cameras to one end of the CATcable and connect the other end to the NVR. Please seal connections with electrical tape to protect against water ingress.
- Plug in the monitor via a VGA or HDMI cable to the NVR
- Connect an ethernet cable from the NVR to the modem (if you wish to do remote viewing).
- Turn on the NVR & Monitor – you should see a setup screen.
- Ensure you write down the username / password you choose. Its a pain in the bum to reset.
- After setup, you should see your cameras on the screen!
- To set up remote viewing, https://www.securitywholesalers.com.au/faq-items/can-use-hik-connect-set-remote-viewing/ (this is a useful video https://www.youtube.com/watch?v=sNtB7Cjm7HY) If you get stuck at this step, please consult an IT professional as it could be your modem or other issue.
- If you’ve bought an Acusense system – how to configure acusense here
Our other FAQ articles are good for troubleshooting https://www.securitywholesalers.com.au/faq-items/ or you can try Googling / Youtubing the problem.
If you still can’t resolve your issue, please email us – support@securitywholesalers.com.au. Please be as detailed as possible regarding the issue.
USEFUL VIDEO FOR SETUP MORE DETAILED VIDEO FOR SETUP (for more complex arrangements)
A MORE DETAILED GUIDE – if the above didn’t give you enough info
️ What You’ll Need Before You Start
-
Hikvision IP cameras (one or more, depending on your system)
-
A Hikvision NVR (Network Video Recorder) with built-in PoE ports
-
Pre-crimped CAT5e or CAT6 cables (one per camera + one for internet connection)
-
A monitor or TV with HDMI or VGA input
-
Basic tools: screwdrivers, ladder, cable clips or ties, and waterproofing materials (e.g., tape, weather boots)
-
Optional: HDD pre-installed in the NVR, or a compatible hard drive to install yourself
Step 1: Plan and Run Cables
-
Plan camera placement: Identify key areas (entrances, driveways, perimeter) that require coverage.
-
Mark mounting positions on walls, eaves, or poles ensuring clear fields of view and minimal obstruction.
-
Run cables from each camera location back to where the NVR will be housed.
-
Use CAT5e or CAT6 cabling.
-
Secure the cables using clips or conduit.
-
-
Also run a network cable from your NVR to your internet modem/router if remote access is needed.
Step 2: Mount Cameras and Connect Cables
-
Mount cameras securely at the planned locations.
-
Connect one end of each network cable to the PoE port on the camera.
-
Connect the other end to a PoE port on the back of the NVR.
-
Waterproof all external RJ45 connections using tape, boots, or junction boxes to prevent corrosion or failure.
Step 3: Connect Monitor and Power Up
-
Connect a monitor or TV to the NVR using HDMI (preferred) or VGA.
-
Plug in the NVR power adapter and switch it on.
-
Power on the monitor/TV and select the correct input.
-
Wait for the NVR to boot into its initial setup wizard.
Step 4: NVR Setup Wizard
-
Choose language and time zone.
-
Create a strong admin password and write it down somewhere safe.
-
The NVR should auto-detect any connected cameras. Follow the on-screen instructions to assign channels.
-
Configure basic settings such as:
-
Date/time format
-
Display resolution
-
Recording schedule (optional at this stage)
-
Step 5: Confirm Live Camera View
Once setup is complete:
-
You should see all connected camera feeds on the monitor.
-
Check each feed for focus, angle, and clarity.
-
Adjust camera direction or zoom if needed.
Step 6 (Optional): Enable Remote Viewing via Hik-Connect
On the NVR:
-
Go to Configuration → Network → Advanced Settings → Platform Access.
-
Enable “P2P”.
-
Confirm that the status shows “Online”.
On your smartphone:
-
Download the Hik-Connect app from the app store.
-
Register or sign in to your Hik-Connect account.
-
Tap the “+” icon, then scan the QR code shown on your NVR screen.
-
Confirm the verification code when prompted.
-
Once added, tap Live View to see camera feeds remotely.
Step 7 (For AcuSense Camera Users)
If you have AcuSense cameras, follow these extra steps for intelligent detection:
-
On the camera:
-
Disable Basic Motion Detection
-
Enable Smart Events (e.g., line-crossing or intrusion detection)
-
Set detection type to Human/Vehicle
-
-
Under Linkage Method, configure alerts such as flashing light, siren, push notifications, or email alerts.
Step 8: Testing and Final Checks
-
Power cycle the system to ensure it starts up properly.
-
Test each camera feed again.
-
Test remote viewing by turning off Wi-Fi and checking the Hik-Connect app over mobile data.
-
Confirm the NVR date and time are correct.
-
Update firmware if needed using files from the official Hikvision site.
Troubleshooting Tips
-
No image? Check cable termination and try a different PoE port.
-
Remote access not working? Make sure P2P is online and your modem isn’t blocking traffic.
-
Camera not showing? Check if the NVR is set to DHCP and that cameras are on the same subnet.
-
Playback issues? Make sure the hard drive is correctly installed and formatted.
Quick Reference Table
| Step | Task |
|---|---|
| 1 | Plan layout and run cables |
| 2 | Mount cameras and connect to PoE ports |
| 3 | Connect monitor and power on NVR |
| 4 | Run through setup wizard |
| 5 | Confirm live camera view |
| 6 | Enable Hik-Connect for remote viewing |
| 7 | Configure AcuSense smart events (if applicable) |
| 8 | Test system thoroughly |