Product SKU: DS-KIS603-P
Product Overview
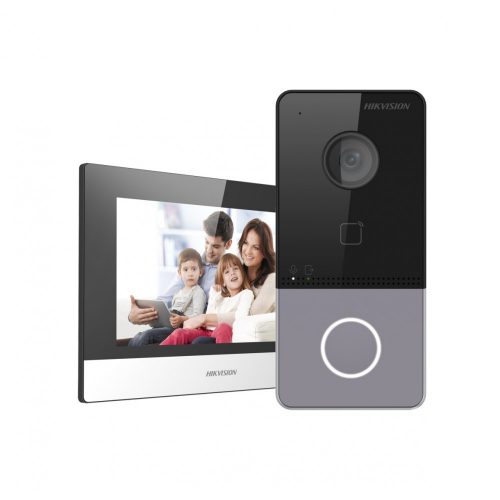
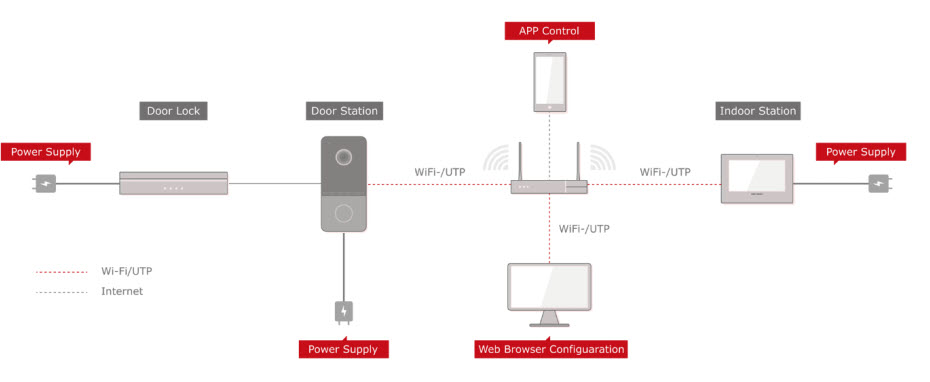
The Hikvision DS-KIS603-P is a second-generation IP video intercom kit designed for villas, townhouses, and standalone properties. Featuring a single-button door station (DS-KV6113-WPE1) and a 7-inch touch screen indoor monitor (DS-KH6320-WTE1), this kit offers high-definition video, remote unlocking, and built-in Wi-Fi for seamless connectivity. The system supports standard PoE, making installation simple with minimal cabling. With remote configuration via the Hik-Connect app or client software, this intercom system is perfect for modern homes seeking secure and smart entry management.
Package Inclusions
Cabling Requirements:
Key Capabilities
High-Quality Video Monitoring
Equipped with a 2MP HD camera, the door station provides clear visuals even in low light. View live footage or playback events from the indoor station or mobile app.
Wi-Fi and PoE Connectivity
Both units support Wi-Fi and standard PoE, making installation flexible and reducing the need for complex cabling in modern homes.
Remote Unlocking
Unlock doors remotely via the mobile app or client software. Ideal for secure delivery access or managing visitors when you’re away.
Message and Picture Storage
The indoor monitor can store messages and snapshots on a TF card, allowing for offline access to missed calls and door activity.
Smart Configuration and Access Control
Easily configure devices via web interface. The door station includes tamper protection and supports Mifare card access, enhancing property security.
Key Features
- 2MP HD camera with low illumination performance
- 7″ touch screen indoor station with 1024 × 600 resolution
- Standard PoE and Wi-Fi supported for both units
- Noise suppression and echo cancellation for clear audio
- Remote unlocking via app or client software
- Live view of door stations and linked cameras
- Built-in TF card slot for local storage of messages and images
Specifications Summary
- Camera Resolution: 2MP (Villa Door Station)
- Indoor Monitor Display: 7″ Touchscreen (1024 × 600)
- Network: Wi-Fi + PoE Support
- Storage: TF Card Slot (Indoor Station)
- Access Control: Mifare Card Support, Remote Unlock
Technical Specifications
- Door Station Model: DS-KV6113-WPE1
- Indoor Station Model: DS-KH6320-WTE1
- Camera: 2MP CMOS
- Display: 7” capacitive touchscreen
- Audio: Two-way audio with noise suppression
- Connectivity: 10/100 Mbps Ethernet, IEEE802.3af PoE, 2.4GHz Wi-Fi
- Power Supply: 12V DC or PoE
- Tamper Protection: Supported (Door Station)
Additional Information
Product Video Samples
NOTE: For best quality viewing, change YouTube settings to 2160p resolution using the gear icon.
-
On a Windows PC connected to the same LAN, download SADP Tool from the official Hikvision support site.
-
Install and run the program. It automatically scans and lists all Hikvision devices on your local network.
2. Activate Devices
-
In SADP, select each device (door station and indoor monitor).
-
If status shows “Inactive,” create a strong admin password to activate it.
-
Record both IP addresses and MAC addresses for later use.
3. Set IP Addresses
-
In SADP, assign static IPs within your LAN range (e.g., 192.168.1.100 for the door, 192.168.1.101 for the indoor).
-
Set subnet mask, gateway, and DNS to match your router’s network.
-
Alternatively, leave DHCP on and later reserve IPs in your router (see below).
4. Configure the Door Station
-
Open a web browser and enter the door station’s IP address.
-
Log in with the admin credentials.
-
Go to Network Settings → configure Wi-Fi or wired mode.
-
Set correct time, timezone, and NTP server.
-
Under Intercom → add or link the indoor station by IP address or device number.
-
Adjust door-unlock parameters: relay mode, duration, and NO/NC type.
-
Test by pressing the call button; you should hear a ring at the indoor station.
5. Configure the Indoor Station
-
From the touchscreen, enter Settings → Network and confirm connection (LAN or Wi-Fi).
-
Under Intercom Settings, link the door station using its IP or serial number.
-
Enable Hik-Connect Service: go to Settings → Platform Access, toggle ON, and note the QR code for app binding.
-
Optional: set language, ringtone, volume, date/time, and display preferences.
6. Test Operation
-
Press the doorbell button → indoor monitor should ring and show video.
-
Speak to test two-way audio.
-
Press the unlock icon → electric strike should activate.
-
On mobile, open the Hik-Connect app → scan the indoor station QR code → test live view and unlock.
Bind MAC Addresses (Prevent Drop-Offs)
1. Find MAC Addresses
2. Log in to Your Modem/Router
3. Reserve Static IPs
4. Reboot Test
-
Reboot router and both intercom units.
-
Confirm that both reconnect automatically and retain the same IP addresses.
-
Power cycle again to confirm stability.
Phase 4 – Final Checks
-
Update firmware to the latest versions.
-
Set both devices to sync with NTP for accurate logs.
-
Configure user cards if using MIFARE reader.
-
Enable event logs and tamper alarms.
-
Back up configuration using the web interface.
Hikvision Warranty
3-Year Manufacturer Warranty
All Hikvision IP cameras and recording devices (NVRs/DVRs) are covered by a
3-year back-to-base manufacturer warranty and authorised dealer partner support.

Note: Disk drives are limited to a 3-year warranty.
Our warranty is limited to the replacement of faulty items or parts
and does not include damage caused by incorrect fitting of parts or accessories.
(a) Australian Consumer Law (ACL)
Certain legislation, including the Australian Consumer Law (ACL) in the
Competition and Consumer Act 2010 (Cth), and similar consumer protection
laws and regulations may confer you with rights, warranties, guarantees, and remedies
relating to the provision of goods or services to you by us via the Site which cannot
be excluded, restricted, or modified. Our liability is governed solely by the ACL and
these Terms.
(b) Goods
If you are a consumer as defined in the ACL, the following notice applies to you:
“Our goods come with warranties and guarantees that cannot be excluded under the
Australian Consumer Law (Consumer Guarantees). You are entitled to a replacement or
a refund for a major failure and for compensation for any other reasonably foreseeable
loss or damage. You are also entitled to have the goods repaired or replaced if the
goods fail to be of acceptable quality and the failure does not amount to a major
failure.”
(c) Our Warranties
To the extent permitted by law, we exclude all express and implied warranties,
and all material and work is provided to you without warranties of any kind,
either express or implied. We expressly disclaim all warranties including but
not limited to implied warranties of merchantability and fitness for a particular
purpose.
(d) Manufacturer Warranties
Certain products, including particular models of IP security cameras and DVR/NVR
equipment, may come with a manufacturer’s warranty. The manufacturer’s warranty is
in addition to but may overlap with any rights and remedies you may have under
applicable law, including any Consumer Guarantees. If you are not considered a
“consumer” within the meaning of the ACL, the manufacturer’s warranty may be your
sole remedy. Many manufacturers’ warranties do not apply in a business or commercial
setting. Please contact the manufacturer if you would like to make a claim under
the manufacturer’s warranty.
(e) Repair, Replacement, or a Refund
If you wish to seek repair, replacement, or a refund for a product, please
contact us and we will explain the requirements to you. This may include you
providing evidence of the faulty product to us.
(f) Refund
You are not entitled to a refund for change of mind. If you are entitled to a
refund, we will only provide it once evidence of the faulty product is received
by us, or once we have received the product at our warehouse and inspected it
to assess whether it is eligible for a refund under these Terms. Any refund we
make will be by the same payment method used to purchase the product.
(g) Installed Products
Subject to this clause, we will not accept for return any product that has been
used, connected, installed, attempted to be connected or installed, or if your
product is custom-made or is a special buy product.
(h) Packaging
You must adequately package any product you are returning for our collection
to ensure that it is not damaged during return delivery to our warehouse. You
are also responsible for arranging the return delivery and the costs involved.
(i) Duty of Care
You have a duty of care for the product while it is in your possession. If
you damage products and then subsequently return them, you may be liable to pay
to repair the product to its original condition. In these circumstances, where
a repair is not economically viable, no refund will be made.
For more terms & conditions, please visit www.securitywholesalers.com.au/terms-and-conditions